If you’re familiar with the world of do-it-yourself (DIY) personal computer building, you know that mastering the art of cable management is no simple task. Fighting with tangled wires is like trying to tame a spirited foal.
Cable management isn’t just a cosmetic choice; it has many practical advantages as well. Gone are the days of haphazardly stuffing everything in and crossing your fingers. It requires careful attention to detail, but the results are well worth the effort.
Bạn đang xem: How To Cable Manage A Pc Update 07/2026
Here’s a quick and easy way to transform your PC from a tangled mess of wires and plugs into something you’ll be proud to show off.
What is Cable Management?
Managing your cables so that your PC doesn’t look like it was put together by a child is called cable management. You need to find a method of organizing them that doesn’t look like a complete failure.
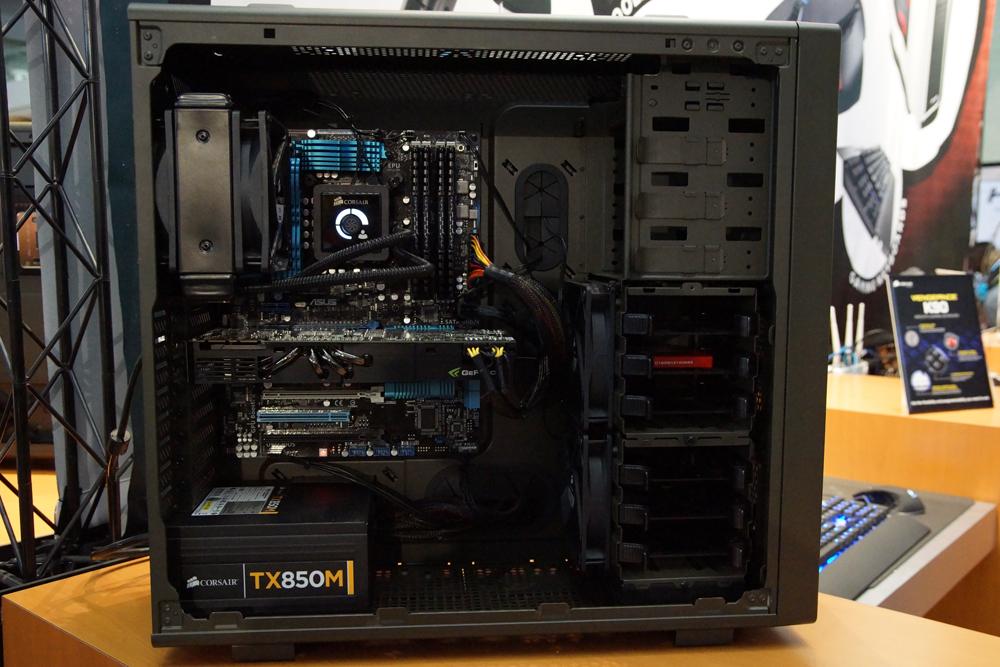
A computer with neatly organized wires is possible.
You could also have a computer where the wires are strung out in every direction, preventing proper ventilation and making you look like a complete n00b.
You can better organize your cables by using a modular power supply (for more information, see our page on modular power supplies) or by simply zip-tying them together and stowing them away in your case.
However, a great PC case with excellent cable management features is one of the best tools at your disposal.
Why is Cable Management Important?
Cable management is essential for a polished PC appearance, but it has little to no bearing on performance or cooling.
You can find more information, as well as visual examples of good and bad cable management, on our page dedicated to the subject of cable management and airflow.
But here’s what you should know right now:
You have some issues on your hands if your cables are jumbled inside your case. For starters, all those cables will get in the way of the ventilation. Second, God help anyone who peeks inside your gaming rig! Keep your cords organized and neat if you want to show off your PC.
Benefits
Airflow
Having your cables neatly organized does more than just make your PC look like something out of the most annoying 1980s science fiction movies; it also improves the computer’s cooling system.
Because of the obstruction caused by the cables’ scurrying from one end of the case to the other, the temperature inside the case rises. We are all aware that excess heat can cause a computer to malfunction.
You can help the fans cool the PC and maintain a steady temperature in the hardware by organizing the cables and keeping them out of the way.
Easy Upgrading and Maintenance
If there isn’t a mess of wires in the way of getting to a PCI-E slot or installing a shiny new SSD, upgrading is much easier. Attempting to install new parts in a computer with poor cable management is like trying to hack your way through a dense jungle with a dull machete.
Intentional cable management creates a logical flow to the machine’s ports and bays, which speeds up the process of upgrades and repairs.
Pre-Planning
Case
As a general rule, not all situations are the same. Manufacturers who are aware of the difficulties in doing proper cable management often include cutouts and mounts for cables all over the case, often behind the motherboard tray, so that the cables can be hidden out of sight.
If you’re starting from scratch, it will save you time and effort to invest in a suitable case from the start. If you have a lot of components, you should make sure there is plenty of room between the back panel and motherboard tray.
To a similar extent, the overall dimensions of the case affect how well cables can be routed and organized. More space in the case means fewer cords to manage, but the case will be heavier. Make the most efficient plans you can.
Modular PSU
The power supply unit (PSU) is a key component in cable management because it is the starting point for the vast majority of cables and connectors. Because of this, despite the slight increase in cost, we strongly advise going with a modular PSU.
As opposed to the tangle of wires inherent in non-modular alternatives, modular power supplies allow users to pick and choose which cables connect to and from the PSU. Going modular eliminates the issue of managing unnecessary, unused cables.
Component Placement
A component’s position within a case can’t be changed after it has been inserted, no matter what the manufacturer has done. Still others, like SSDs, HDDs, and GPUs, can be installed in a variety of slots and orientations that facilitate cleaner cable management.
A shorter length of cable not hidden behind the tray can be achieved by placing components close together and paying attention to where cable holes are located on the motherboard or case. In a similar vein, avoid having multiple components’ connectors jam into the same cable hole by positioning them appropriately.
Equipment
Avoid using regular plastic zip ties because, once used, they can’t be used again, which can add up to a lot of waste and extra expense if you make a mistake or want to experiment. Instead, you should use ESD-safe elastic ties, twist ties, sleeves, combs, or velcro ties.
If you have any trouble bending stiff cables to your will, don’t be afraid to use ESD-compliant tape to tape them to the back of the motherboard tray. Select a tape color that complements your PC case and, if you’ve already decided on a color scheme, your peripherals.
Managing cables neatly helps a computer look more put together, and a roll of tape can do wonders for that.
Xem thêm : JBL 104 Bluetooth Speakers Review – Why It’s GREAT! Update 07/2026
Even though minimizing cable length is a cornerstone of good cable management, there are situations where having a little extra can actually be helpful. This is especially true when considering the location and accessibility of cable holes in the case and motherboard.
Extension cables clip onto the end of your existing cables, giving you the extra length you need to plug everything into its proper place.

Cable Management Best Practices and Strategies
Start Fresh
Like moving into a new home, cable management entails cleaning up the clutter and rearranging the furnishings of the outgoing tenants. The process of managing cables is very similar. Before starting, make sure all cables are unplugged and the components are rearranged as described above.
The Motherboard Tray
The motherboard tray, or more specifically the space behind it, is a cable manager’s best friend. Pull cables through the tray’s cable holes and direct them to their destinations, taking care to expose as little of the wires as possible to the outside world.
Although the tray works well to conceal wires, the space behind it must be kept just as neat. Don’t just shove the cables in the back of the tray and call it good; instead, give some thought to the most efficient routes for them to take.
Utilize the built-in cable cutouts and holds by passing a tie through to secure a bundle of cables. It’s recommended that you follow the shape of the case’s frame as closely as possible for a sleek finish.
Tie and comb smaller cables together to keep things organized. Use sleeves and velcro to secure the larger PSU cables.
Give Every Cable The Attention It Deserves
Finding the optimal path for all the cables will be a matter of trial and error from here on out. Spend the time necessary to determine the most efficient route for each cable. If you focus on the little things rather than trying to find a quick fix, you’ll be pleasantly surprised at how smoothly the management comes together.
Start with the front panel and case cabling that connects to the motherboard, as these are often the source of problems. After that, you can move on to the SATA cables for the hard drives, SSDs, and the CPU/motherboard. The last thing to do is attend to add-on components like the GPU.
All cables should be routed behind the tray and then back out through a nearby cable hole to the component they serve. The power supply unit (PSU) cable is a prime example of where this is important.
It is recommended to make use of all of the cable’s length to prevent bunching. Cable management pitfalls include bunching, which can make it difficult to organize and shape cables into a neat configuration.
Covering fans, heatsinks, and coolers is equally detrimental because it limits airflow.
Wait to secure the cables with tape or ties until you’ve verified the optimal placement. Securing all of the cables and then realizing a better layout is a nightmare.
Best Cases for Cable Management
NZXT H510i
BEST CASE FOR CABLE MANAGEMENT
This case is attractive, functional, and well-equipped with features like a power supply shroud and cable management channels. The H510i is our top pick for the best cable management case.
- Compact
- Gorgeous
- A number of dust filters
- Cool window in the side panel
- Astonishing cable organization
CONS
- A smudge-prone window
NZXT’s case is a staff favorite here at Easy PC. The sleek exterior belies the case’s ample interior space, which is ATX standard despite the case’s diminutive dimensions.
Two front panel case fans and a rear case fan are installed in the H510i before shipping.
To reduce internal temperatures and keep your case neat and tidy, you can tuck your power supply and any extra cables away in the shroud located at the case’s base.
To keep cables out of sight, the motherboard tray has a lot of space between it and the right side panel of the case.
The abundance of grommets and holes allows you to neatly organize your wires and avoid a tangled mess. However, you don’t have to take my word for it because this case has received nothing but praise on Amazon.
Corsair Crystal 280X
BEST MICRO ATX CASE FOR CABLE MANAGEMENT
If this weren’t a piece about organizing cables, I’d go on and on about how great the 280X is. Not only is it a top-notch micro ATX case, but its cable management is second to none.
- Compact
- Fantastic RGB illumination
- As for the cables, they’re tucked away in the second compartment.
- What a great side window
CONS
- It seems like windows are more prone to breakage than other parts of a building.
- Poor cooling for the hard drive
Now, here’s the deal:
The cable management features aren’t the only reason the Corsair Crystal 280X is one of my favorite cases right now.
This is a great case if you like RGB lighting and transparent side panels. Additionally, it has excellent methods of cable organization.
My favorite feature of this case is the covert compartment where I can stow my power supply, hard drives, and cables.
Although the stock cooling is subpar, this case has space for front and top water cooling radiators. More fans can be installed on the available brackets if desired.
Cooler Master MasterBox Pro 5 RGB
BEST ATX CASE FOR CABLE MANAGEMENT
Xem thêm : Geforce Experience Not Opening Update 07/2026
If this weren’t a cable management article, I’d go on and on about how great the 280X is. It’s not just a great micro ATX case overall; it’s also one of the best in terms of cable management.
- Sexy layout
- Fantastic RGB fans are included.
- Fantastic organization of wires and plugs
- Side panel window made of toughened glass
CONS
- There is nowhere for a fan to be mounted on the top of the case.
- Very little airflow compared to other cases
We highly recommend the Cooler Master MasterBox Pro 5 RGB. It has three RGB fans, tempered glass panels, and excellent cable management for under a hundred dollars.
It does, however, have some drawbacks. Before anything else, a 240mm or 360mm radiator can’t be used because there are no places to mount it on top of the case. However, a single 1 mm radiator can be installed on the case’s exhaust at the back.
Also, make sure your power supply has at least one four-pin molex connector so you can run the included fans.
There are only three front intake fans (hidden behind a panel) and one exhaust fan in the back of this case. This case is perfect if you’re planning on building a $600 or $700 gaming PC.
The most “computer” parts I’d put in here are an i5 9400f processor and maybe a Ryzen 5 3600. Similarly, a GTX 1060 or 1070 is the highest-end graphics card I would consider.
You should upgrade to a higher-end case with better airflow if you intend to use premium high-end components such as a 1080 Ti or RTX 2080 Ti in this enclosure.
Cooler Master’s MasterCase series is their top-tier product, made specifically for powerful PC setups. Although still fantastic, the MasterBox is priced for those on tighter budgets.
However, the MasterBox Pro 5 RGB is completely cable-management-friendly. Multiple cable grommets and a wide gap between the right panel and the motherboard tray make this case ideal.
Cable Management Tools
You’ll need more than just a nice cable management case. Competent PC builders always carry around a selection of tools designed to keep cables organized.
Please consider some of the following suggestions:
- Side-Cutting Shears
- Small
- Scissors
- Sticky tape with two faces
- Optional, but highly practical, cable mesh
Cable Management Tips
You have the necessary tools and a sturdy carrying case; now follow our advice on how to best organize your cables:
Map it out
We note in our cable management guide that doing so does not significantly affect performance or ventilation. Almost all of the time, the purpose of cable management is purely aesthetic.
That being said, you should have a strategy in mind if you want your build to look awesome.
No matter how securely you bundle them, a tangle of diagonally running wires is a safety hazard. The most aesthetically pleasing appearance is achieved when cables only appear to be running in the vertical and horizontal planes.
Get a better sense of what you’ll be doing by first sketching out your cable management plan on paper or in Paint.
Start with the small cables
Assuming you’ve already put together your PC, you can begin working on the finer details of the build by first clearing the way with the larger cables (likely the motherboard and CPU power).
Some examples of these cables include the audio cables and fan wires that come with your case.
Use the empty slots for the DVD drives as well as the existing case openings to hide the small zip ties. You can use those crannies to stow away the wires and adapters that connect your front-facing IO devices.
Save your SATA cables for last
When connecting components, you should wait to use the SATA data and power cables due to their fragility.
Trust me, they are much more likely to break than the other cables in your system.
Cable management was a nightmare for me when I built my first cheap gaming PC in a poorly designed case. My SATA cables were the first ones I wired up and stored away. When the connector got caught on another cable, I unfortunately snapped it and broke it.
What’s the takeaway here?
Cable management for your SATA drives should not be left until the last minute.
Cable Management Is An Art
Those who have trouble keeping their cables organized will be disappointed to learn that there is no special knowledge that can be obtained through secret rituals known only to the initiated.
In order to achieve the best results, cable management is an art that requires experimentation and patience. In cable management, as in painting, the more time and effort you put in, the better the results will be.
A level of patience and creativity is required. Inevitably, you’ll have to take apart and reassemble some pieces of equipment before you find the optimal path for a set of cables. You might use some ESD tape to bundle some connectors, only to find out later that a cable tie would have been a better choice.
Sometimes it seems like you have to take three steps back to make one forward. Know that this is normal and that the benefits will outweigh the time spent on it.
Nguồn: https://gemaga.com
Danh mục: Blog