If you’re one of the lucky few to have a 5.1 surround sound system, Windows 10 is ready to take advantage of all the sonic and acoustic possibilities it offers. So, the question is: how does one go about setting up OS 5.1 surround sound?
Microsoft’s flagship product has a process that is somewhat hidden away safely but relatively straightforward, and this is probably the most criticized part of the product. Detailed instructions for installation, verification, and troubleshooting are included in our manual as usual.
Bạn đang xem: How To Configure And Test 5 1 Surround Sound On Windows 10 Update 07/2026
It’s important to remember that in order to experience true 5.1 surround sound, your computer’s sound card or onboard motherboard audio outputs must support this format.
From this point on, it is assumed that you have a 5.1 output sound card cable, as you have obviously invested in a 5.1 surround sound system.
Update Sound Card Drivers
Before setting up 5.1 surround sound in Windows 10, it is always a good idea to update the computer’s sound drivers.
- To open Device Manager, right-click the Windows Start button (found in the lower left corner of the screen) and select it from the context menu that appears.
- To view all of your game controllers, expand the “Sound, video, and game controllers” section in Device Manager.
- Find the sound card that’s linked to the 5.1 surround speakers, right-click it, and select “Properties” from the menu that appears.
- To access the Driver section, click the corresponding button.
- To find the most recent drivers, choose to automatically search for updates by clicking the “Update Driver” button.
- If the driver hasn’t been removed, Windows will look for an updated version and install it.
- Alternatively, you can find the most up-to-date drivers for your sound card by visiting the site of the company that made it and going to its support page.
- To begin the installation process, open the executable file you downloaded.
- It’s not uncommon to need to restart.
Configuring 5.1 Surround Sound In Windows 10
Windows can now play back 5.1 surround sound thanks to the updated driver for the sound card.
- To begin, open the Sounds menu by right-clicking the speaker icon in the Windows taskbar.
- Click the “Playback” button in the Sounds window.
- After locating a sound card that supports 5.1 surround sound, select it from the list and then click the “Set Default” button.
- To the left of the Set Default button, select “Configure.”
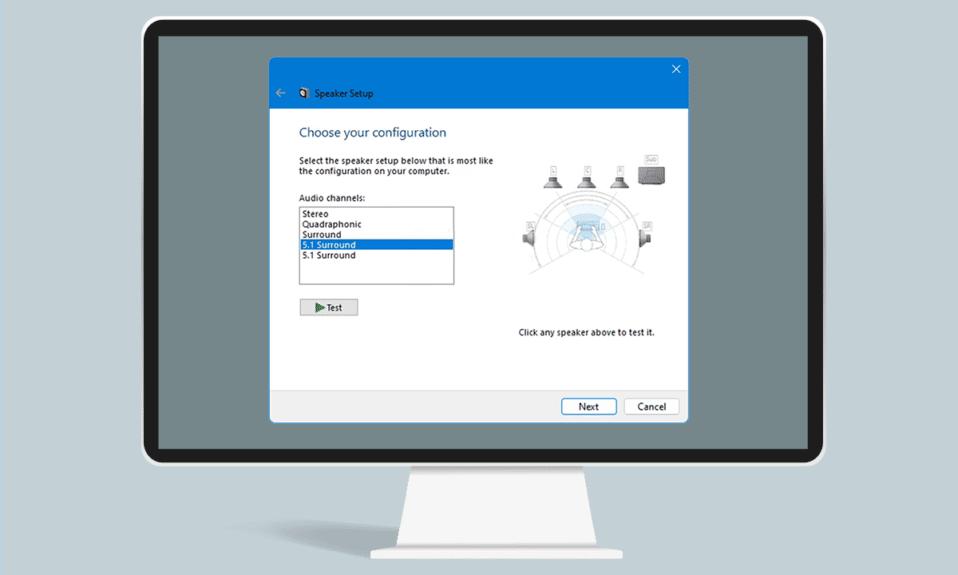
- Choose 5.1 Surround from the “Audio Channels” list on the left side of the Speaker Setup window.
- To proceed, select “Next.”
- If you have a complete set of speakers (subwoofer, center, side pair, and rear pair), you can select them all on the “Optional speakers” tab of the following “Customize your configuration” window.
- To proceed, tap the “Next” button.
- Check the boxes next to your speakers that can reproduce the full dynamic range by going to the ”Select full-range speakers” section.
- When you reach the “Configuration complete” screen, click “Next.”
- To save your changes, select “Finish.”
Testing 5.1 Surround Sound In Windows 10
Now that we’ve configured Windows 10 for 5.1 surround sound, we should test it to make sure everything is working properly. The good news is that Windows 10 comes with its own testing protocol, drastically reducing the complexity. Learn to utilize the built-in Windows 10 configuration testing tool by reading this article.
- The ”Sound” properties window’s Playback tab must be opened once more. For clarification, read the first two paragraphs of this section again.
- Click the “Configure” button after you have chosen the 5.1-capable sound card.
- Take a look at the ”Test” button that sits beneath the ”Audio Channels” drop-down menu.
- Turn on the speakers and crank up the volume, then press the “Test” button.
- In Windows 10, each individual sound will play through the system’s speakers. To identify which speaker is being evaluated, consult the visual diagram located on the right side of the Speaker Setup window.
- Make sure all of the speakers are receiving sound by listening carefully.
- If you’re satisfied with the sound, you can close the Speaker setup window by selecting “Cancel.”
- Put an end to any audible distractions by closing the “Sound” window.
- Kick back with some tunes by firing up your preferred media player (iTunes, Spotify, Winamp, etc.) or a streaming service like YouTube.
- Test each speaker to make sure it is receiving sound.
We’ll wrap up by putting the system through its paces with a sample of real 5.1-channel audio.
- Just play this video I found on YouTube.
- Play the entire thing through, paying close attention as the audio moves from one speaker to the next, to make sure everything is in fine working order.
Xem thêm : Fortnite Vs Realm Royale Update 07/2026
Testing and configuring 5.1 surround sound in Windows 10 is as simple as that. From this vantage point, you can immerse yourself in 5.1 surround sound while watching movies or playing the latest AAA games.
7 Best Free Surround Sound Software For Windows
Equalizer APO
Windows users can download Equalizer APO, an open-source equalizer, for free. As it operates at the system level, it will convert any music played on your computer to 5.1 surround automatically. Both speakers and headphones can benefit from its surround-sound generation abilities. In addition to a wide variety of other useful audio editing and processing tools, this program also includes a sophisticated 31-band equalizer. Whenever you make a modification to the audio settings, it will immediately take effect in the background. With its specialized Analysis Panel, you can do more than just modify audio settings: you can also analyze your audio.
How to get surround sound using Equalizer APO:
- Invoke the program’s main window, then navigate to the Channel Configuration submenu.
- Select the appropriate surround sound mode from the Channel Configuration menu: surround, 5.1 surround, or 7.1 surround.
- Preamplification, audio frequency, audio filters, and delay are just some of the audio parameters that can be modified by hand using the available tools.
- After finalizing the settings, play a video or song using your preferred media player to experience the full effect of the surround sound. Your custom settings can also be saved in text format.
Additional Features:
- You can modulate frequencies in a specific frequency range using the parametric filters included in this software (low pass, high pass, band pass, etc.).
- Graphic equalizers: The software comes with two equalizers, one with 15 frequency bands and the other with 31 frequency bands, so you can manually adjust the audio by adjusting the frequencies individually.
- There are three primary filters available within this program: preamp, delay, and copy, each of which can be used to amplify, delay, or copy audio.
Final Thoughts:
Since it allows you to tailor the surround experience to your specific speaker setup, it ranks among the top free surround sound programs.
![Tutorial] How to Set up 5.1 Surround Sound on PC Windows 10](https://gemaga.com/wp-content/uploads/2023/03/how-to-configure-and-test-5-1-surround-sound-on-windows-10-2.jpg)
ViPER4Windows
Another free option for Windows users interested in surround sound is ViPER4Windows. With this program installed, your computer can produce 5.1 or 7.1 surround sound. This software’s system-wide effect ensures that all audio played by any program on your computer will have a realistic surround sound experience. This software lets you get the best sound for your speaker setup by tailoring its output to the dimensions of the listening area (small, medium, large, etc.). Audio properties such as surround sound, reverberation, bass, clarity, and convolution can all be modified.
How to get surround sound using ViPER4Windows:
- To get the best possible surround sound, launch the program, navigate to the Surround section, and pick a room size.
- Next, you should activate the surround sound by toggling the Surround switch.
- You can now modify audio effects such as reverb, pre-volume, clarity, bass, etc.
- Lastly, select “Power” to activate the system and start listening to surround sound.
The Save preset option allows you to save your current settings in a.VPF file format for later use.
Additional Features:
- This program includes an equalizer with 18 separate bands, allowing for fine-tuned control over the audio’s frequency response.
- Make-Up Gain, Release Time, Knee Width, Threshold, etc. are just some of the audio parameters that can be modified with a compressor.
- The software provides you with three distinct audio modes—Music, Movie, and Freestyle—to allow you to customize the audio for each of your different media types independently.
Final Thoughts:
It’s another top-notch piece of software for enabling full-blown surround sound on your PC.
Spatial Sound Card
Another free option for Windows users looking for surround sound is Spatial Sound Card. This software is excellent for surround sound as it can enhance the experience with either speakers or headphones. Even in headphones, it can make it seem like you’re surrounded by sound. Entertainment media like video games, films, and music were taken into account while developing this software. It yields excellent outcomes in all three scenarios (movies, music, and games). Its user interface displays a set of five speakers, each with a volume intensity controller that can be used to muffle individual speakers or adjust the volume of individual outputs for a more or less immersive surround sound experience.
How to get surround sound using Spatial Sound Card:
- Initiate this program and tweak the individual speaker volumes to achieve the desired surround effect.
- When you’re ready to listen to your music with a surround sound experience, simply press the Headphone Surround button.
Additional Feature:
- Volume Boost: This function allows for a significant increase in volume, far beyond what is possible with regular music players.
Final Thoughts:
With this software, you can enable full-blown surround sound on your computer’s system.
KMPlayer
If you’re looking for the next free 5.1 or 7.1 surround sound software for Windows, MacOS, and Android, look no further than KMPlayer. You can play media files in a wide variety of formats, including MP4, AVI, MOV, WMV, MP3, M4A, and more, thanks to the software’s built-in media player. It does not offer true surround sound like other software does. The software only uses the surround sound effect when playing audio.
How to get surround sound using KMPlayer:
- Start the program and right-click anywhere on its interface to access the menu that appears.
- If you want to use surround sound in this program, you can do so by selecting Audio > Rare Filters from the right-click menu.
- After that, just load up some media and hit play to hear the audio with the augmented surround sound quality.
Additional Features:
- Equalizer: It includes an equalizer that lets you manually tweak frequency ranges in order to achieve desired sound effects.
- A preamplifier is an amplifier that boosts the volume of incoming signals. If your audio file has very low volume, this is a great feature to have.
- The purpose of True Bass, as the name suggests, is to amplify the bass frequencies of an audio signal.
- Vocal Removal is an easy-to-use program that can identify and eliminate unwanted vocals on their own.
- You can modify the motion blur, add effects, rotate the screen, and other video parameters with the software’s built-in video settings.
Final Thoughts:
Xem thêm : Best Wrist Rest Update 07/2026
It’s basic media player software that lets you watch movies or listen to music with immersive surround sound.

Windows Sonic
Those using Windows 10 will immediately benefit from Windows Sonic, the system’s built-in surround sound system. The Windows 10 Creators Update of 2017 was the first to include this function. Windows 10 includes a new audio enhancement feature designed to boost the quality of audio during gaming, movie watching, and music listening. It can make it so that headphones can simulate a 7.1 surround sound experience. That option is still turned off by default. For this reason, surround sound is disabled by default and must be enabled before use.
How to get surround sound using default Windows 10 feature called Windows Sonic:
- To open the Sound window, head to Control Panel, then Hardware and Sound, and finally Sound.
- Choose an output device (headphones, speakers, etc.) from the Sound menu.
- Next, open the Speakers Properties window by clicking its Properties button, and then select the Spatial sound tab.
- Choose Windows Sonic for Headphones from the Spatial sound tab, and then activate 7.1 virtual surround sound by selecting the corresponding box.
- Finally, select OK to activate the system’s surround sound.
Final Thoughts:
Simple to activate, Windows 10’s built-in support for surround sound produces high-quality results.
SMPlayer
Another free option for Windows, Ubuntu, and Linux is SMPlayer, which supports surround sound. First and foremost, it’s a media player that supports a wide variety of audio and video file formats and includes 5.1 surround sound. Media formats such as MP3, OGG, OGA, WAV, AC3, FLAC, AVI, MPG, M2V, MPV, 3GP, etc. are all supported by this program. This program can enhance audio with surround effects for a variety of speaker setups (5.1, 6.1, 7.1, etc.). In addition to the standard surround sound, it provides a plethora of options for customizing the audio experience, such as an Equalizer, Filter, Stereo Mode, etc.
How to get surround sound using SMPlayer:
- Launch the program and click the File menu item to import a media file.
- After that, choose a surround sound setup (4.0 Surround, 5.1 Surround, 6.1 Surround, or 7.1 Surround) from the Audio > Channels menu.
- There are a variety of audio controls, such as an equalizer, filters, stereo mode, and so on, that can be adjusted right now.
- Click the Play button to hear the loaded media in 5.1 surround sound.
Additional Features:
- When you enter a video’s URL, the feature will begin playing the video.
- Radio: It enables access to radio broadcasts from all over the world via the Internet.
- This program includes a built-in equalizer with 10 separate frequency bands for fine-tuning the sound quality of the output.
Final Thoughts:
It’s a good piece of surround sound software that can be used to listen to music or watch movies with enhanced audio.
ZPlayer
You can use ZPlayer as a music player or a surround sound system without paying a dime. It’s compatible with Microsoft’s Windows operating system. The player supports a wide variety of audio file formats, including WAV, MP1, MP2, MP3, OGA, and OGG. Play, pause, next track, a playlist, volume control, and other fundamental functions are all conveniently located on the music-themed interface of this program. The software’s surround sound function is disabled by default and must be activated before use.
How to get surround sound using ZPlayer:
- Open the program, navigate to the Settings > Advanced menu, and then choose the ZBass plugin from the Description box.
- Then, select a surround sound mode (Mode 1 or Mode 2) by pressing the Config button, which will bring up the ZBass Config window.
- Sample rate, sample format, interpolation, ramping, maximum voices, and so on can all be modified from this Zbass Config.
- In the end, you can use this player to listen to music with a surround sound effect.
Final Thoughts:
It’s an easy-to-use music player that includes a built-in virtual surround sound system.
Conclusion
Now that you know the speakers are hooked up properly and the sound is coming from the right place, we can move on to more thorough testing. You can use the following collection of sample tests to determine if the lows, mids, highs, and subwoofer on your speakers are functioning correctly. To get things rolling, here is a collection of demo tracks that can be listened to right away without downloading anything.
Keep in mind that the decoder is always the limiting factor in the overall sound quality. Dolby Digital and DTS are not supported by most video-sharing sites, including YouTube. Check your speakers’ surround sound capabilities with a DVD/Blu-ray player, game console, or other source material encoded in DTS or Dolby Digital.
Nguồn: https://gemaga.com
Danh mục: Blog