If your Nintendo Switch’s joy-cons drift while you play, follow this easy tutorial to correct the issue. Return to playing your Nintendo Switch in joy after you have fixed the joy-cons.
As for what triggers Joy-Con drift, there are two widely held hypotheses. Since the Switch is portable and exposed to both outdoor and indoor contaminants, the first theory makes sense: debris buildup inside the joystick’s housing damages the contacts inside.
Bạn đang xem: How To Fix Nintendo Joy Con Drift Update 07/2026
The second theory has been put forward by people who have taken apart their own Joy-Con and use it with a Nintendo Switch. Their main complaint is that the joystick’s internal contacts degrade over time regardless of how often or where the Switch is used, because they are made of cheap plastic.
Since most Switch owners will want to address this issue at some point, we’ve compiled a list of potential causes and solutions, complete with detailed instructions.
Okay, so let’s begin!
What Is Stick Drift?
An issue known as “stick drift” occurs when an analog control stick “drifts” in response to input without actually being moved. The stick can drift in a single direction (say, to the left) or in a number of different directions at once, depending on the most recent direction pressed. Drift’s emergence can be sudden or gradual, or it can pause for a while and then reappear.
This issue, which is not necessarily caused by misuse, has a long and documented history with the Nintendo Switch. Unlike Nintendo’s removable Joy-Con, the problem doesn’t appear to have been a widespread one with the Nintendo Switch Pro controller.
Stick drift is something you might experience in-game, but you can also check for in the console’s System Settings > Controllers and Sensors > Calibrate Control Sticks. You’ll be shown a crosshair with a plus sign or a dot in it, and asked to hold a direction on the stick you want to calibrate.
Your Joy-Con is experiencing stick drift if the plus icon isn’t centered, or if the dot moves erratically or “leans” in one direction.
What Causes Stick Drift?
Stick drift in gamepads of any brand, including those made by Microsoft and Sony, is typically the result of simple use and abuse. The analog stick is a moving part and will break down over time just like any other mechanism of its kind.
A potentiometer is used in controllers to detect the current stick position. The “neutral” position that the stick is supposed to return to when it is not being tilted in a particular direction can be affected by damage to the controller. This may result in continuous or erratic readings from the potentiometer.
All controllers are susceptible to this issue after extensive use due to the gradual accumulation of dust and debris within the mechanism. This point was reached for the Nintendo Switch a lot faster than many had predicted. When opening up their Joy-Con, some users have found the contacts to be worn. To date, Nintendo has provided no explanation for the pervasive nature of this problem.
The issue may also be triggered by general damage to an analog stick. This could happen if you accidentally drop the controller or press down too hard on the analog sticks, or if you spill liquid on the controller.
How To Fix Nintendo Joy Con Drift
Solution 1: Update Your Switch’s Firmware and Recalibrate Your Joy-Con
What you’ll need:
- Ignition Switch
- The availability of an online connection
Alternatively, if you’re not experiencing Joy-Con drift, it’s possible that you either haven’t updated to the latest firmware or that your joysticks need to be adjusted. To access these features, select System Settings from the Switch’s main menu and then navigate to ‘Controllers and Sensors’ on the left side of the screen.
When you get there, look for “Update Controllers” in the list of options that appears on the right. If you click this, the newest firmware will be installed on your device.
Select the “Calibrate Control Sticks” option down below. Select the joystick you want to calibrate by clicking on it, and then following the on-screen instructions. You may use either Joy-Con for this purpose. Follow on to Solution 2 if you’re still having problems with either controller.
Solution 2: Send Your Joy-Con to Nintendo for Repair
What you’ll need:
- Which Way Do You Want to Flip
- The availability of an online connection
- An empty box and some tape
If updating the controllers doesn’t work, sending in your Joy-Con for repair is the next best option.
At first, Nintendo required Switch owners to show proof of purchase before offering a free repair; now, however, you don’t even need to prove your warranty status to get your Joy-Con fixed for free.
Repair appointments can be made at support.nintendo.com by clicking the “Joy-Con Repair Setup” link. A form will appear for you to fill out with your name, address, email address, and a brief description of the problem you’re experiencing.
As soon as you submit the form, Nintendo will get in touch via email with further instructions and a shipping label for your controller(s).
Know that if Nintendo is unable to fix your Joy-Con, they may give you a new one in a different color (gray, neon blue, or neon red).
Once your Joy-Con has been received and processed by Nintendo, you can check its repair status on store.nintendo.com. Once you’ve logged in, click your name in the upper right corner to access your profile.
Click “Repair History” after you reach the “View Details” section. You can check the current status of all scheduled repairs here.
Xem thêm : What Is The Best Monitor Response Time For Gaming? Comprehensive Guide Update 07/2026
Once Nintendo receives your Joy-Con for repair, the process can take up to two weeks (not including shipping time). This means it will take at least a month before you get your Joy-Con back.
For those who can’t wait that long and don’t mind getting their hands dirty, we’ve included some alternative solutions.
Solution 3: Clean Your Joystick with Contact Cleaner
What you’ll need:
- Ignition Switch
- Disinfectant for electrical contacts
- Some tweezers
This fix should stop your Joy-Con from drifting for the time being. Most notably, there is no need to even open the controller. To begin, go out and pick up some electrical contact cleaner from either an electronics store or a home improvement center.
It is important to note that you should not use any chemicals you find lying around.
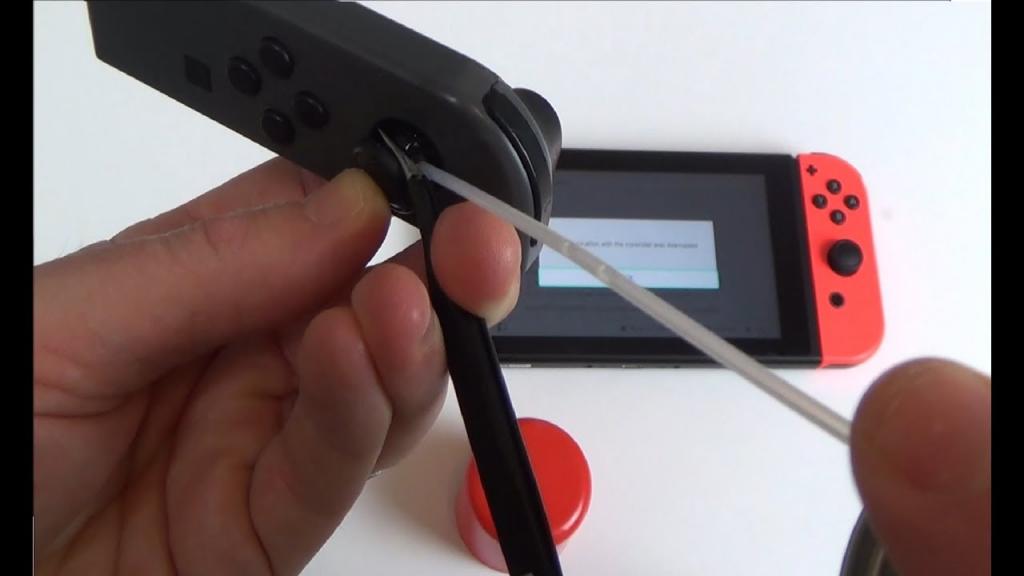
Take the Joy-Con out of the Switch tablet and tilt it so that the bottom of the joystick is visible. Take the joystick apart using tweezers and carefully remove the rubber covering. The white plastic housing the inner mechanism should now be visible.
You need only use one or two drops of electrical contact cleaner to get rid of years’ worth of gunk. After applying the cleaner, move the joystick in all directions for about a minute to ensure that it is spread out evenly. Please be patient and refrain from pressing any buttons at this time.
When you’re finished, put the controller somewhere dry and airy for a few hours to dry. Hopefully, this will put an end to the problem, at least temporarily. To continue having problems, continue on to Solution 4.
Solution 4: Replace Your Joystick
What you’ll need:
- Online shopping for a replacement analog stick
- Little Phillips screwdriver
- Tweezer with three blades
- Plastic shiv of some description
- A tweezer set
You’ve looked everywhere else for a solution, but you’re still set on finding it on your own. Our highest praise!
To implement this Fix, you should look into buying a new joystick from a website like eBay, Amazon, or somewhere else similar. We suggest getting this repair toolset, which comes with an extra joystick and everything else you’ll need if you don’t already have them, so you can implement this Solution.
You can get down to business once you’ve settled into a neat, tidy, and adequately lit workspace.
Carefully remove the four black screws from the back of your Joy-Con using the Tri-wing screwdriver. After the screws have been taken out, you can use the plastic shiv to pry open the seam between the Joy-Con’s front and back halves of the case.
Take your time and don’t use excessive force to separate the two pieces.
After the Joy-Con’s inner workings have been exposed, the battery can be removed by sliding the shiv underneath it and gently prying it out of the housing without piercing the battery or severing any wires.
There are five screws holding the battery housing in place; only three of these (shown above) need to be removed. To access the battery’s inner workings, remove the three screws with a Phillips screwdriver and carefully lift the housing upwards, taking care not to yank the connecting ribbon out of its slot.
The silver square at the back of the analog stick is now visible. If you want to remove it from the circuit board, you’ll need to use your tweezers to carefully detach the ribbon that’s attached to it.
Release the bottom black clasp. With any luck, it will pop up without much effort, allowing you to gently remove the ribbon with the tweezers.
You’ll see that the stick is only secured by two screws, one in each of the four corners. First, you’ll need to unplug the ribbon that’s covering the one on top.
It’s very similar to when you took off the ribbon before, except this time the clasp is gray and you have to open it from the top.
The two screws securing the joystick are now within reach. Take them off, and then carefully remove the controller from the joystick.
This step is complete; you can now set up the replacement. Simply unscrew the old one and screw in the new one to replace it.
The next step is to re-establish contact between the two ribbons by reconnecting the ends and gently pressing on them. When they are properly reinstalled, the clamps should be gently pressed down to hold them in place.
Carefully reinsert the battery housing, avoiding the ribbon leading to the “ZL” button.
Then, carefully replace the battery pack inside the device’s housing. You should be able to press each button on the rail and watch the corresponding light cycle (except for the stick click) to ensure proper operation.
Xem thêm : Fortnite Vs Realm Royale Update 07/2026
When you’re done, make sure the two halves of the casing are perfectly aligned before you tighten the four Tri-wing screws.
Congratulations! You’ve just swapped out the analog stick on your Joy-Con. You may now resume Switch gameplay.
Alternatively, Buy a New Set
In cases where immediate action is required, when the prospect of waiting for repairs or replacement parts to be shipped doesn’t appeal, it is possible to simply throw money at the problem. A single Joy-Con will set you back $39.99, while the pair will run you $79.99.
Finding a good deal at a popular store or waiting for a sale or discount event could help you save money. Neon Pink and Neon Green are just two of the new color schemes that have been introduced by Nintendo since the release of your console.
Nintendo Switch – Joy-Con (L/R)-Neon Green/Neon Pink Splatoon 2 (Japan Import)
Neon pink and green Joy-Con controllers from Nintendo. Play as you like with the help of the motion controls, infrared sensor, and built-in batteries.
It’s also possible to use third-party Joy-Con, which may be more reasonably priced or feature bonus additions like enlarged grips. Many of these choices, alas, skimp on construction or features, missing things like internal batteries or motion controls. If you want to get the best results, it’s best to go with a first-party vendor.
Avoiding Stick Drift in Future
The simplest way to prevent stick drift is to simply never use your Switch, which is obviously impractical. Instead, have fun with your console and keep a copy of your receipt in case you ever need to make a warranty claim.
A hard case is a sensible investment if you plan on using your Switch in portable mode. This will keep the analog sticks from getting crushed in a bag and possibly getting damaged before their time.
Nintendo Switch Pro Controller
Official Nintendo Switch Pro Controller, ideal for use with the system docked or propped up in a stationary position. The controller has a far more comfortable feel in the hand than the Joy-Con and features motion controls but no infrared sensor.
If you prefer to play in front of a TV (or on a stationary surface like a table), you can also purchase a Nintendo Switch Pro Controller for use in docked mode, which provides a more natural and ergonomic feel for extended gameplay.
What to Look for in a Joy-Con Replacement
Though inferior third-party controllers are no longer an issue, careful consideration should be given before purchasing a set of replacement Joy-Cons. A few features found on Nintendo’s Joy-Cons aren’t present on third-party alternatives, and extras like turbo mode and macro buttons can vary widely between products.
What to watch out for when purchasing a second-hand pair of Joy-Cons
- The Joy-Con controllers for Nintendo’s Switch can be used in a variety of configurations, including single-player, local multiplayer, local co-op, online co-op, and online co-op with a friend sharing one Joy-Con. Most third-party controllers are capable of fulfilling all three functions, though thePro Split Pad from Hori, only function properly in particular setups
- The official Nintendo Joy-Cons can be used for about 20 hours before needing a recharge. Battery life is another area where third-party options fall short, with most advertising a maximum of 10 hours.
- Games like Splatoon and The Legend of Zelda: Breath of the Wild can make use of motion controls thanks to certain third-party Joy-Cons.
- Rumble: The Joy-Cons from Nintendo have a feature called “HD rumble,” which gives players fine-grained control over the vibration motors. Some third-party Joypads have basic vibration motors but do not support HD rumble.
- Third-Party IR Support Few games (aside from 1, 2, Switch) actually make use of the infrared camera that the Joy-Cons lack.
- Support for Nintendo’s action figures and trading cards (known as “Amiibo”) is rare on third-party Joypads. The BestFire Joy-Cons are a must-have if you want to use your Amiibo figures in games like Animal Crossing and Smash Bros.
- Many third-party Joypads have an adjustable turbo mode for blazing through menus, and some even have macro buttons that can activate a long string of pre-programmed commands (especially helpful for combos in fighting games). The Joy-Cons covered here can be programmed for macros without the aid of a computer.
We can get right down to business now that you know what to look for. Take a look at this list of the top third-party Joy-Cons for the Nintendo Switch.
The 5 Best Joy-Con Replacements for Nintendo Switch
Best Overall: ECHTPower Joy-Cons
They’re not only cheap and cozy, but they also have motion and rumble controls. For most people, the ECHTPower Joy-Cons are the best third-party alternative. The controllers have a 10-hour battery life, making them suitable for even the longest gaming sessions in front of the TV, whether you’re playing solo or in split-screen mode with a friend.
There is a D-pad, two macro buttons, and two turbo buttons on the ECHTPower Joy-Cons. The M-shaped grip on these Joy-Cons makes them ideal for use in wireless gameplay.
Best Premium Pick: Binbok RGB Joy-Cons
There must be a good reason why Binbok’s Joy-Cons have gained such a stellar reputation. They have a textured grip, motion and rumble support, a premium D-pad, and customizable RGB lighting for the area around the joysticks. The Binbok Joy-Cons are a great substitute for the real thing, as they feature a 10-hour battery, a Joy-Con grip, and support for portable, wireless, or split multiplayer mode.
The Binbok Joy-Cons have four buttons total, with two being macro buttons and the other two being turbo buttons. The RGB lighting can be set to any of eight different colors at any time with a simple button command (holding the turbo button and pressing down on the joystick).
Best Portable-Only Option: Hori Split Pad Pro
Are you sick of your hands cramping up? Unfortunately, the Hori Split Pad Pro can only be used in its portable form. It’s the best alternative to a traditional controller for mobile gaming. Look how the D-pad and action buttons are placed at an angle relative to the joysticks; this is a welcome design feature absent from other third-party Joy-Cons.
Although the Hori Split Pad Pro lacks rumble and motion controls, it does feature two macro buttons, two turbo buttons, and two rear programmable buttons located in the grip. Remember that the Hori Split Pad Pro is only usable in portable mode, and that it will probably not fit in your Switch’s carrying case.
Best with Amiibo Support: BestFire Joy-Cons
Are you in need of some Amiibo assistance? The BestFire Joy-Cons are a budget option that mimic the GameCube controller in design while adding rumble and Amiibo support. The BestFire Joy-Cons are ideal for Smash Bros. players who have amassed a sizable collection of Amiibo figures due to their ergonomic curved design, D-pad, and familiar button layout.
This Joy-Con can be used in a variety of different ways, including portable, paired, and split-screen multi-player. However, the 6-hour battery life and the reorganized buttons and shrunken C-stick make split-screen play less than ideal.
If You Just Need a D-Pad: Hori D-Pad Joy-Con
If you already have a pair of functioning Nintendo Switch Joy-Cons and want one with a D-Pad, the Hori D-Pad Joy-Con is what you need. It’s a new left Joy-Con that swaps out the clumsy directional buttons for a standard D-Pad.
The Hori D-Pad Joy-Con may look and even feel like a regular set of Joy-Con, but it lacks that controller’s rumble and motion controls. Its low price is due to the lack of a built-in battery or wireless hardware, which also limits its usability to “portable mode only.”
Conclusion
It’s possible that Nintendo’s repair service isn’t available in your country, or that you’ve voiding your warranty by disassembling your Joy-Con, both of which prevent you from sending it away for repair. The good news is that you haven’t exhausted your choices even if this happens.
Nguồn: https://gemaga.com
Danh mục: Blog