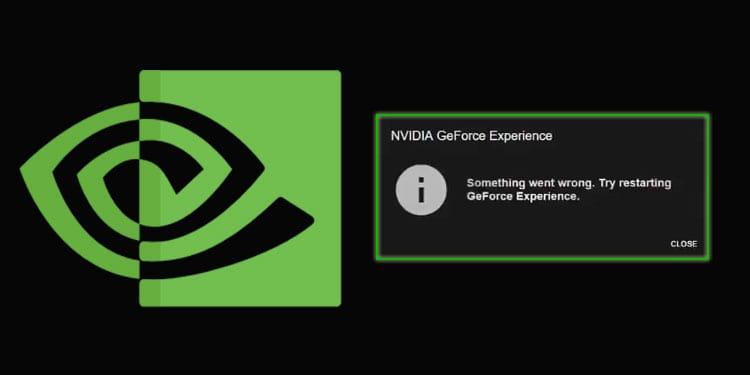
Want to maximize your GPU’s performance, but GeForce Experience won’t open? Here’s how to quickly restore functionality.
What Is GeForce Experience?
The Nvidia Graphics Processing Unit (GPU) is supported by the GeForce Experience software suite.
Bạn đang xem: Geforce Experience Not Opening Update 07/2026
Nvidia Shadowplay for live streaming, built-in game filters (think Instagram filters, but for your PC games), and a ton of other powerful features are all available in the GeForce Experience.
There has been some controversy surrounding Nvidia’s GeForce Experience. Some people thought it was pointless for a gaming PC. Some people say it’s a waste of system resources, though. GeForce Experience, however, has evolved into a powerful GPU management application for Nvidia GPU users.
GeForce Experience vs. Nvidia Control Panel
Hold on. Can the same customization options be found in the Nvidia Control Panel as in the Nvidia GeForce Experience?
It’s a bit perplexing that Nvidia sets you up with not one but two programs to tweak your GPU’s settings. However, each tool provides users with a unique set of GPU possibilities.
The majority of the Nvidia Control Panel is devoted to global GPU options, but there are also game-specific options available.
You can do things like manage the system-wide 3D settings for your Nvidia GPU, lock in a specific screen resolution, change the colors on your desktop, and set up multiple displays. If your laptop has an Nvidia graphics processing unit (GPU), you can extend the battery life of your device by configuring the Nvidia Control Panel to use the GPU only when absolutely necessary.
The Nvidia Control Panel defaults to global settings, but you can also tailor it to specific apps if you like. The program-specific GPU settings take precedence over the global settings. Game settings like anisotropic filtering, V-Sync persistence, and GPU power management mode definition are all within your control.
Forcing a game or program to use these 3D settings can cause unexpected behavior. Nothing will be permanently damaged, but you may experience random program and game crashes.
What Does GeForce Experience Do?
What, then, does Nvidia GeForce Experience do, if it does not regulate the display’s color or resolution?
The Nvidia GeForce Experience includes a wide variety of enhancements, such as:
- Automatically improving gameplay
- Use Nvidia ShadowPlay to automatically capture and edit gameplay highlights.
- Share your GeForce Experience gameplay instantly on Facebook, Twitch, and YouTube.
- Take screenshots and edit them in filters
- Automatically updating Nvidia graphics card drivers
- Playable on Nvidia Shield devices via streaming
- Scaling of Images
Let’s delve a little deeper into these GeForce Experience options, shall we?
1. Automatic Game Optimization
The visuals in today’s PC games are breathtaking. Some games strive for photorealism in their visual presentation, giving players a new level of realism and immersion.
These stunning visuals are accompanied by equally stunning customization options for the game’s visuals. Most games have a simple graphics toggle that lets you switch between different settings like Low, Medium, High, Ultra, etc. The vast majority of games these days automatically detect your computer’s configuration and adjust the visual quality accordingly.
The Nvidia GeForce Experience will then use its vast cloud data center and its database of thousands of different PC hardware configurations to further optimize those graphics settings. Nvidia’s game optimization works with a wide variety of games and can be used to improve framerates and other aspects of gameplay.
The Nvidia game optimization settings are currently set to manual. This necessitates double-checking the game-specific optimization settings. You can see the quality differences before even starting the game thanks to the dynamic screenshot in the games panel that updates as you adjust the settings.
If you prefer, however, you can enable automatic optimization. To enable automatic optimization for newly added games, click your Nvidia username in the top right, then navigate to Account > Games.
If you’re running Windows 10, GeForce Experience isn’t your only option for fine-tuning your PC’s performance. Learn the best settings for making Windows 10 a gaming machine.
2. Record and Stream Video Using Nvidia ShadowPlay
With Nvidia ShadowPlay, you can capture gameplay footage for later viewing or live streaming. ShadowPlay allows for multiple capture and recording modes, including live streaming and instant replay. Some RTX 30-Series graphics cards can record 8K HDR at 30 frames per second, while others can record 4K HDR at 60 frames per second.
Nvidia ShadowPlay, the gaming overlay previously optimized for content sharing, has been rebranded as Nvidia Share. Despite this, Nvidia’s official branding and the release notes for GeForce Experience still include references to ShadowPlay. Therefore, Nvidia ShadowPlay will still be used throughout this article.
Xem thêm : How To Catch And Breed Shiny Pokemon Update 07/2026
ShadowPlay’s features have expanded over time. ShadowPlay allows you to record gameplay with Nvidia GeForce Experience running in the background. To start recording with ShadowPlay, press ALT F9 while in-game. There are a variety of quality options for recording, from low to high. Until you press ALT F9 again, the recording will keep going.
Instant Replay is an addition to the regular recording feature. With Instant Replay, you can record 15 seconds to 20 minutes of gameplay at a time at your discretion. While playing, press ALT F10 to activate ShadowPlay and record gameplay for the duration you choose.
When you choose Instant Replay, your recording will be made with the same parameters as a regular recording. When Instant Replay is activated, recordings are continuously made. However, you must press ALT F10 to save the recording. In that case, it will delete the recording in chunks determined by your preferences.
ShadowPlay also supports live streaming to platforms like Facebook, YouTube, and Twitch. Before going live, you can adjust the video quality and add graphical watermarks to promote your brand. To begin a live stream of your game with Nvidia ShadowPlay, press ALT F8.
ShadowPlay’s modifiable HUD (Heads-up Display) is another great addition for streamers. With the Nvidia ShadowPlay overlay, you can incorporate a live webcam feed, a recording progress bar, a viewer counter, and a comment feed into your broadcast. You can also adjust the size of the options by moving them to one of the four corners of the screen.
3. Capture and Filter Screenshots with Nvidia Ansel
The ability to take screenshots is not particularly impressive. Nvidia Ansel’s additional functionality and power, however, warrants mention.
With the help of Nvidia Ansel, you can set up a custom camera within the game and take screenshots from almost any angle. Then, you can use the post-processing filters in Ansel to apply your own personal flair to your screenshot. In addition to capturing 4K HDR images, you can create 360-degree panoramic screenshots with Ansel and take huge screenshots that are larger than your monitor’s resolution.
Nvidia Ansel is a screenshot tool, but it offers a robust system for capturing important moments during your games. Examples of fantastic screenshots captured with Nvidia Ansel can be found on Shot With GeForce. Keep an eye out for Nvidia’s periodic screenshot competitions.
When you want to take a screenshot in-game using Nvidia Ansel, press ALT F2. When you take a screenshot with Nvidia Ansel, an overlay appears, allowing you to make adjustments.
Unfortunately, not all games are compatible with Nvidia Ansel. You can check out the games that are compatible with Ansel on Nvidia’s list. To locate your game, choose Ansel from the menu. You’ll find that many games only provide limited support for Ansel.
4. Update Nvidia GPU Drivers Automatically
Do you constantly fail to update the drivers for your graphics card? For that, there is Nvidia GeForce Experience. If a new GeForce Game Ready Driver is available for your GPU, GeForce Experience will notify you automatically.
It’s important to always use the most recent version of your GPU driver. The performance of many games, especially new games, can be greatly enhanced by updating to the latest graphics drivers. Change logs for graphics drivers often boast of 20 percent performance boosts in newly released games when run on specific hardware.
It is possible to automate the driver download and installation with GeForce Experience. To access your account’s settings, select General after clicking your Nvidia username in the top right. To have driver updates downloaded automatically and installed at my convenience, select the aforementioned option under Downloads.
The Nvidia graphics processing unit drivers come with custom settings for each game. With the Nvidia game profiles, your GPU’s performance may be slightly improved. Reaching peak performance for your hardware may not revolutionize your game, but it will definitely improve it.
In addition, the drivers can add new RTX-specific features and a significant performance boost for users with the latest Nvidia RTX GPUs.
5. Stream Games to Nvidia Shield Devices Using GameStream
For those who own an Nvidia Shield Tablet or Nvidia Shield TV box, Nvidia GeForce Experience serves as a central hub for streaming games. See below for a comprehensive guide on how to link your Nvidia Shield TV box with GeForce Experience.
With Nvidia Shield, you can play all of your games on any of your devices simultaneously, stream in up to 4K with HDR, and take advantage of Google Assistant.
One such service is Nvidia’s Shield, but there are many others. Numerous alternate options exist, even from Nvidia. Take a look at how Google Stadia stacks up against Nvidia GeForce Now to see which one is best for you.
6. Nvidia Image Scaling
Image Scaling, accessible via Nvidia Geforce Experience, is Nvidia’s directional scaling algorithm that employs adaptive sharpening to simultaneously detect, upscale, and sharpen gameplay. Deep Level Super Sampling is an artificial intelligence upscaling tool developed by Nvidia that makes the image you see appear to be running at a higher resolution and can significantly improve your video output.
How to download GeForce Experience
Even if Nvidia’s GeForce Experience wasn’t included with your graphics card, you can still get the driver from Nvidia’s website. The Nvidia GeForce Experience page is where you need to be (link opens in new tab).,and then select “Download Now” from the menu.
When the download is complete, launch the.exe file to begin installing GeForce Experience. After you have the software installed, you can either sign up for a new Nvidia account or sign in with your existing one. If you don’t already have an account, you can quickly create one by signing in with your existing Facebook or Google credentials.
Xem thêm : How To Disable Mouse Acceleration In Windows Update 07/2026
A tour prompt dialogue box will appear once you’re done. If this is your first time using GeForce Experience, we suggest going through the tutorial to get acquainted with the program and all it has to offer. However, it’s not an absolute requirement. You can skip this section if you’re short on time.
Restart GeForce Experience
If GeForce Experience has been functioning normally but is suddenly unable to launch, it’s likely that a previous installation of the program is conflicting with the current one. To fix this, we can terminate all related processes and launch the program again.
- Select “Task Manager” from the list of options that appears when you press Ctrl, Alt, and Delete. If you prefer, you can also right-click the Task Bar and choose “Task Manager” from the context menu that appears.
- Find any running programs from NVIDIA. NVIDIA Settings, NVIDIA User Experience Driver, NVIDIA Backend, and possibly others may be among these.
- Select the processes, and then click the “End Task” button.
- When all programs have been terminated, restart the computer.
- Put GeForce Experience into action.
If the app still won’t launch, try the next solution.
Change NVIDIA Telemetry Container Settings
- Select “Run” from the context menu that appears when you right-click the Windows Start button.
- Type “Services.msc” into the Run box and press the Run button.
- To access the NVIDIA Telemetry Container, it must be located in the Services pane of the application.
- To open the “Properties” window, look for the tab labeled “Log On,” and then double-click it.
- To use a local system account, go to the “Log On” tab and click the corresponding drop-down menu.
- Go to the General menu and select “Start” or “Stop.” If the service is not already running, you will be prompted to start it before proceeding.
- Put an end to adjusting settings for the NVIDIA Telemetry Container.
- Locate NVIDIA GeForce Experience Service in the service window and select it.
- To restart a service, select it from the list and then click “Application Information” to the left of the list.
- If that doesn’t work, go back to the Services window and set the “Log On” for each NVIDIA service to “Local System account,” and then make sure “Interact with desktop” is checked.
- Force GeForce Experience to reload.
Disable Antivirus Shield/Create Firewall Exception
The procedures differ for each antivirus program. We’ll use avast for demonstration purposes.
- To adjust the Avast shields, right-click the icon in the system tray and select the option from the context menu that appears.
- Choose an inactivation choice. If the problem still persists after 10 minutes, restart GeForce Experience to see if the reorganization helped.
- Start up GeForce Experience again.
If this fixes the opening problem, GeForce Experience will need to be whitelisted permanently.
- Select “Open Avast user interface” from the context menu that appears when you right-click the Avast icon in the system tray.
- To adjust your preferences, go to your app’s settings by clicking the gear icon in the upper right corner.
- Look for the “General” heading in the window’s sidebar and click it.
- Choose “Exceptions” over on the right.
- Select the “Add Exception” button in green.
- To make an exception for the GeForce Experience executable, enter the path to its location in the field and then click “Add Exception.”
- Put NVIDIA GeForce Experience to sleep and then restart it.
Uninstall & Reinstall GPU Drivers
It’s possible that the NVIDIA driver being used to power the GPU at the moment is what’s causing GeForce Experience to crash and refuse to load. Using an outdated driver, or one that was improperly installed, can exacerbate the issue significantly. Here is how to remove the current GPU driver and install the newest one.
- To access Device Manager in Windows, click the Start button and then right-click.
- Extend “Display adapters” in “Device Manager” to find your graphics processing unit.
- Select “Uninstall” from the menu that appears after you right-click the icon. Select “Properties” from the context menu, then click “Driver” to open the device’s driver settings, and finally “Uninstall Device” to remove the driver.
- The driver can be removed by following the instructions provided by the uninstall wizard.
- For more information about NVIDIA drivers, click here.
- Type in the specifics of your graphics card—model number, operating system, etc.—into the “Manual Driver Search” field. Start your search here. If you want the most up-to-date version of a driver, for instance, select the top result in the search. The green “Download” button should be clicked.
- Double-click the downloaded driver executable and go through the on-screen instructions to complete the installation.
- After that is done, try launching GeForce Experience on your PC.
Uninstall & Reinstall NVIDIA GeForce Experience
When GeForce Experience fails to launch, a clean installation is often the best solution. It updates your PC to the most recent version of the app and all associated files and data. How to do it is as follows:
- To use Windows Search, right-click the Start menu and pick the option.
- Type “Control Panel” into the search bar, and then click on the first result that comes up.
- Below the Uninstall button in the Control Panel window, you’ll see the option to “Uninstall a program.”
- In the list of available software, select NVIDIA Geforce Experience.
- Select “Uninstall” up top.
- Observe the prompts presented by the uninstaller.
- When done, head over to NVIDIA’s official download page to grab the most recent version of GeForce Experience.
- To begin the installation process, simply double-click the downloaded executable file.
- Initiate GeForce Experience.
How to optimize your games with GeForce Experience
The fact that drivers can be downloaded from GeForce Experience is reason enough for us to keep the program running at all times. But if you still need convincing, the game’s optimization is a standout feature you’re sure to enjoy. GeForce Experience makes it easy to fine-tune your gaming settings with a single click. Without spending an hour agonizing over graphics settings, you can achieve the optimal balance of performance and visual quality.
The best part is that when you launch GeForce Experience, it will automatically check your computer for games and add them to your library if they are found. If you don’t want to wait until the next time you launch GeForce Experience to perform a scan, you can do so manually by clicking the three vertical dots in the top right corner and choosing “Scan for games”.
Select “Details” when you have the game in question already in your GeForce Experience library and are ready to optimize it. All the game settings, their current values, and the optimal settings for each are displayed here. Click the “Optimize” button if you want to quickly and easily enhance your gaming experience. The software will then immediately adjust all settings to its optimal configuration.
By selecting the gear icon and adjusting the resolution, display mode, and balance bar, you can fine-tune the way these settings are optimized for you.
If you simply don’t have time for any of this, you can simply click the three vertical dots in the top right corner of the library screen, and then select “Optimize all games”. That’s pretty cool, right?
How to use GeForce Experience to record your gameplay
GeForce Experience can help you record a full gameplay tutorial or simply save a screenshot of your current killstreak.
Simply press the GeForce Experience shortcut key (by default, Alt Z) while in a game to bring up the GeForce Experience window as an overlay. When you click that link, a menu of choices will appear.
If you press a shortcut key, Nvidia ShadowPlay will start recording the most recent few minutes of gameplay. Instant Replay’s recording duration, video resolution, frame rate, and bitrate are all adjustable via the settings menu. We suggest you keep the majority of the default settings and only adjust the duration of the recording. By default, you can save a video of your gameplay by pressing Alt F10; the clip will then be stored in your gallery.
GeForce Experience also allows you to record your gameplay manually. To begin recording, open the GeForce Experience overlay and click the record button. By default, you can use a hotkey without entering the overlay by pressing Alt F9.
GeForce Experience now supports streaming. You can share your gameplay on social media, streaming platforms, and video sharing sites. Click the “Broadcast LIVE” button, followed by “Settings,” to access the broadcast settings menu. While other programs like OBS and XSplit offer more customization options, GeForce Experience stands out for its intuitive interface. After finalizing your streaming preferences, you can begin broadcasting by selecting ‘Start’ or by pressing the shortcut key combination Alt F8.
GeForce Experience naturally includes a screenshot capture feature. While pressing Alt F1 will take a screenshot, using photo mode will allow you to capture much higher-quality images.
To activate photo mode, press Alt F1 or use the GeForce Experience’s “Photo mode” overlay. Here, you can use AI to improve the quality of your screenshots by applying filters and increasing the resolution. Not only that, but with Nvidia Ansel technology, you can manipulate the camera in certain games to get the best shot.
What Are the Best GeForce Experience Features? Is It Worth Using?
Nvidia users, your search is over: GeForce Experience is the best GPU management tool available. The in-game filters, other advanced settings, and the ability to record and stream gameplay are the highlights of Nvidia’s GeForce Experience.
Many Nvidia users, however, stay away from GeForce Experience like the plague. GeForce Experience had a bad rep as an annoying and unnecessary program in the past. However, opinions are shifting, so it’s time to give GeForce Experience another look.
Nguồn: https://gemaga.com
Danh mục: Blog