Video recordings of their favorite broadcasts can be saved locally or uploaded to a service like YouTube for later viewing. Learn the steps to downloading Twitch VODs from this article.
What to Know
- Select Settings > Channels and Videos > Store saved broadcasts to have Twitch automatically save your broadcasts.
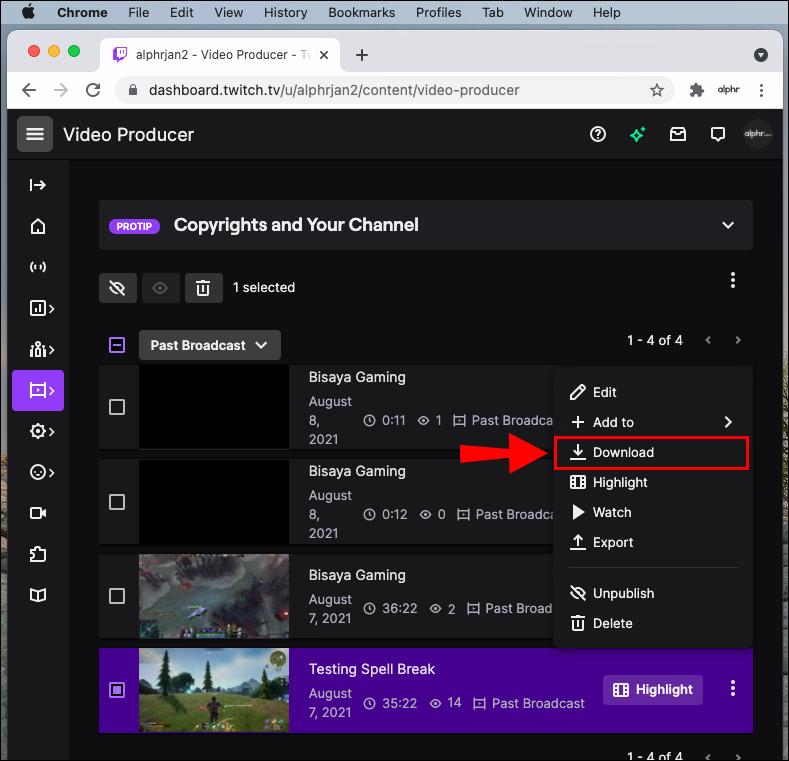
- After a stream is saved, you can access it by visiting the Video Producer page, clicking the More icon next to a video, and selecting Download.
- Using a third-party program like Twitch Leecher, you can record the streams of other streamers.
How to Download Your Twitch Broadcasts
Users of Twitch can access and save copies of their broadcasts from the service’s website. Regular users have 14 days after the initial stream to download broadcasts; Twitch Affiliates and Partners have 30 days; and Twitch Partners have 60 days. The clip will be automatically erased after this point.
Bạn đang xem: How To Download Twitch Vods Update 07/2026

Enable Auto-Archiving
With the flip of a switch, Twitch can automatically record your broadcasts. It can be located at this link.
-
To change your Twitch settings, click the gear icon in the top-right corner of the page.
-
Just pick a chanel and some videos.
-
Check the box next to Save broadcasts for later viewing.
-
When you finish a future broadcast, it will automatically save to your profile.
Download Your Videos
With archiving enabled, you can save broadcasts to your computer for later viewing.
-
Under your profile picture on the homepage, you’ll find a menu option to switch to Video Producer.
-
To download a video, go to the page after and select “More” to the right of the clip in question.
-
You can save the video to your computer by selecting the Download button.
Unfortunately, Twitch does not allow users to save previously broadcasted content from other users’ accounts.
How to Download Someone Else’s Twitch Videos
To get Twitch videos without spending a dime, you can use a program called Twitch Leecher. Since it was developed independently, it is not backed by or affiliated with Twitch in any way. However, the program’s clean interface and thoughtful design make it seem less daunting than alternatives.
What makes Twitch Leecher so great is that it can grab videos from any channel on the network. This tool also receives regular updates to keep up with major changes made to Twitch. If you have any questions or need help, you can contact the developer through the app’s in-built links.
Instructions on downloading Twitch videos on demand (VODs) and how to install the program, Twitch Leecher, are provided below.
Twitch Leecher will not allow you to download videos that are restricted to subscribers only.
-
To get the most up-to-date version of Twitch Leecher, visit the project’s official GitHub page.
-
The computer asks if you want to launch the program or save it. To install the software on your computer, click the Run button.
-
Launch Twitch Leecher once the installation is finished.
-
The Search box can be found in the main menu.
-
Xem thêm : How To Clean A Mechanical Keyboard Update 07/2026
Go to Twitch and click the Videos tab.
-
To start downloading a video, just right-click on it. Then click the option to Copy Link Address.
The specific syntax of the command may vary from browser to browser.
-
Select the Urls menu in Twitch Leecher once again.
-
Copy the link to the video, then click the Search button.
-
A window containing the Twitch video you selected should now open. Simply click the Download button that appears in the corner of your screen.
-
Select the desired video quality and save location on the following screen. An individualized filename and selection of the video’s beginning and ending timestamps are also available.
-
Once you’re satisfied with your selections, click the Download button. Your video will be downloaded to the location you specify shortly.
How to Enable VOD on Twitch:
- To access your Twitch profile, select the profile picture icon in the upper right corner of the screen.
- Select “Creator Dashboard” now to proceed.
- To begin streaming, go to “Settings” on the left and then “Stream.”
- To enable “Store Past Broadcasts,” navigate to the “VOD Settings” menu option.
- When it is activated, a purple checkmark will appear.
To turn off Twitch’s recording of your broadcasts and VODs, simply click this button.
How Long do Your Saved Broadcasts Last on Twitch?
Past broadcasts will be automatically saved for 60 days before being deleted if you have Twitch Prime, are a Twitch Partner, or use Twitch Turbo.
Your broadcast history will only be kept for 14 days if you do not subscribe to Twitch Prime, Twitch Turbo, or are a Twitch Partner.
You can download your VOD to your computer if you want to keep it for an even longer period of time. My advice is to purchase an external hard drive, such as the Seagate, which is available on Amazon, before you begin downloading VODS.
With so many VODS, it’s easy to run out of room on your computer; moving them to an external hard drive is a great way to free up valuable storage space. As far as content storage goes, I find that using an external hard drive is immensely helpful.
Creating highlights from your past broadcasts is another option for preserving your favorite moments forever (or at least until you delete them). What are highlights and why should you use them? I’ll get into that below.
Why Should You Enable VODs on Twitch?
If you’re streaming on Twitch, but some of your viewers can’t watch at the time, you can give them a chance to catch up by making your streams available as VODs. Some of your subscribers and viewers may compare your streams to television shows, and of course no one wants to miss an episode of their favorite show.
The ability to store video on demand content on your channel can be a useful selling point. If someone likes your channel but isn’t a subscriber, you can restrict access to your video-on-demand library or archived broadcasts to paying customers only. Anyone interested in viewing your archived content would be a fool not to hit the subscribe button.
You can go back and download just the segments of the stream that you enjoyed the most by using the option to save previous broadcasts. These recorded snippets can then be pieced together to create professional-looking videos for sharing on platforms like YouTube and Vine.
Check out my video for a tutorial on clipping on Twitch:
However, keep in mind that your ability to go back and analyze the recorded streams is time-limited, so don’t procrastinate too long or you’ll lose access to them permanently.
Here’s how to restrict access to your Twitch VODs to paying subscribers only.
How to Turn On/Off Sub-Only Mode for VODS on Twitch
- To access your creator dashboard, select the profile icon.
- Select “Settings” and then “Affiliate” from the menu on the left.
- Go to the “Subscriptions” section by scrolling down.
- Subscriber-only archives can be turned on or off.
Xem thêm : Dualsense Vs Xbox Series X Controller Update 07/2026
Having said that, here’s what you need to know if you ever want to watch a previously recorded show and pick out the best moments.
How to Make Highlights on Twitch
- Enter your username and password to access your Twitch dashboard.
- Then, click “video producer” under the “videos” heading that should appear on the left side of the screen.
- When you select “video producer,” all of the videos you have made, including broadcasts, will be displayed. To highlight a specific previous broadcast, locate it and then click the highlight button.
- You’ll be directed to a new tab where you can start marking up your video with annotations.
- Last but not least, after you’ve chosen which segments of the video you want to highlight (you can do this at the bottom of the page by entering or selecting the various times of the video that you want to highlight), you can then click the “create highlights” button.
Adding highlights is a breeze and only takes a few minutes of your time. You should do your best to condense the highlights into a concise and informative summary. Keep in mind that these are just the highlights and not the entire show over again.
Why Should You Make Highlights on Twitch?
Rather than having to watch you stream in real time, viewers can get a taste of your channel and your content through highlights. Your viewers will still be able to watch your content, even if you go offline, if you have highlights from your previous streams available.
Viewers can see your best work if you provide highlights. If someone happens upon your Twitch channel while browsing the platform, wouldn’t you rather they see your best content than you fiddling with your camera for five minutes?
In addition, viewers who are just browsing Twitch for new channels won’t want to tune in for four hours to determine whether or not they like you as a streamer.
The primary goal of archiving old broadcasts should be keeping your subscribers and followers informed, rather than drawing in new viewers.
Highlights should be no longer than two minutes in total, preferably closer to a minute. The purpose of highlights is to pique viewers’ interest and encourage them to tune in when you’re live.
In order to attract more viewers, you can also share your edited highlights on other platforms like YouTube and Instagram.
![How To Download Twitch VODs as Viewer On PC? [Step-By-Step Guide]](https://gemaga.com/wp-content/uploads/2023/04/how-to-download-twitch-vods-3.jpg)
How to Export Your Twitch Highlights to Youtube
- To begin, go to your profile and select settings to link your Twitch and YouTube accounts.
- Go to your device’s configurations, then to the “connections” tab, and finally to the “YouTube” section. Simply hit the link to connect. (You might need a Google or YouTube account to use this.)
- Your next step should be to access the dashboard.
- Select “videos” from the menu on the left. Navigate to the “video producer” link under the “video” menu.
- Your video library will load. To export a video, select it, then click the “export” button in the drop-down menu that appears by clicking the three dots to its right.
- You can edit the page’s meta data, including title, description, and tags, from this screen. When you’re ready, click the “start export” button at the box’s bottom, and your file will immediately begin exporting to YouTube.
How to Export Your Twitch Highlights to Instagram, Facebook and Others
The process of transferring videos from YouTube to other platforms varies. Therefore, downloading the video to your computer is the best option if you want to share it on multiple social media platforms. To save a video from Twitch to your computer, you must:
- Initiate a visit to the control panel.
- To view videos, head to the left side of your dashboard and scroll down.
- You can view your video archive by selecting the “video producer” menu item. To download a video, locate the clip you want to save and click the three-dot menu that appears to the clip’s right.
- When the menu appears, select “download” from the submenu that appears. There will be no delay in the video’s download process.
When you save a video to your computer, you have the flexibility to watch it whenever and wherever you like.
You can streamline the process of sharing your content by linking your Twitter and Twitch accounts. Watch this video for instructions on how to accomplish that:
Why is it Important to Post Twitch Highlights on Multiple Social Media Outlets?
More people will see your Twitch highlights if you share them on multiple platforms, such as YouTube, Instagram, Facebook, etc.
Posting on multiple platforms increases the likelihood that your content will be seen by as many people as possible because some people spend more time on YouTube while others spend more time on Instagram.
Always include a call to action encouraging people to visit your Twitch channel in your social media posts.
Use these channels to spread the word about your live broadcasts.
Just drop by my Twitch channel here and say hey if you have any questions or just want to hang out!
FAQ
How long does it take to download a Twitch VOD?
The answer is conditional on the video’s length and your upload speed. A lengthy video download could cause you to wait an additional hour or more after the initial start time.
How do I steam on Twitch?
Use either Twitch Studio or an external broadcasting program like OBS Studio or Streamlabs OBS to broadcast to Twitch from your personal computer. Streaming to Twitch from a Nintendo Switch requires a capture card, but Xbox and PlayStation consoles already have Twitch apps built in.
How do I delete a Twitch video?
You can get rid of your Twitch clips by going to the Creator Dashboard, then Content, then Clips, and finally the Garbage Can. Navigate to “Settings” > “Channel” > “Enable Clips” to turn off “Automatic Clip Creation.”
How do I use video clips on Twitch?
To make a clip on Twitch, just hover over a video and click the Clip button. Select your profile picture, then go to Creator Dashboard, Menu, Content, and finally Clips to begin sharing a clip. Select the video and click the share button.
Nguồn: https://gemaga.com
Danh mục: Blog