Do you want to show off your friends and the loud hordes on Reddit with a breathtaking or carefully framed screenshot from your favorite game? Stuck trying to find Steam’s screenshots folder? We’ve got your back.
Through the Screenshot Manager of the Steam Client
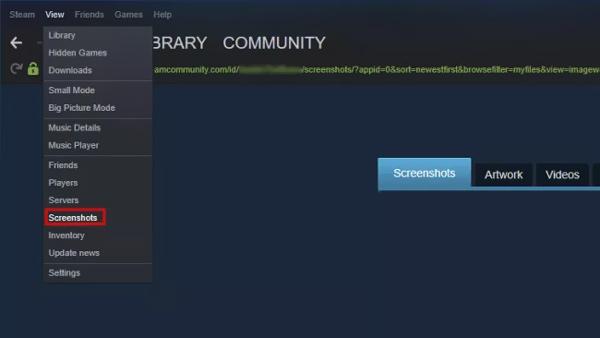
Using Steam’s Screenshot Manager is the quickest way to access your game’s dedicated screenshots folder.
Bạn đang xem: How To Access The Steam Screenshot Folder Update 07/2026
- Start up the Steam client and click the View menu to open it.
- The next step is to go to Screenshots and then use the Show dropdown to choose the game whose screenshot you wish to view.
- You can save a screenshot to your computer by selecting it in the screenshots panel and then clicking the Show on Disk button.
- If you click this, your operating system’s file manager (like Windows’s File Explorer) will open to the game’s screenshots folder. It’s important to remember that the screenshots all live in the same root directory, but that each game has its own unique sub-directory.
- You should now be able to recall the location of the screenshots folder by creating a shortcut.
When a user wants to check out his screenshots online, he can do so by selecting the image in the Screenshots Manager and then clicking on View Online Library.
Use the File Manager of the OS
It’s not always convenient to launch the Steam client and go through the update processes just to look for a screenshot. Here, the user may wish to use the OS’s File Manager to locate the desired folder; however, doing so is not without its challenges (although the OS’s image search feature can be put to good use).
For Windows Users
In Case of a Single Steam Account is Used in the Steam Client
When only one Steam account is in use, locating the Steam Screenshots folder is a more streamlined process.
Warning:
Avoid making any changes to the folders in these locations, as doing so could cause problems with taking screenshots or launching the Steam client.
- Select Open File Location from the context menu after right-clicking the Steam shortcut (on the desktop or in the Windows Start menu). The default installation folder will open, typically containing:
Program Files (x86) can be found at C:Program Files. Steam
- To access a user’s Steam ID, double-click on the userdata folder and then open the folder named something like “numbers.” One and only one folder will exist if only one Steam account is used with the Steam client. Additional numerically-named Steam account folders may exist in the Steam client. In that case, the user can either try the Steam ID method (which will be discussed later) or open the folder with the numbers one by one to locate the Screenshots folder of the user.
- Double-click the folder labeled “760” inside the numbered folder, and then navigate to the Remote directory.
- If you have many games in your Steam library, you may see many folders with varying numbers. The game’s AppIDs on Steam can be found here. You can either look up the AppID of the Steam game you’re looking for, or you can open each folder one by one and search for the game’s contents that way.
- To view the game’s screenshots, open the main game folder and then double-click the ScreenShots folder inside. The full directory structure for the screenshots is as follows:
In the "C:Program Files (x86)" folder. Steamuserdata<SteamID>760remote<AppIDofGame>screenshots
Find the Steam ID in Case of Multiple Steam Accounts
Xem thêm : Mobile Cpu Vs Desktop Cpu Update 07/2026
It’s possible for the second step in the above process to cause confusion if multiple Steam accounts are used in the Steam client. The best course of action here would be to track down the Steam ID associated with a specific account.
- Start up Steam and click the View menu to open it.
- Now go to the Interface tab in the Settings window by clicking the Settings button.
- Then, in the right pane, select the option to Display Steam URL Address When Available, and hit OK to save your changes.
- Select View My Profile by clicking on your username in the top right corner of the Steam window.
- Finally, a URL will be displayed at the top, with the final digits representing the user’s Steam ID. One can verify his Steam ID on the Steam website.
- Double-click the userdata folder that corresponds to your Steam ID in the Steam installation directory.
- Then, double-click the Remote file inside the 760 folder.
- First, double-click the Screenshots folder within the game’s main folder (as described in Method 4, above).
- Then, if you need quick access to the Screenshots folder, you can create a shortcut to it.
For Mac Users
Steam’s default Mac OS X installation location is as follows:
Specifically: Users/MacUserName>/Library/Application Support/Steam
In order to locate game screenshots, a user can now refer to the previously described procedure. If the default Steam installation location isn’t working, you can change it by right-clicking Steam, choosing “Get Info,” and then looking at the “Where” tab.

For Linux Users
For distributions of Linux (like Ubuntu), Steam’s default installation location is:
~/.local/share/Steam
Then, after locating the game’s AppID (as was previously discussed), a user can access the game’s screenshots folder.
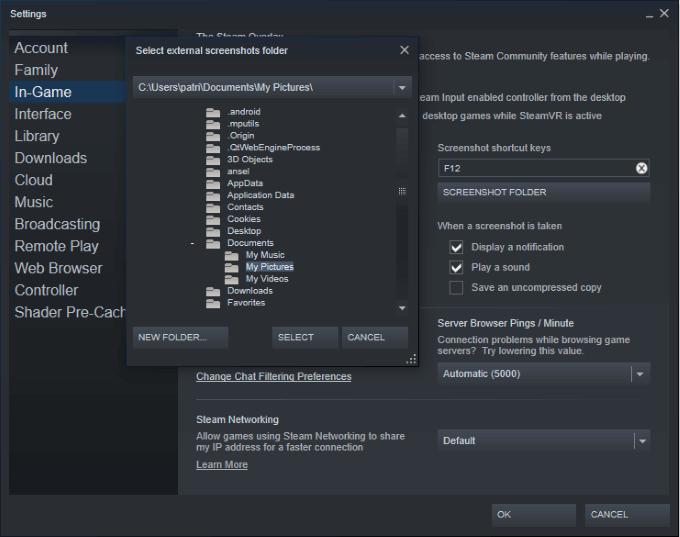
Use the In-Game Tab to Setup the Customized Screenshots Folder
The In-Game tab of the Steam client can be used to create a custom folder for screenshots, which can then be shared on the local network or uploaded to a cloud service.
- Get the Steam client going, and maximize View.
- The In-Game section of the Settings menu can be found in the window’s left pane.
Launch the Steam Client and navigate to the In-Game menu, then click the Screenshots folder. - After that, in the right pane, under Screenshot Shortcut Keys, pick the folder you’d like to store your screenshots in by clicking on Screenshot Folder.
Keep in mind the screenshots will be stored in two places, the Steam installation directory (in the JPG format) and the user-specified path (in the PNG format; the uncompressed version is preferred). If a user only wants to set up one folder, he can do so by erasing the Remote folder from Steam’s installation directory at the following path:
Steam Account ID: 760, User Data: C:SteamUserData, Program Files (x86)
To do so, open a Command Prompt as an administrator and type the following (replacing SteamID> with your own Steam ID).
A mklink /D The full path to the installation files is "C:Program Files (x86)." "D:newfolder" "SteamuserdataSteamD>760remote"
Xem thêm : Hardest Video Games Update 07/2026
A user can either take advantage of the operating system’s built-in screenshotting functionality or try out a third-party app to gain more control over the screenshotting process.
How To Change The Steam Screenshot Folder
- Get Steam ready.
- The “View” option can be accessed via the Steam window’s top-right menu bar.
- When the submenu appears, select “Settings” from the menu.
- The “In-Game” option can be found in the vertical menu on the left side of the Settings window that appears after clicking the aforementioned button.
- Locate the “SCREENSHOT FOLDER” option just below the “Screenshot shortcut keys” pull-down menu.
- Determine the folder Steam will use to store screenshots.
Where Is The Steam Screenshot Folder In Your Computer?
All of your captured images are stored within the Steam client. Access ‘View’ from the main menu. Choose “Screenshots” from the menu’s pull-down. It’s where you’ll keep a record of every screenshot you take. To view the directory on your hard drive, click the “Show On Disk” button. If you click that, Windows Explorer will open to the folder where your screenshot is stored.
Go to your computer’s Steam installation directory to access your screenshots.
Local Disk C: > Program Files (x86) > Steam is where Steam is typically installed by default on all versions of Windows, including Windows 8 and Windows 10.
If you’re using a Mac, Steam can be found in the default installation location of Users > [username] > Library > Application Support. Please use your Mac username here, not your Steam username.
Finally, the default Steam folder on Linux is >.local > share > Steam.
Why you’ll want to get Markup Hero for Steam Screenshots
- Markup Hero’s screenshots can be accessed from any computer, any device, any operating system, and any location in the world thanks to their safekeeping in the cloud.
- Instantly Shareable – Markup Hero instantly generates a share link so you can email, SMS, iMessage, or post your screenshots on social media.
- Insert Explanatory Notes – A screenshot doesn’t always convey the whole picture. Add arrows, boxes, ovals, highlights, callouts, and more to your explanations using Markup Hero.
- Annotations can be edited, changed, copied, and duplicated indefinitely after they have been added. Markup changes are reflected immediately, even in the links you send out to others.
- Arrangement – The accumulation of screenshots and notes means it will soon be necessary to find a way to store them. You will never lose any of your data, including guides and saved games. Keep your files organized with the help of tags and folders.
- Multi-Page: Share multiple screenshots at once by compiling them into a single document that can be accessed via a single link. Absolutely, that functionality is available in Markup Hero.
Best of All, Markup Hero is Free
- The Markup Hero app must first be downloaded. There is no cost involved and no registration is required.
- Installing Markup Hero is as simple as navigating to Local Disk (C:) > Users > [username] > Downloads and double-clicking the.exe file once it has finished downloading. On a Mac, click “File” in the Finder window and then “Home.” In the new window that appears, select “Downloads” from the menu on the left.
- And with that, I think I’ve covered everything. Launch Markup Hero with the shortcut Ctrl Shift 1 on a Windows machine. To initiate on a Mac, hit CMD Shift 1 at the same time.
- You can use Markup Hero to take a screenshot of a selected area or your entire screen, and then publish it online. Next, Markup Hero will provide you with a set of tools to use in order to highlight, modify, and annotate the image.
Final Words
You can probably take a screenshot on your Windows or Mac computer, but it won’t be nearly as much fun as using an app with all of these extra bells and whistles. You, as a gamer, should strive for the highest quality in your screenshots.
Markup Hero allows you to easily take screenshots, annotate them, and share them with others. Make sure you’re recording your screen at the appropriate times no matter what method you use.
Nguồn: https://gemaga.com
Danh mục: Blog