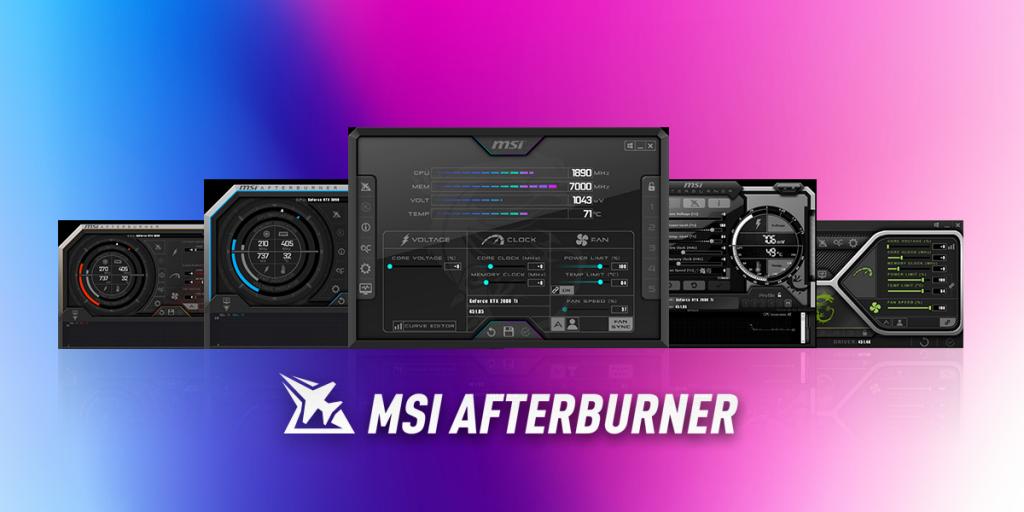
To maximize the performance of their graphics cards, MSI created a utility called MSI Afterburner, which features assisted overclocking.
In reality, this handy tool provides a ton of helpful functions for monitoring, fixing, and adjusting your system.
Bạn đang xem: Msi Afterburner Update 07/2026
Read on for a simple, no-nonsense introduction to MSI and all that its Afterburner utility has to offer, including instructions on how to install it and make the most of its features.
What Does MSI Afterburner Do?
Overclocking, monitoring, benchmarking, and video capture are just some of MSI Afterburner’s many features.
Overclocking Features
Overclocking can seem like a daunting and risky endeavor to those who aren’t familiar with it. However, MSI Afterburner streamlines the procedure by supplying fine-tuned settings to maximize your GPU’s performance without risking irreparable hardware damage.
The program allows users to adjust a wide variety of GPU parameters, such as voltage, power, temperature, clock, and fan settings. The purpose of this selection of tools is to strike a balance between efficiency and versatility.
The newest version of MSI Afterburner includes OC Scanner to make this process easier. This program employs a proprietary Nvidia algorithm to analyze your graphics card and find the optimal overclocking settings for instantaneous performance boosts in games.
Afterburner also allows you to set a custom fan profile, or a user-defined bespoke fan speed curve, that will increase or decrease fan speed depending on the GPU’s temperature. With this feature enabled, users can confidently push their GPU to its limits, knowing that if it reaches unsafe temperatures, the fans will automatically increase their speed to dissipate the heat.
Overclocking profiles can be saved alongside the fan profiles, allowing for quick switching between different settings for different games or performance needs.
Monitoring
In addition to the aforementioned overclocking options, the program also displays information about the hardware’s current performance.
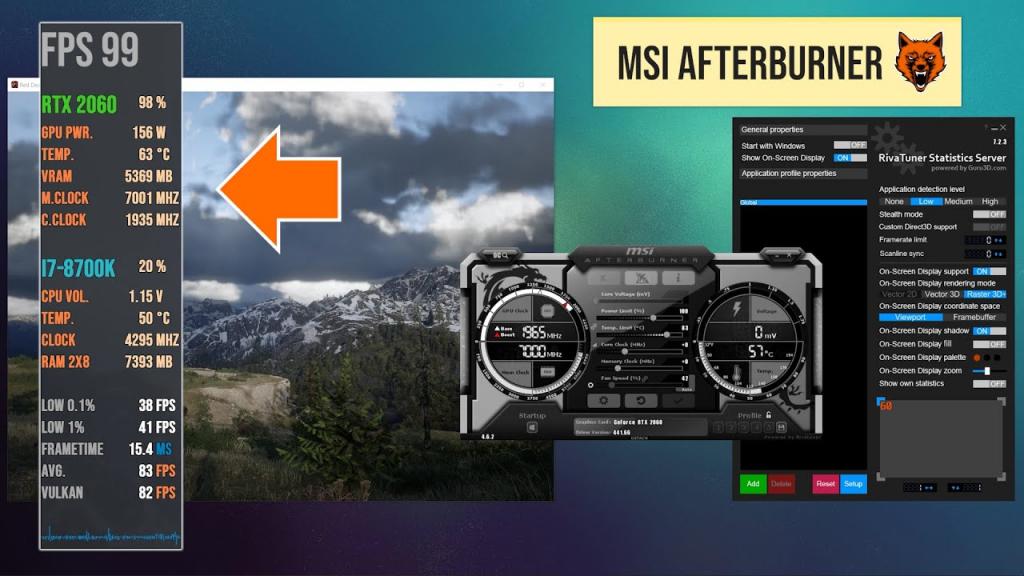
You can see the effects of your overclocking adjustments in-game by cycling through graphs of GPU temperature, core and memory clock speed, voltage, FPS, and usage percentage.
Those with low to mid-range GPUs will find the On-Screen Display’s use of the add-on utility RivaTuner Statistics Server, which can also be used to set a frame cap for a specific game, particularly helpful.
Benchmarking
The MSI Kombustor benchmark found in MSI Afterburner is a fairly standard burn-in GPU stress test utility that measures both stability and thermal performance in a benchmarking setting.
Together with the overclocking tools, it can give precise data on the impact of the user’s adjustments on the system’s overall performance. It’s DirectX and OpenGL compatible.
Video Capture
Predator is an add-on application for MSI Afterburner that allows for the recording of video in a number of different formats, including WMV and AVI using the H.264 codec, with a wide range of customization options, including compression type, framerate limit, quality, and resolution (up to 1080p).
Compatibility
MSI afterburner is a very flexible graphics tweaking tool because it is compatible with all GPUs regardless of chipset manufacturer (NVIDIA or AMD) and card manufacturer (MSI, EVGA, Gigabyte, etc.). The software was tested on a Gigabyte AORUS Radeon RX 580 and an ASUS GeForce RTX 2080.
Xem thêm : Meco Mouse Bungee Update 07/2026
This feature sets it apart from other overclocking utilities, such as EVGA’s Precision X1 and AMD’s Overdrive, which only work with NVIDIA’s RTX and GeForce GTX graphics processing units (GPUs) and AMD’s Radeon graphics processing units (GPUs), respectively.
Even more firmly establishing MSI Afterburner as the premier graphics utility is the fact that it is available for no cost whatsoever to download and use.
How To Download MSI Afterburner
- You should check out MSI’s Afterburner hub.
- Get MSI Afterburner by scrolling down and clicking “Download” at the very end of the page. To avoid having to alt-tab out of a game to access the utility, you can instead download the Afterburner App to your mobile device.
- In order to use MSIAfterburnerSetup.zip, you must first download it and then extract its contents.
- To begin installing, simply double-click the executable file. Install Kombustor when prompted to do so.
- Start up MSI Afterburner. When it’s ready, hit the gear-shaped “Settings” button.
- Changing the skin to “Default MSI Afterburner skin” under the “User Interface” tab will give you a less busy, more straightforward experience as you learn to use the program. And it’s not uncommon for other skins to mysteriously do away with sliders, making them unusable.
- Unlock voltage control and monitoring by selecting them under “General.”
- You can overclock or keep an eye on a specific GPU by choosing it from the “Master graphics processor selection” drop-down menu on the “General” tab if you have more than one GPU installed.
- In this section, you can also change various settings, such as those for the system’s initial boot process, compatibility modes, AMD-specific attributes, and so on. Most people will be satisfied with the default settings.
How To Run Benchmarks In MSI Kombustor
Before beginning the overclocking process, it is recommended that you first run benchmarks to establish the upper limits of your system. These will help you determine how far you can safely push the system.
- To do this, select the K icon that appears in the top left of Afterburner, usually next to the GPU name and driver version if you’re using the default skin.
- Instinctively, MSI Kombustor initiates the stress test against the benchmark.
- Keep an eye on the card’s temperature, frames per second, and GPU load to see how it performs without any overclocking.
- Additionally to this foundational test, we suggest researching what other users have accomplished with overclocking via the Internet. This should give you an idea of the limits of your GPU and the maximum safe setting to protect your hardware.
How To Overclock Using MSI Afterburner
Keep in mind that overclocking carries inherent dangers, and any changes you make to your GPU could potentially brick it, so proceed with caution. Overclocking is a breeze with MSI Afterburner, but you should still use common sense.
Stop immediately and get advice from knowledgeable sources if you’re not sure if you’re pushing the GPU hard enough.
MSI Afterburner’s overclocking follows the tried-and-true overclocking and testing methodology, allowing you to achieve the highest and most stable settings possible. When making adjustments in MSI Afterburner, be sure to click the “Apply” button.
- The first step is to crank up the heat and power settings to their absolute limits. The GPU will run hotter and consume less power with these adjustments compared to its factory settings. Because of this, you shouldn’t be alarmed if the maximum temperature on the slider appears dangerously high; the GPU will never reach the upper limit unless there’s a serious hardware malfunction. These limits are set by the card manufacturers, so they are considered to be safe and pose no threat to the GPU.
- You should raise the core clock speed by a fraction of a second. Every increment up or down the slider represents an increase or decrease of one MHz relative to the factory setting. Increases of 20–30 MHz are suggested. After making changes to the clock speed, be sure to click “Apply.”
- Keep Kombustor active in the background at all times and inspect it for artifacts, flickering glitches, black flashes, and crashes after each update. It’s recommended to give each adjustment a few minutes of watching time.
- If you’re experiencing a consistent stream of visual bugs, you should stop increasing the frame rate. Don’t fret over anything that seems out of the ordinary; this is the GPU’s way of communicating that it’s maxed out. In the event of a crash or black screen, the GPU driver will be reset, allowing you to return to the previous clock speed shortly thereafter.
- By decreasing the CPU’s clock speed by 5 MHz increments, we were able to fix all of Kombustor’s graphical artifacts and bring the game to a stable state. We also suggest trying out any alterations in the context of a particularly taxing game. Turn everything up to maximum to put the GPU to work and stress the new settings. Slow the processor down if it starts giving you trouble.
- The memory clock speed will next undergo the same stress test, but with larger increases. Between 50 and 100 MHz is ideal, as suggested by us.
- If you’re having repeatable graphical problems in Kombustor, try dialing back your computer’s memory clock speed until you find a rate that works. Play the game and see how it works.
- We plan to now run extended tests of the upgraded core clock and memory clock speeds. Launch Kombustor and monitor its behavior for 10 minutes to look for strange artifacts, unexpected crashes, and other issues. Reduce the velocities by 0.1 mph increments until a stable fusion is achieved.
- When you’ve reached a level of stability with which you’re satisfied, you can save your preferences as a profile by selecting the floppy disk icon and then one of the 1–5 profile buttons.
How To Enable The On-Screen Display In MSI Afterburner
- Click the “Monitoring” tab in the settings window to return to the monitoring settings.
- Click the descriptive name under “Active hardware monitoring graphs” to choose the data you’d like to see in OSD. After that, make sure “Properties” is set to “in OSD.” Framerate, graphics processing unit (GPU) temperature, GPU utilization, GPU voltage, and fan speed are all good baseline metrics to check.
- When you fire up a game, the on-screen display (OSD) will update you on the GPU’s status in real time.
- You can set a shortcut key to activate or deactivate the on-screen display (OSD) in the “On-Screen Display” section of the settings. Doing so and assigning it to a seldom-used key like “Insert” or something similar is a good idea.
- If you want to get into the nitty-gritty of customizing the OSD, you can open up RivaTuner Statistics Server by clicking “More” at the bottom of the “On-Screen Display” tab.
How To Set A Fan Profile
- To adjust the fan speed, go to the “Settings” menu in the bottom right corner and then to the “Fan” tab at the top of the resulting window.
- To modify the fan curve, select “Enable user-defined software automatic fan control” from the main menu.
- Simply click anywhere on the curve to create a new point, and then adjust its position and orientation as needed. Select the point you want to delete on the curve, and then press Delete on your keyboard.
- The other choices are unnecessary and can be left alone.
After this point, the curve’s position is a matter of taste. Above 70 to 80 degrees Celsius, the risk of permanent damage increases exponentially, so we recommend running the fan at full blast in these conditions.
If your fans are always humming away, even when the temperature outside is mild, adjusting the profile can help quiet things down. Generally speaking, it’s best to err on the side of caution.
How Do I Install MSI Afterburner?
MSI’s website is where you can get the most up-to-date version of Afterburner. You can skip hunting for obscure versions and just use the installer to get things rolling. An archive of previous releases is available on FileHorse in case you need to use an older version of the software.
You can then launch the setup program from that location. MSI Afterburner and RivaTuner Statistics Server (abbreviated as RTSS) are included in the installer and will prompt you to set them up if you want them. The Real-Time Statistical System (RTSS) is not required for the software to function, but it does provide a neat feature in that it can display statistics and frame rates superimposed over games. That decision is entirely yours to make.
After making your selections, all that’s left to do is launch the installer and follow the on-screen prompts until completion. Congrats! Having followed these steps, MSI Afterburner should now be running on your PC.
How Do I Use MSI Afterburner?
As its name suggests, MSI Afterburner has considerable capabilities. What you can do with it and how to do it is outlined below.
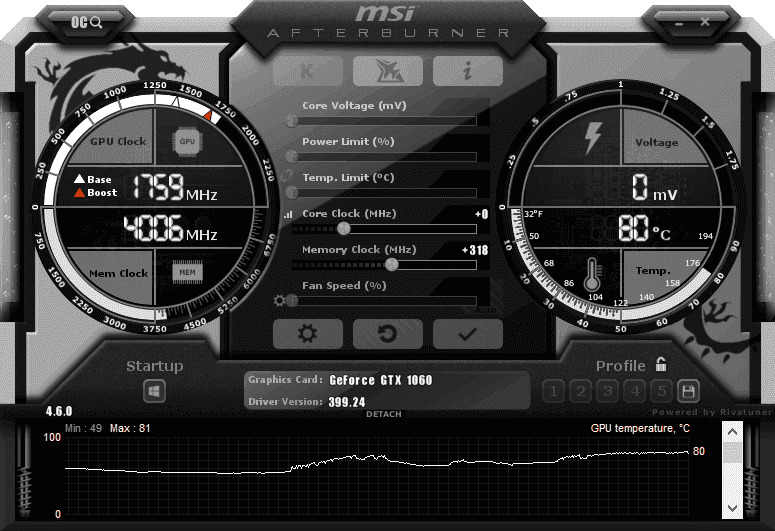
When you first launch the program, you’ll see a user interface (UI) that’s reminiscent of a dashboard in a car. Overlaying a heavy theme, it’s reminiscent of Windows Media Player’s themes from the Windows 98 era.
Information about your GPU, such as its current clock speed and temperature, will be displayed at the top. We’ll get into the specifics of the sliders in the bottom section in a bit, but for now know that they are what allow you to overclock and underclock your GPU as well as make other adjustments.
You’ll find a variety of options along the left side. Clicking on the spaceship icon will take you to the Afterburner website, the “K” icon will launch MSI Kombustor, and the “Information” button will display data about your computer’s central processing unit (CPU) and graphics processing unit (GPU). The OC Scanner tool is next, and it is designed to automatically scan your GPU (using an algorithm developed by Nvidia for the RTX 20 series of cards) and apply the maximum possible overclock to your GPU. From there, you can access the settings menu and the “monitor” tab, which displays a temperature graph for your graphics card.
After that, there’s a list of figures on the right. Profiles is the term for such things. Whatever settings you find optimal for your GPU, you can save them as a “profile,” then load it up with a single click whenever you like.
Xem thêm : Is Nvidia G Sync Worth It Update 07/2026
You can also customize the layout to your liking if the default doesn’t cut it. Simply navigate to the Settings menu and then to the User Interface section, where you can pick from a variety of predefined looks.
How to Modify Your Fan Curve
The fan curve can also be adjusted within the software. You can adjust the fan’s maximum speed and the temperature at which it turns on and off. Just head to your device’s preferences and select the Fan section to get started. Click the switch labeled “Enable user defined software automatic fan control” to turn on this feature. By doing so, the fan curve graph will become visible.
The fan curve can have up to eight additional nodes added to it for personalized cooling. If you want to manually modify the fan curve, remember that a steeper fan curve will keep GPU temperatures lower, but it can also put additional wear and tear on the fans themselves, so find a good middle ground.
How to Limit Your GPU by Power Consumption/Temperature
Overclocking can be accomplished with the help of the Power Limit and Temperature controls, as we mentioned earlier. However, it can also be employed for the purpose of regulating power usage or temperature without incurring a drastic reduction in efficiency.
The sliders should be moved down rather than up for this purpose. If you don’t want your graphics card to use too much juice, for instance, you can set the Power Limit slider to 75% to prevent the card from drawing more power than that.
FAQs
Does MSI Afterburner improve FPS?
The answer is almost certainly yes, MSI Afterburner will raise your frame rate. In fact, there are two ways it can increase your FPS.
To begin, MSI Afterburner has an in-built overclocking facility that can be used to safely and automatically overclock your GPU and, to a lesser extent, your CPU.
This feature is very helpful and can be compared to Intel’s TurboBoost CPU technology, except that it applies to graphics processing units instead of central processing units. It goes as far as possible without causing hardware instability, making it ideal for novices just getting their feet wet in the world of overclocking.
MSI Afterburner’s monitoring system, which displays real-time updates as you engage in some manual overclocking, is the second way it can help you improve your FPS. You’ll be led step-by-step through the process, with the guarantee that your hardware will never be overworked.
Does MSI Afterburner damage GPU?
MSI Afterburner uses a process called OC scanning to determine the specific GPU installed in your system.
As a result, you can rest assured that utilizing the recommended settings for an automatic OC will never result in damage to your GPU. No adjustments that would increase the voltage or temperature thresholds will be suggested.
Yet, overclocking is inherently risky and will always have at least a minor impact on device longevity, so maybe keeping this auto OC on 247 isn’t such a good idea if you really want to optimize the lifespan of your graphics card.
Careless manual overclocking with MSI Afterburner can significantly shorten the lifespan of your graphics card. It provides means for gradually and intuitively pushing the GPU, but users may still go too far.
Afterburner doesn’t limit OC settings, which can be harmful to our GPU given that overclocking is inherently experimental.
MSI Afterburner Opens the Overclock Floodgates
MSI Afterburner is an awesome program that I believe every PC gamer should install. It’s lightweight, and it lets you overclock and otherwise customize your GPU to your heart’s content.
We’ve just given you some suggestions for its use, but this is primarily a toy for those who enjoy tinkering. There may be a small learning curve, but ultimately, it is designed for you to experiment and discover its full potential.
Nguồn: https://gemaga.com
Danh mục: Blog