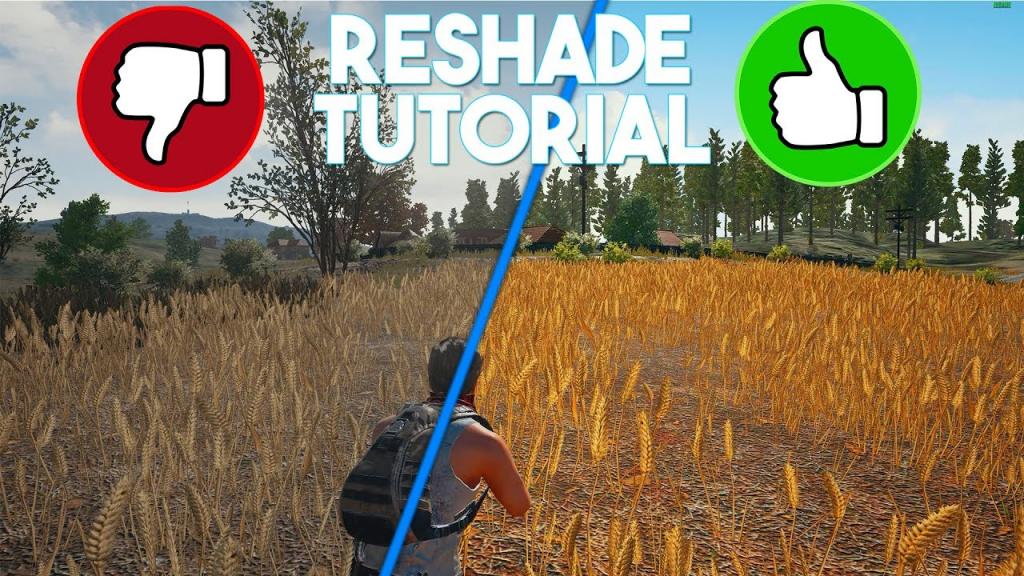
A popular PUBG ReShade mod is PUBG ReShade due to the fact that the game is lacking in color and visibility, making it difficult to see things like adversaries and objects in various areas of the game. PUBG ReShade Settings can be a little tricky to set up and utilize, which is why many people have trouble with the program when it comes to getting it working.
- Pokemon Sword And Shield: How To Get Every Eevee Evolution? Update 08/2026
- How To Monitor Your Gpu And Cpu Temperature Update 08/2026
- How To Fix NVIDIA GeForce Experience Error Code 0x0003? Ultimate Guide Update 08/2026
- When Is The Best Time To Buy Computer Parts? Comprehensive Guide Update 08/2026
- How To Install A New Graphics Card Update 08/2026
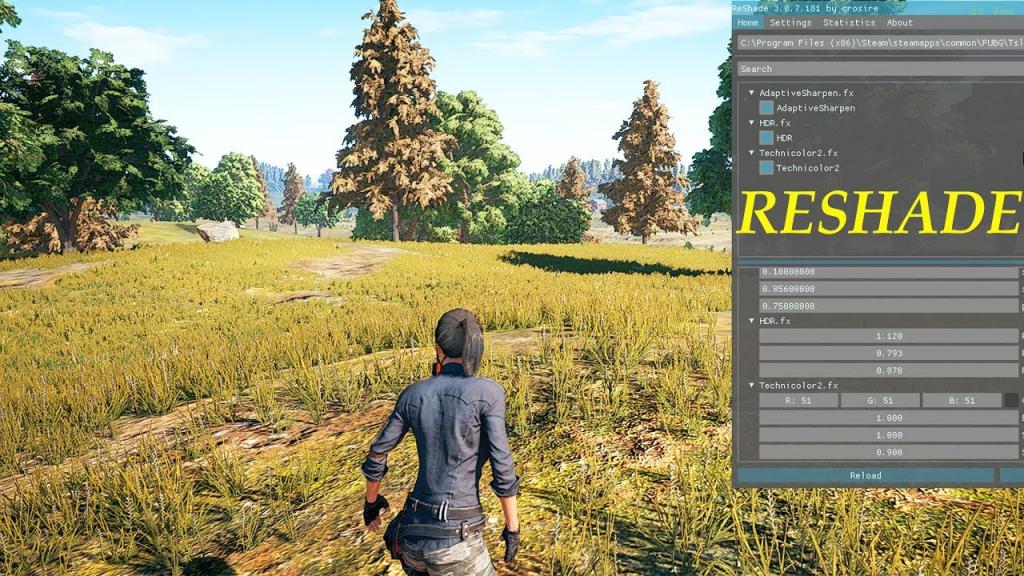
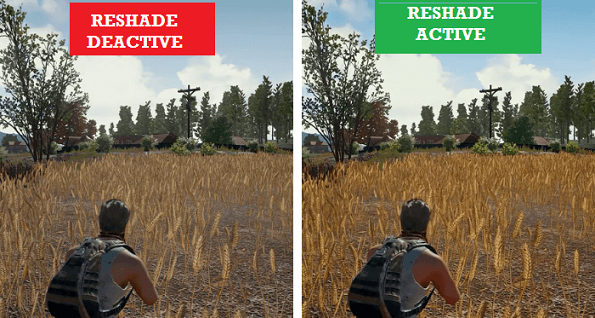
What is Reshade? Reshade is a post-processing tool that enhances the color and lighting of your game. By adjusting the game’s lighting and colors, you may notice objects that might normally be difficult to see, such as foes or rivals.
Bạn đang xem: Pubg Reshade Guide Settings Update 08/2026
What is PUBG Reshade?
Now, you may be wondering what this Reshade for PUBG is all about. Basically, Reshade is an utility that enhances the visual quality of a game, like an add-on. PUBG is a survival game, and it’s difficult to do well in that game if you can’t see clearly. Since you can’t see your foes clearly because of this defect, this shade is a godsend.
PUBG ReShade Settings
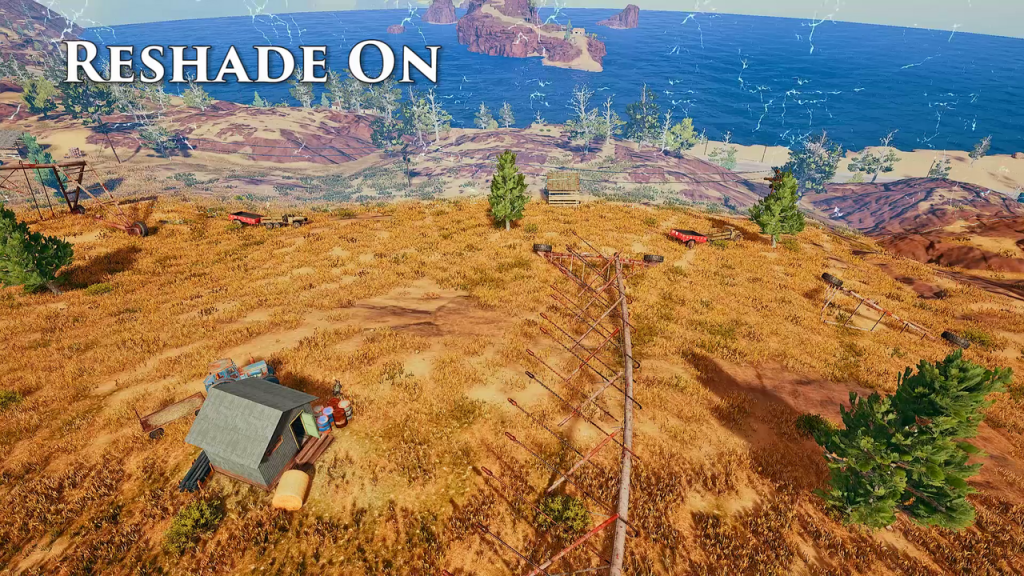
You can improve the game’s texture and color scheme by utilizing ReShade, but you will have to make some sacrifices in the process. You’ll notice a dip in frame rate of between 5 and 10 FPS as a result of this. Consequently, you may not need to install the application if you wish to keep your FPS above boosting color and visibility. As a result, if you have an entry-level GPU, it may be best to turn off your graphics card.
Using PUBG ReShade, you’ll also notice that some of the game’s textures have been masked by the software. Here are the PUBG ReShade settings to follow once you’ve accepted the game’s limitations:
Obtaining and Setting Up the Required Files
Downloading ReShade is a simple process that requires no registration or payment of any kind. Once you’ve found this site and clicked on the purple button to download the program, the next step is to install it using these instructions:
- Once you’ve opened the software you downloaded it to, go to File > Open > Select Game.
- You should be able to select the game by navigating through this. In the Program Files (X86) folder, click on SteamSteamappsCommonPUBGTslGameBinariesWin64Tslgame.exe
- Select Direct 3D 10+ as your rendering API.
- Once you’ve selected “yes,” you’ll be able to download standard effects.
- Select the desired effects by unchecking all shaders.
- Finally, press the “OK” button and you’ll be done.
Step 2: Enhancing Color and Visibility
Your graphics card will have a role to play since it will have the onerous task of managing the effects, but you may start by selecting post-processing effects from those available. Colorfulness, Clarity, LunaSharpen, and Vibrance are some of the effects.
To set up your game, follow these steps:
- You should launch your PBUG as soon as you’ve finished installing and configuring it.
- Pressing SHIFT + F2 will open the ReShade menu in the game, which may be used to change various settings.
- You’ll see a +button at the top of the setup window. After clicking the button, you will be able to enter in a name for the custom option.
- You’ll see the previously selected effects after giving the custom settings a name, and you can then decide which ones to enable.
- When you select the effects you desire by checking the appropriate checkboxes, they will be applied to the game automatically.
- The ReShade Config Window can be minimized by pressing SHIFT + F2 again after following all the procedures.
In order to achieve the desired level of clarity and vibrancy in your colors. Once you’re happy with that, you can experiment with different effects until you find the one that’s right for you, as the results are entirely dependent on the choices you make.
Of course, the most important thing is to make sure you have the appropriate PUBG ReShade settings, because installing ReShade and having poor vision and color quality is pointless.
Note
For your own safety, it’s crucial to know that PUBG has outlawed the use of ReShade in their game. Game makers had previously said that they had no objection to players employing it, but after a crackdown on cheats, they changed their tune and have now outright outlawed the practice altogether.
More than a million accounts were banned as a result of the anti-cheat solution that was implemented in early 2018. Gamers who use the ReShade mod will not be barred from the platform, despite it being prohibited. Instead, they will be unable to play the game unless they uninstall the application. Error messages will pop up as soon as you start the game. You’ll have to download and reload the game if something goes wrong while removing it.
As a result, PUBG Corp has outlawed the use of ReShade because it acts like a cheat application and offers gamers an unfair edge over their opponents.
If this is the case and you’d like to uninstall PUBG ReShade, follow these simple instructions:
- You’ll need to go to the directory and delete some files: SteamSteamAppscommonPUBGTslGameBinariesWin64
- Find and remove the following files—they are your responsibility
— Shaders with reshade (directory)
Both.ini files are required.
It is critical that you uninstall ReShade for PUBG in the manner described above. This is because deleting the wrong files may get the game not to launch properly, that means you will have to download and have it installed again.
Is ReShade Allowed? Will I Get Banned For Using ReShade?
It is critical that you uninstall ReShade for PUBG in the manner described above. This is because deleting the wrong files may get the game not to launch properly, that means you will have to download and have it installed again.
It is critical that you uninstall ReShade for PUBG in the manner described above. This is because deleting the wrong files may get the game not to launch properly, that means you will have to download and have it installed again.
It is critical that you uninstall ReShade for PUBG in the manner described above. This is because deleting the wrong files may get the game not to launch properly, that means you will have to download and have it installed again.
Steps To Install Reshade For PUBG
Reshade Download
Uninstalling ReShade for PUBG requires that you adhere strictly to the instructions provided above. Delete the erroneous files, and you’ll have to download and install the game over again.
- Once you’ve done that, click the purple Download button.
- Once the download is complete, locate the Reshade file and double-click it.
- Next, take the following route: In the Program Files (X86) folder, click on SteamSteamappsCommonPUBGTslGameBinariesWin64
- Select TslGame.exe
- Select Direct3D 10+ from the list.
- Click “Yes” both times when requested.
- This new pop-up will let you to select all of the PUBG effects that you desire.
- It’s best if you pay attention to the following aspects:
— Definition
— Color
It’s called LumaSharpen.
- Once you’ve made your selections, click the “OK” button.”
- Now that you’ve installed Reshade, you’ll need to configure it.
Reshade Configuration
You must configure Reshade before you can see the optimum PUBG settings.
- Begin by opening the game’s client.
- Press SHIFT + F2 to open the Reshade settings window.
- Here, look for the plus (+) sign generally found in the upper right corner and then type new into the box that appears.
- Time to choose the game’s effects; simply check the boxes to do so.
- Press SHIFT + F2 again to delete the configuration window.
- The Reshade will now be automatically activated whenever you launch the PUBG client.
Best Settings for PUBG Reshade FPS
Being on the leaderboard in a game requires a lot of persistence and strategy, as you’re all aware. Since any super gamer recommends high settings, you must have them to be a part of the elite group of players. Once you’ve followed these instructions, you’ll be well on your way to becoming a top layer.
Xem thêm : Are Sound Cards Worth It? Comprehensive Guide Update 08/2026
Enhance the Performance of Your Computer
The first thing you should do is run your computer on high performance rather than balanced.
It’s all about Nvidia.
- You must configure your Nvidia graphics card in this way to achieve the optimum performance.
- Right-click on the desktop and pick NVIDIA from the drop-down menu to open your Nvidia control panel or interface.
- Here is where you may adjust your 3D settings.
- There should be a Power Management Mode choice, and you should set it to Maximum Performance.
- In the Change Resolution section, check sure your computer is running at its native resolution.
- Go to the Refresh Rate menu and set it to Very High.
- For those of you who own a G-Sync Monitor, you can turn it on in the Setup G-Sync menu.
- When using a G-Sync Monitor, go to Manage 3D Settings and turn off Vertical sync.
B). Customize DPI Scaling
To get the most out of your game, it’s important to adjust your DPI scaling to get the best possible performance.
- Simply adhere to the steps outlined below: Windows XP/Vista/Server 2003 SteamsteamappscommonPUBGTslGameBinaries Win64
- As soon as you find it, right-click TslGame.exe to get to the Properties menu.
- Select the Compatibility tab to get started.
- The choice is yours, so go for it. Go to Display scaling on high DPI settings and turn off Override high DPI scaling behavior.
- Select Application from the drop-down menu.
- Simply click OK to save your changes, then monitor the difference in your frame rate.
C). Eliminate DPI Scaling Greying Out
When the Override high DPI scaling behavior is greyed out, it can happen. Here’s an easy fix for the problem:
- Press the Windows key and R to open the Run application.
- To open the Registry Editor, type regedit and press Enter.
- The registry list will be opened, and you can then follow this path: AppCompatFlagsLayers in HKEY CURRENT USER/Software/Microsoft/Windows NT/CurrentVersion
- Add a new string by right-clicking in the layers area and selecting “Add new string.”
- Entering a name is done in the Name field, which is usually: Steam (x86)/Steamapps (common)/PUBG (Binaries)/TslGame (Win64) (TslGame.exe)
- In the Data area, copy the following text: ~HIGHDPIAWARE
- For HIGHDPIAWARE, the tilde sign is required.
- TslGame.exe’s Properties window now shows the option to enable high DPI scaling, which was previously greyed out.
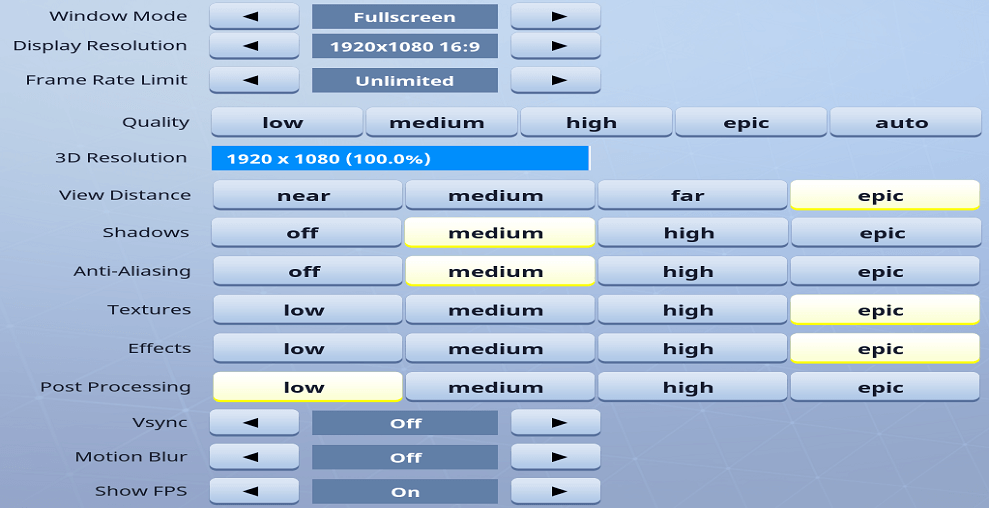
Some Other PUBG Best Reshade Settings
The greater the FPS Camera Fov, the more quickly you can spot the hidden adversaries.
Anti-Aliasing: Try it at ULTRA and see how it performs; if it doesn’t, you can adjust it to your liking.
Post-Processing: reduce it to a minimum, and maintain it there to improve frame rates.
Again, keep the shadows at a minimum. Depending on whether or not you are easily distracted by shadows, you can make the necessary adjustments.
Keep Textures high, and you won’t have to worry about hiding from your foes; they’ll be simple to see because to the better texture.
If you don’t want a frame to skip, keep the effects at a low or even lower setting. To ensure a smooth experience, it is best to keep the settings modest.
Grass and other bushy elements should be kept to a minimum by lowering the foliage setting once more. You’ll be able to notice enemies clearly and accurately if you do this.
PUBG Reshade Not Working
The Reshade feature has been disabled due to a recent PUBG update. This is one of the biggest drawbacks that players are experiencing. The game’s algorithm for detecting cheating has been made public.
Because using a Reshade mod in PUBG is considered cheating, doing so will result in an error notice. The practice has been outlawed by the creators in the interest of maintaining equality for all players, resulting in a PUBG Reshade crash.
Some of the PUBG twitter chats are available in forums or chats on social media networks like Twitter. PUBG Reshade reddit has had similar talks over why the Reshade PUBG ban occurred.
For the time being, there isn’t a specific solution to this problem, but participating in the daily Reshade-recovery experiments on Twitter on PUBG Reddit may give you some optimism.
How To Uninstall Reshade PUBG?
During gameplay, gamers may wonder how to remove Reshade PUBG because of troubles and bugs they encounter. Reshade has the same drawbacks as any other mod or add-on we utilize as a cheat. Because of the potential for incompatibilities, the GPU may be strained.
Reshade may not work for a variety of reasons, including a recent PUBG update that prevents it from working. Reshade is the only choice you have in this case.
It’s okay if you don’t know how to uninstall Reshade because this guide will walk you through the process step-by-step. To uninstall PUBG Reshade, simply follow these steps:
- To begin, locate the path to your game and navigate to the Reshade folder.
- You’ll find the four files here titled as follows:
d3d8.dll and d3d8.ini files
d3d9.dll and d3d9.ini are the two files involved.
dxgi.dll and dxgi.ini files
opengl32.dll and opengl32.ini.
- The only thing you need to do after finding them is to remove them.
- Now that you know how to uninstall Reshade PUBG, you can return to the game and enjoy it normally.
Sometimes it is hard to see enemies in PUBG
It’s not hard to see how this remark is relevant, as many gamers are seeking ways to improve their chances of getting specific items in the game. Nevertheless, if you don’t want to use Reshade, which is discussed in this post, you can get better graphics.
This post is not for you if you’re looking for a better frame rate because the Reshade somewhat reduces the FPS. It’s not that it’s lowered, but it does have an effect. However, you can still improve your graphics by adjusting the overall vibrancy of the image.
NVIDIA’s Digital Vibrance is known as Color Saturation for AMD’s Color Saturation. VibranceGUI is a program that may be used to activate and deactivate game settings.
For better graphics and FPS, look no further than this page. When you’re done with the reading instructions, your visuals will look sharper and have less blur. However, there are gamers who dislike bright colors.
Reshade for PlayerUnknown’s BattleGrounds can be installed using this video tutorial.
Xem thêm : What Are NVIDIA CUDA Cores? How Many CUDA Cores Do You Need? Update 08/2026
A lot of individuals are unsure if they will be banned if they use Reshade. However, this isn’t actually true. Reshade can be used in the game, according to a PlayerUnknown’s official statement.
The installation guide for PUBG Reshade
- Reshade’s official webpage may be found here.
- The purple Download button is now available.
- After the download is complete, select a game from the list.
- Go to the game’s directory and start the game.
C:Program Files (x86)SteamsteamappscommonPUBGTslGameBinariesWin64 is an example of this.
- Select the TslGame.exe and choose Direct3D 10+ from the menu.
- When you click Yes, you’ll see two messages appear.
- Once you’ve clicked, a menu will appear with all of the PUBG-specific effects you may add to your game. It has some nice effects, and it’s best suited for PUBG.
- Clarity
- Colourfulness
- LunaSharpen
- Vibrance
- After pressing the OK button, the process is finished.
Configuration guide for PUBG ReShade
- ReShade’s configuration window may be opened by pressing SHIFT + F2 when playing PUBG.
- To create a new preset, click on the + sign at the top right corner and type new in the text field, then press the Enter key.
- Afterwards, you may select the effects you want to use in a game by ticking the checkbox next to the effect.
- To minimize the ReShade configuration window, press SHIFT + F2.
- Every time you start the game, the effects you’ve selected will be loaded.
So How the Visibility is increased in PUBG
In addition, your PUBG experience will be enhanced if your system is equipped with adequate peripherals and hardware.
A good monitor, a good headset, and a good mouse are the first items on this list.
Downloading and Installing Reshade
If you’re looking for a simple way to download the game without having to fill out any surveys or pay any fees, we’ve got good news for you. Don’t hesitate to download it because it’s completely free. Try out this Reshading tutorial first.
Installing Reshade for PlayerUnknown’s Battlegrounds is as simple as downloading the newest version from the link provided above and following the installation instructions that follow.
Installing Reshade for PUBG
Step 1: Open Reshade.exe by clicking on it once it has finished downloading. A window will appear requesting you to select a game. It’s there.
The TslGame.exe, which is located in the PUBG’s game directory, must be selected in a file browsing window, which may be found under C drive and Steam apps. Try this path ==> C:Program Files (X86)SteamSteamapps…
Try this if you can’t find the TslGame.exe file!
Once Steam is installed, check for the Steamapps and then common/PUBG/TslGames and so on as mentioned above if you installed it on a different drive.
When you see the TslGame.exe file, you can search for it by pressing the Windows button and typing in “TslGame” in the search field. To open a file, simply right-click on it and then select Open File Location from the context menu that appears. As a result, Reshade will navigate through all the folders to open the file location for you, and now you have to remember that Path when you open TslGame.exe through Reshade’s Select Game option.
Selecting the Rendering API is the next step. Direct 3D 10+ is the first of three choices that follow.
Finally, you’ll be asked to answer yes to both of the two questions that will pop up.
Step 5: Select the post-processing effects you want to utilize to improve your game’s visual appeal and make it easier to see your opponents.
Here are the recommended effects that you should use:
- Vibrance
- LunaSharpen
- Clarity
- Colorfulness
- HDR stands for high dynamic range (Optional)
Your graphics card’s capacity to handle these post-processing effects is still a factor to consider. In addition, if you aren’t satisfied with the outcome or want a more accentuated look, you can experiment with various effects factors.
Enabling Reshade effects within the PUBG Game
- Open the Game first.
- As a last step, hit the SHIFT + F2 keys simultaneously to bring up the Reshade config menu in the game.
- You’ll notice a + button at the top of the Reshade Config window now. It’s there. Start typing in the name of your custom Reshade preset here.
- Once you’ve given your custom preset a name, scroll down to see the effects you chose earlier in the process. After this, we’ll let them.
- Select all your effects by clicking the checkboxes, and they will be applied every time you launch the game from now on.
- The Reshade Config window can be minimized by pressing SHIFT + F2.
That being stated, this was the final step in adding post-processing effects and enhancing PUBG’s color palette. In addition, you can experiment with the numerous effect combinations that we discussed in Step 5 of the Reshade section installation.
In addition to the ever-expanding battle royal game, PUBG, mobile devices have also seen a large amount of downloads. This section of the PUBG settings guide will focus on optimizing the game’s frame rate and graphics for a more pleasurable visual experience.
This will necessitate editing the custom config files. There’s no harm in generating an extra copy of the original settings file in case you have doubts about our updated recommendations. ES file explorer can also be downloaded and installed on your Android phone.
Take a look at this path ==> in Es file explorer. UserCustom.ini: SD card > Android > Data > com.tencent.ig > Shadow Tracker: Shadow-Tracker > UE4Games: Shadow Tracker: Shadow-Tracker- > Saved
Make a copy of the original UserCustom.ini and put it in a new folder on your phone in case something goes wrong or something doesn’t work.
Once the backup is complete, you’ll be able to download the updated UserCustom.ini file from the link provided in this section.
Step 4: Paste the newly downloaded UserCustom.ini file by going to the following URL ==> Android > Data > tencent.ig > com.tencent.ig/files/UE4Games/Shadow-Tracker/Shadow-Tracker-Saved/Config (–UserCustom.ini–) – New Downloaded
UserCustom.ini (Note: Do not call it newly downloaded usercustom.ini, retain the name comparable to the Original file)
This is the final step before you begin playing the game on your Android device.
Go to the game’s options and choose Ultra HD for the graphics, Frame rate of high quality, and style of realistic.
If you’re playing PUBG on an Android smartphone, this should provide you the finest visual experience.
FAQS:
How to improve visibility in PUBG?
To access the ReShade control panel, start PUBG and press “SHIFT+F2.” The shaders can be activated and deactivated in this section. The “Settings” button in ReShade must be clicked. Select “Performance” from the “Usage Mode” drop-down menu.
What does ReShade mean?
In a wide variety of games, ReShade is a graphics post-processing rejigger that allows players to change their color and lighting settings on-the-fly.
Why can’t I spot enemies in PUBG?
You have two options: either set up an ambush or play it safe. PUBG Mobile, on the other hand, has a problem with spotting other players. In-game settings or bad tactics may be at blame.
Conclusion:
It’s possible that you won’t be able to use the PUBG ReShade settings listed above, even though they usually increase visibility and color quality in the game. PlayerUnknown’s Battlegrounds, as previously indicated, has discontinued the use of this particular program. Your game may fail to launch even if you are successful in installing ReShade and configuring it properly.
Nguồn: https://gemaga.com
Danh mục: Guide