The power of weapons in Genshin Impact is roughly proportional to how uncommon they are. A 5* weapon is superior to a 4* weapon in any situation. And if you have other choices, you shouldn’t waste time with a 3* weapon. That’s all there is to it.
Their high ATK is a major factor in this. The ATK stat is used as a multiplier for most abilities. Simply put, rarer weapons have a higher attack power (ATK) output than common ones.
Bạn đang xem: Genshin Impact Weapon Tier List Update 07/2026
In addition, a character’s base attack is determined solely by their main stat ATK from weapons and their innate ATK from character levels.
When calculating damage, only the character’s base attack is factored into weapons and artifacts that list ATK% as a primary or secondary stat. Therefore, the greater the weapon’s ATK number, the greater the DMG you will receive from all the ATK bonuses.
For the benefit of new Free-to-Play players, we still ranked all 3* weapons.
After all, not every three-star film is created equal. The 3* Harbinger of Dawn Sword is Albedo’s best in slot weapon, and it routinely outperforms 5* weapons. However, these instances are not the norm.
What is Genshin Impact?
Genshin Impact is a free-roaming action role-playing game that makes use of “gacha” mechanics (which we’ll get into later). Chinese developer and publisher miHoYo is responsible for the game. It allows players to take charge of a large party, each member of which has their own unique set of skills, arsenal, and playstyle. Throughout the game’s open world and dungeons, players engage in real-time combat using a variety of ranged, melee, and elemental attacks against a wide variety of enemies.
Genshin Impact is a multiplayer-focused MMORPG that can only be played online. It features many of the same elements as popular games as a service, such as daily quests, rewards, and loot, to keep players coming back for more.

Genshin Impact has been likened to an anime version of The Legend of Zelda: Breath of the Wild by critics and players alike. Many of the settings and locations are similar between the two games, so it’s a valid comparison. The ability to climb almost any surface in Genshin is most similar to Breath of the Wild, with the amount of climbing being limited by a stamina meter. Another parallel is that once you reach the peak of your destination, you can simply glide off and continue your rapid exploration of the world below.
To simply label Genshin Impact a “Breath of the Wild clone,” however, would be unfair.
Now let’s talk about the game’s main “gacha” features. The “gacha” component refers to the random loot box or slot machine style of monetization used in the game. Characters, loot, and equipment packs can be purchased with in-game currency (or real money) and contain random items of varying rarity.
It’s possible to get the desired character on your first try, or it could take hundreds of hours (and a lot of money) to get them. It feels like “luck of the draw” because different characters and items have different drop rates. But you can also get characters just by playing the game normally. However, players will spend hundreds of dollars on currency to get their hands on the most coveted items or characters.
Banners for individual characters change at various points in the game’s lifespan. The higher drop rate for these characters is intended to keep players engaged. Sometimes after a character has been pushed during a Banner, the community will re-roll them, giving them another shot at getting the character. In a nutshell, the randomness is the game’s primary method of making money off of players.
What platforms is Genshin Impact available on?
Genshin Impact is currently playable on PC, Android, iOS, PS4, PS5, and PS Vita, with a Nintendo Switch port in the works. The fact that people who play it on PS4, PS5, PC, or mobile can all join in on the fun together is a big reason for the game’s popularity. Genshin Impact combines the best features of console gaming with the ubiquity of mobile games, giving players the best of both worlds.
However, if you own an Xbox, you won’t be able to play Genshin Impact, as the studio miHoYo has no plans to port the game there. We wouldn’t rule out a port just yet, though, as Xbox’s popularity has skyrocketed thanks to its first-party output and Game Pass.
At launch, it was clear that mobile was the game’s primary focus, as the controls on console often felt clumsy. The game’s design clearly prioritized touch screens, as evidenced by the multiple screens required to access the map, the confusing menu structure, and the inability to map the controls (at least on console). Fans are anticipating the Nintendo Switch release because it has the potential to add touch screen controls and even gyro support.
Is Genshin Impact multiplayer?
In a nutshell, online co-op multiplayer is supported in Genshin Impact (again, across PS4, PS5, PC, and mobile devices). It supports four-player squads, so you can play with as many pals as you like. There’s a wide open world to discover, quests to complete, and dungeons to explore in this game. In many zones, you’ll encounter formidable monsters that are much simpler to take down with a group.
However, if you don’t play very often, getting to Adventure Rank 16—the minimum requirement for playing with friends—can feel like a bit of a grind. You can then invite up to two other players to your game, or host your own game with up to three players. You don’t need full squads of four to play, though. In co-op mode, only the host can open chests and collectibles, and you can’t participate in story quests. It therefore has some restrictions.
What’s the gameplay like?
Genshin Impact’s moment-to-moment gameplay involves a wide variety of quests that send you scouring the expansive world map, completing dungeons, and, of course, fighting enemies. In combat, players can instantly swap between different members of their party, giving them access to a wide variety of attacks. When it comes to fighting, some characters are better at close quarters than others are at long range.
In order to progress through the game, you must discover and open all of the game’s dungeons, as well as fast-travel points, better equipment, collectibles, and more. When you clear one of these dungeons, you’ll be rewarded with rare loot. There are usually prerequisites to enter a dungeon, and once inside, you’ll face a variety of foes and puzzles.
The ability to chain elemental attacks (called Elemental Reactions in-game) to create a unique effect is one of the game’s more intriguing mechanics. For instance, you can freeze your opponent in place by combining the Hydro and Cryo elements. You could also try using the fire-based elements Pyro and Dendro. Players are encouraged to play around with these variables to see what happens.
Crafting equipment that will help you in your quests is strongly encouraged as you amass resources. Food, crafting materials, weapons, equipment, and more are all available for purchase. Almost everything that could be desired in a massive open-world RPG is present.
There are numerous traditional JRPG elements present, including a party system, elemental combat, and a vast world to explore. You’ll need to practice quickly swapping between party members because you can use them in a chain to unleash devastating combos on your enemies. This is true whether you’re preparing for a dungeon or a story mission in the open world; knowing the types of enemies you’ll face will help you select the best party members.
Is Genshin Impact free?
We brought up the gacha mechanics, which are similar to loot boxes and would normally be a cause for concern, but given that Genshin Impact is free to play, players have been understanding of this method of monetization. Actually, you can have a great time playing the whole way through without spending a dime. In-game purchases are available in Genshin Impact, but unlike in many free-to-play games, they don’t make you feel obligated to spend real money.
Unlike many other games that label themselves as “free-to-play,” it actually is free to play when referred to by players.
Does Genshin Impact have DLC?
Genshin Impact has a wealth of downloadable content, including a variety of currencies, playable characters, and weapons and armor. Again, none of this content is mandatory or even suggested unless explicitly requested. As a game as a service, however, it receives free updates on a regular basis that add new features. This consists of supplemental missions, explorable new zones, and time-sensitive special events. Offering both free and premium content, it has everything needed to be a successful service-based game.
Every five or six weeks, new content appears on Genshin Impact. In fact, everyone is getting ready for the launch of Genshin Impact Version 2.3 at the end of this month. If you’re thinking about diving in, now is a great time because it coincides with the release of fresh content like new characters, weapons, and events.
What is the Battle Pass?
Finally, since the battle pass is such an integral part of Genshin Impact’s loot system, we’ll discuss it. A battle pass is something you should be familiar with if you’ve played games like Fortnite or Call of Duty: Warzone. It’s essentially a seasonal ranking system where you earn bonuses as you progress and start over at the beginning of each new season. As you progress through the battle pass, you’ll unlock new rewards, such as skins, weapons, and more.
Combat passes come in two varieties in Genshin: The free Sojourner’s Battle Pass is one option, and it grants benefits every ten levels. For an additional ten dollars, you can purchase the Gnostic Hymn Battle Pass, which includes everything in the Sojourner’s Battle Pass and more, including additional upgrade materials, Hero’s Wit, Mora, and Mystic Enchantment Ores. Offering both a free and a paid version of the battle pass demonstrates miHoYo’s dedication to customer satisfaction. Many games as a service charge for battle passes, so players are grateful to Genshin for making them available for free.
You’ll need to level up your character to Adventure Rank 20 before you can use the battle passes in Genshin. But the payoff is substantial afterward. The season in which you earn levels in a given battle pass is the only time during which you will receive those levels (though you will retain any rewards you have earned). Given the game’s relative youth, it stands to reason that the seasonal content will develop over time, as it does in many other games of this type.
How Should You Evaluate Weapons?
It’s crucial to consider the stats your character requires before settling on a weapon. Each weapon also has a unique substat, such as Elemental Mastery, ATK%, DEF%, HP%, CRIT Rate, CRIT DMG, Elemental Recharge, or Physical DMG in addition to the flat ATK it provides.
Choose a weapon with a substat that fills in a hole in your stats left by artifacts unless you’re using the best weapon for your character. This will help you develop into a more complete person.
Last but not least, every weapon also has a hidden effect. The significance of these background influences may be negligible or enormous.
Refining these effects by feeding them duplicate items can boost their effectiveness by a factor of up to four. Not in the enhance window, though! You can level up your weapons in the enhance window, and you can refine them in the refine window.
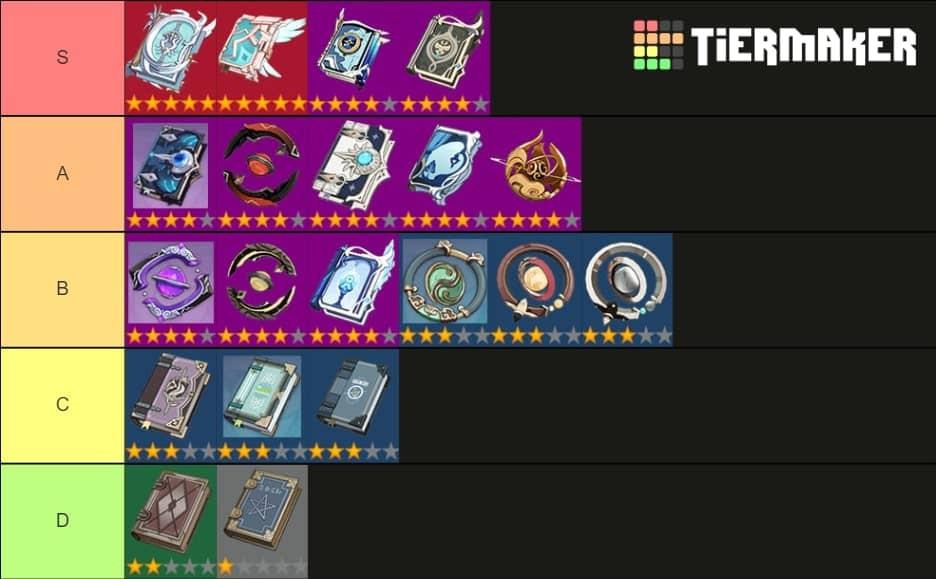
Ranking Criteria
We took into account flat ATK, substats, and passives when making this weapon tier list, and you can see the results of our hard work. At level 1, we will display the weapon’s ATK value.
This makes it simple to compare the damage of different weapons without having to account for their relative rarity, as all weapons use the same multipliers as they level up.
We also considered how many different characters would benefit from using each weapon. A weapon receives a lower rating if it works well for only one or two characters but is rejected by the rest of the playable cast.
Furthermore, if multiple weapons perform the same function (for example, Energy Recharge for supports), we attempted to rank them so that the clear winners would be obvious.
At long last, it must be made clear that all weapons of a given tier are considered equivalent. We did not always score weapons in a given tier relative to one another, despite how their placement might make it seem. After all, each tier will have its share of defensive and offensive weapons, and there is no fair way to compare them.
Since comparing a Claymore to a Bow is irrelevant, we made a distinct tier list for each weapon category to keep things clear and understandable.
Claymores
S-Tier
Some 5* weapons are superior to others. You won’t find finer Claymores anywhere.
Wolf’s Gravestone
ATK: 46
ATK Percentage Breakdown
Adds 20/25/30/35/40 percent to attack power passively. Each member of the party gains 40/50/60/70/80% Base ATK for 12s after successfully attacking an enemy with less than 30% HP. A maximum of once every 30 years.
Every damage dealer covets Wolf’s Gravestone, a legendary Claymore. It has a proc that can increase the entire party’s Base Attack Power, and both its substat and passive increase ATK%.
Expanding Foundation The addition of ATK makes all of your multipliers more effective. Therefore, despite the fact that this weapon appears to deal less damage than other 5* Claymores, it likely deals more damage overall. To proc the passive, even supporters won’t mind having it.
Skyward Pride
ATK: 48
Substat: Recharging the Battery
Passively, your total DMG is 8/10/12/14/16 percent higher. Creates a vacuum blade that deals 80/100/120/140/160% Physical DMG to enemies in its path after using an Elemental Burst, Normal or Charged Attack on a hit. Uses up 8 vacuum blades or 20 seconds.
Skyward Pride deals less damage than Wolf’s Gravestone overall despite dealing more damage at the base level.
This is due to the fact that it is not a weapon meant for use by damage dealers. Both the Energy Recharge and the entertaining passive are better suited to supporting roles. And any backup would be delighted to don this gear.
A-Tier
The potential for S-Tier exists in these 5* Claymores, but they aren’t quite as flexible.
The Unforged
ATK: 46
Breakdown: Average Team Kill Percentage
Passive: Increases Shield Strength by 20/25/30/35/40%, and increases Attack Power by 4/5/6/7/8% for 8s whenever you deal damage to an opponent. Only allow up to 5 stacks. Limit of once every 0.3 seconds. This effect on ATK while shielded is amplified by a factor of 100.
If you can build up The Unforged to maximum stacks and keep a shield up, its damage output will exceed that of Wolf’s Gravestone. But here’s the catch: only Noelle, who can get just as much use out of an r5 Whiteblind at c6, is one of the few Claymore characters designed around shield use.
The shield’s support can be anything, of course. Unfortunately, this weapon’s lengthy startup and construction times drop it to A-Tier.
Song of Broken Pines
ATK: 49
Physical DMG Substat
Part of the ‘Millennial Movement’ that drifts where the winds take it. Increases Attack Power by 16/20/24/28/32% and grants a Sigil of Whispers whenever a Normal or Charged Attack causes damage. Every 0.3 seconds, you can use this effect once.
You can grant your entire party the “Millennial Movement: Banner-Hymn” effect for 12 seconds if you have four Sigils of Whispers in your possession. Increases Normal ATK SPD by 12/15/18/21/24% and increases ATK by 20/25/30/35/40% with “Millennial Movement: Banner-Hymn.”
– For 20 seconds after this effect is activated, no new Sigils of Whispers will be gained. The “Millennial Movement” has many effects, but buffs of the same type do not stack.
The Song of Broken Pines only provides 3 more DMG than Wolf’s Gravestone or the Unforged at level 1, but that difference grows to a significant amount by level 90!
It’s preferable to focus on multiple attributes, so you get both Physical DMG and ATK%. Proccing the passive has the added effect of increasing Normal ATK speed, making all Claymore users’ attacks as fast as Razor’s Burst. This weapon isn’t S-Tier because some players don’t like using it to deal physical damage.
B-Tier
These 4* Claymores are the most consistent of any in the game.
Serpent Spine
ATK: 42
CRIT Rate Substatistic
The passive effect increases damage dealt by 6%, taken by 3%, and time on the field by 9% for every 4 seconds. There is a maximum of five stacks of this effect, and it does not reset when the character leaves the field or takes damage.
The A-List could have accommodated Serpent’s Spine. The best possible weapon substat is Critical Hit Rate. The Serpent Spine also scales very well in terms of damage. Additional refinements, which can be obtained reliably by purchasing the Battle Pass, also provide a significant boost to DMG. Its r5 damage is higher than that of some 5* weapons.
The difficulty of avoiding damage in the late game is a major factor in its placement in Tier 2. You won’t just have to watch out for enemies and environmental hazards in the upper Abyss Floors. And now that bleed mechanics have been implemented, not even Zhongli’s shield can protect you from them. And each injury, no matter how minor, will exacerbate the Serpent Spine. A high-risk, potentially high-reward weapon, in a nutshell.
Akuoumaru
ATK: 42
ATK Percentage Breakdown
This weapon has a passive effect that raises the user’s Elemental Burst damage by 0.12/0.15/0.18/0.21/0.24% for every point of the party’s total maximum Energy capacity. This method can boost Elemental Burst DMG by up to 40/50/60/70/80%.
Amuoumaru is a refined 5* for characters whose only goal is to boost the damage of their Elemental Burst. Put this on Beidou and watch in awe as massive purple DMG numbers flood the screen, thanks to her godlike off-field Burst DPS that keeps her relevant despite being an Electro character.
That doesn’t mean right clickers can’t benefit from the weapon. You can still deal respectable 4* damage with your right clicker if you have a high base ATK and a high ATK% scaling. However, the following choice is optimal for increasing their DMG:
Prototype Archaic
ATK: 44
At-Kick Percentage (Section)
Passive: When you land a Normal or Charged Attack, there is a 50% chance that nearby enemies will take additional damage equal to 240/300/360/420/480% of your Attack power. Limit of once every 15 seconds.
When it comes to 4* Claymores, Prototype Animus is one of the safest options. The ATK% substatistic is useful for everyone.
Critting with the passive proc is great fun for damage dealers. And support characters can use it to get off a few swings before proccing the extra damage and then leaving the field.
Favonius Greatsword
ATK: 41
Recharging of Energy Systems
There is a 60% 70% 80% 90% 100% chance that a CRIT hit will create an Elemental Orb, restoring 6 Energy to the character. Limited to once every 12s, 10.5s, 9s, 7.5s, or 6s.
With respectable raw stats, Energy Recharge, and an inbuilt method to speed up energy acquisition, Favonius Greatsword is the best choice among support Claymores.
Blackcliff Slasher
ATK: 42
CRIT DMG Substat
ATK is passively increased by 12/15/18/21/24% after a successful kill for 30 seconds. There can be a maximum of three stacks of this effect, and each stack lasts for a different amount of time.
A weapon with high CRIT DMG and an in-built method of increasing ATK% that is simple to refine to level 5?
Count us in!
The Blackcliff Slasher, in contrast to the Royal Greatsword, is worthy of a Starglitter. When fully stacked, this weapon’s damage is almost on par with that of a 5*. Combatting Bosses renders the passive completely useless.
C-Tier
The right illumination brings out the best in these Claymores.
Whiteblind
ATK: 42
DEF: Substat
Passive: Your Base Attack and Defense will increase by 6/7.5/9/10.5/12% for 6s after a Normal or Charged Attack hits. Don’t exceed a maximum of four stacks. Limit of once every 0.5 seconds.
Whiteblind is the only 4* weapon with DEF% as a substat, making it a Claymore that most players try to avoid at all costs.
You can use this weapon with a little more confidence knowing that your Base Attack and Defense have been increased thanks to the passive. However, a c6 Noelle can make it into an A-Tier weapon.
Luxurious Sea-Lord
ATK: 41
ATK Percentage Breakdown
Increases the damage done by Elemental Bursts by 12/15/18/21/14% passively. A giant tuna will charge at your foes, dealing area-of-effect damage equal to 100, 125, 150, 175, or 200% of your attack power if Elemental Burst hits. Once every 15s, this effect can take place.
A heavy sigh.
The weapon is not terrible. When it comes to Burst, most Claymore users prefer it over Prototype Archaic. The difference is so slight that you shouldn’t bother if you already have a Prototype Archaic. Because Akuoumaru can provide a larger Burst DMG bonus at r1 than the Sea-lord can at r5, the Sea-lord has been demoted to C-Tier.
We are grateful for your help. You can knock yourself out if you want a meme weapon in your game, but if you don’t want one, you’re not wasting anything by not using it.
Katsuragikiri Nagamasa
ATK: 42
Recharging the Power Source
Passive: Deals 6/7.5/9/10.5/12% more damage with Elemental Skills. Damage from Elemental Skill costs 3 Energy, but the user regains 3/3.5/4/4.5/5 Energy every 2 seconds for the next 6 seconds. Once every 10s, this effect can take place. Activation is possible even if the character is currently off the field.
The Inazuma Claymore, which can be crafted, is more impressive on paper than in use. Even so, only Beidou can fully take advantage of the passive, making it a fantastic choice for Claymore users in need of Energy Recharge. The Nagamasa is a weapon to keep an eye on, as its value can easily increase as a result of the introduction of new Claymore characters.
Snow-Tombed Starsilver
ATK: 44
Physical DMG Substat
Passive: There is a 60/70/80/90/100% chance that an Everfrost Icicle will form and fall on an opponent after a Normal or Charged Attack hits them, dealing 80/95/110/125/140% Area of Effect Attack Damage.
Cryo causes 200/240/280/320/360% Attack Damage to foes. Limit of once every 10 seconds.
Compared to the Prototype Archaic, Snow-Tombed Starsilver usually performs poorly. Only Cryo Physical DMG characters, like Eula, will find this appealing.
We just don’t see why you would choose this over the Archaic, considering that both weapons are craftable and Northlander Claymore Billets, which are used to craft Claymores, have terrible drop rates.
Sacrificial Greatsword
ATK: 44
Recharging of Energy Systems
Passive: Your Elemental Skill has a 40/50/60/70/80% chance to end its own CD after dealing damage to an opponent. Exactly once every 30s, 26s, 22s, 18s, or 14s.
With Elemental Skill-focused characters like Chongyun, Sacrificial Greatsword is a solid B-Tier support Claymore.
However, the Favonius Greatsword is the preferred choice of most Claymore backers in need of an Energy Recharge weapon.
Lithic Blade
ATK: 42
ATK Percentage Breakdown
The user of this weapon receives a passive 7/8/9/10/11% ATK buff and a 3/4/5/6/7% CRIT Rate buff for every character in the game that was born in Liyue. The multiplicity of this effect is up to 4.
It’s possible to abuse Lithic Blade, a 4*, with the right build. This is possible. It provides a CRIT Rate of 12–28% when used in an all-Liyue build.
Just for that alone, it would be considered a B-Tier refinement. However, the weapon is only useful under certain conditions, and it requires you to construct your entire team around it. However, unlike most weapons, it improves with practice.
Skyrider Greatsword
ATK: 39
DMG, Phys., Substat
Passive: Attack Power is increased by 6/7/8/9/10% for 6 seconds after any Normal or Charged Attack hits. There is a limit of four stacks. Limit of once every 0.5 seconds.
Are you taken aback by the prominence of a 3* weapon on this list? If you’re looking for a 3* Claymore, look no further than the Skyrider Greatsword.
It has a low base damage, but its passive increases attack power by 40% if you stack it. The obvious presumption is that you already possess this weapon at r5.
D-Tier
These Claymores are better than nothing, but you should still do your best to avoid them.
The Bell
ATK: 42
HP Percentage Breakdown
Taken damage passively generates a shield capable of soaking up damage equal to 20/23/26/29/32% of maximum health. This shield can be activated once every 45 seconds, and it will remain in place for 10 seconds or until broken. The character’s DMG is increased by 12/15/18/21/24% while the shield is up.
The Bell is universally acknowledged as the game’s worst 4* weapon, and with good reason.
Claymore characters aren’t interested in maximizing their health percentage, and they’d rather not proc a shield every so often if they can help it. It’s possible that a 3* Claymore would be preferable to the Bell, depending on the character.
Royal Greatsword
ATK: 43
Type of Data: ATK Percent
Inflicting damage on an opponent passively raises your CRIT Rate by 8%, 10%, 14%, or 16%. The maximum number of stacks is 5. All stacks are destroyed on a CRIT hit.
One of the two Claymores that can be traded for the rare commodity known as Starglitter is the Royal Greatsword.
If it didn’t require Starglitter, it’d be a C at best. Starglitter is overpriced if it guarantees a crit every few hits even without a high CRIT Rate.
Rainslasher
ATK: 42
Mastery of the Elements – Substat
Damage dealt to enemies by Hydro or Electro is increased by 20/25/30/35/40% passively.
This Claymore is at its most effective when used against foes who are afflicted with either Hydro or Electro. However, the underlying stat here is Elemental Mastery, which boosts the damage done by Elemental Reactions.
Elemental afflictions could be cured by procing Elemental Reactions. Can you see where I’m going wrong? No way! We are aware that Electro-Charged does not cure ailments, but it is still the worst reaction possible.
Debate Club
ATK: 39
ATK Percentage Breakdown
Passive: After using an Elemental Skill, Normal or Charged Attacks that hit deal an extra 60%, 75%, 90%, 105%, or 120% of their attack power. The duration of the effect is 15 seconds. Every three seconds, DMG is disabled.
Miniature Prototype Archaic best describes Debate Club. It’s the best choice for new Free-to-Play players lacking 4* options for their Claymore characters.
E-Tier
Please don’t…
White Iron Greatsword
ATK: 39
DEF: Substat
When you defeat an opponent, your health returns by 8/10/12/14/16% passively.
Noelle is the only character who cares about Defense Enhancement (DEF), and even F2P players can make her a Whiteblind for no cost.
Quartz
ATK: 40
Mastery of the Elements – Substat
Increases Base ATK by 20/25/30/35/40% for 12s after inflicting Overloaded, Melt, Burning, Vaporize, or a Pyro-infused Swirl.
While the sword’s ability to boost Base ATK is incredible, it’s not enough to justify purchasing it.
Ferrous Shadow
ATK: 39
Paragraph: Highest Pass Rate
Passive: When health is below 70%, 30%, 35%, 40%, or 45%, Charged Attacks deal 30%, 35%, 40%, 45%, or 50% more damage and are much more difficult to interrupt.
The Charged Attack DPS increase isn’t enough to make up for the Stamina cost in the HP% substat.
Bloodtainted Greatsword
ATK: 38
Elemental Prowess as a Substat
DPS against foes hit by Pyro or Electro is increased passively by 12/15/18/21/24%.
The Rainslasher is already a weapon of the lowest tier, and this one is objectively worse.
Bows
S-Tier
All bows rated 5 stars are excellent, but these are the best.
Skyward Harp
ATK: 48
CRIT Rate, a Breakdown
Increases CRIT DMG by 20%, 25%, 30%, 35%, or 40% passively. When a target is hit, there is a 60% 70% 80% 90% 100% chance to deal 125% of their Physical ATK in damage in a small area around them. Exactly once every 4s, 3.5s, 3s, 2.5s, or 2s.
The Skyward Harp has been heralded as the ultimate Skyward weapon. Having CRIT Rate as a secondary stat is largely responsible for this.
The passive not only boosts CRIT DMG, but also gives crits a chance to deal additional damage in a small area of effect every few seconds. Nothing could possibly top this moment. Although there are other 5* bows that can deal more damage in the right hands, none of them are as reliable as the Skyward Harp.
Elegy of the End
ATK: 46
Recharging of Energy Systems
Inactive: A drifting member of the “Millennial Movement.” Improves your mastery of elements by 60/75/90/105/120. This weapon grants the wielder a Sigil of Remembrance whenever one of their Elemental Skills or Elemental Bursts deals damage to an enemy. Even if the specified character is not currently on the field, this effect can still go off once every 0.2s. You can grant the “Millennial Movement: Farewell Song” effect to your entire party for 12 seconds by consuming all four Sigils of Remembrance at once. “Farewell Song,” part of the “Millennial Movement,” raises Elemental Mastery by 100, 125, 150, 175, and 200, and boosts attack power by 20, 25, 30, 35, and 40%. This effect prevents you from acquiring Sigils of Remembrance for 20 seconds after it is activated. The “Millennial Movement” has many effects, but buffs of the same type do not stack.
You can’t find a better 5* support bow than Elegy of the End. Having a high Energy Recharge is always useful, and who wouldn’t enjoy a global increase to their party’s Elemental Mastery and Attack Percentage?
It may be more challenging for some characters to trigger the passive’s buff than others, but in the vast majority of situations, you can always count on receiving this bonus.
A-Tier
Some but not all characters can use these Bows at the S-Tier level.
Polar Star
ATK: 46
CRIT Rate, a Breakdown
Increases of 12/15/18/21/14% were made to the passive abilities of Elemental Skill and Elemental Burst DMG. One stack of Ashen Nightstar is gained for 12s after a Normal Attack, Charged Attack, Elemental Skill, or Elemental Burst hits an opponent. With 1/2/3/4 stacks of Ashen Nightstar, your attack power will increase by 10%, 20%, 30%, 48%, 15%, 30%, 45, 72%, 17.5, 35%, 52.5, 84%, and 20%, respectively. Whether you use a Normal Attack, Charged Attack, Elemental Skill, or Elemental Burst, each stack of Ashen Nightstar you generate will be tallied separately from the others.
This weapon’s official description for its passive feature is confusing, so I’ll just give you the TL;DR version:
Your Skill and Burst DMG have been increased uniformly. Furthermore, a stacking ATK% buff for 12s is granted whenever a Normal Attack, Charged Attack, Elemental Skill, or Elemental Burst is used.
Given that Childe is the only character who can easily get max stacks on this weapon, it stands to reason that he should use it. However, most characters will require some unusual play patterns in order to make the most of this bow, and even then they will likely fall short of its full potential. Polar Star is an A-Tier item because even though it has the desirable CRIT Rate substat, not every character needs or wants it.
Amos’ Bow
ATK: 46
Substatistic: Accuracy of Total Kill
Passive: Adds 12/15/18/21/24% to the damage of normal attacks and aimed shots. Damage done by arrows is increased by 8/10/12/14/16 percent for every 0.1 seconds the arrow is in flight, up to 0.5 seconds. Allows for a maximum of five stacks per arrow.
This bow’s DMG amplification abilities are useful for any bow character, but Ganyu is the only one who can truly unleash its full potential.
Thundering Pulse
ATK: 46
CRIT DMG Substat
Passive: Grants the power of the Thunder Emblem and raises ATK by 20/25/30/35/40%. The Thunder Emblem boosts Normal Attack damage by 12/24/40%/15/30/50%/18/36/60%/21/42/70%/24/48/80% at Stack Levels 1/2/3, respectively. In each of the following cases, the character will gain one stack of Thunder Emblem: Damage from a standard attack leaves a stack for 5 seconds, while using an elemental skill leaves a stack for 10 seconds; energy is below 100% (stacks vanish when energy is at 100%). The time required to complete each stack is determined separately.
On the surface, Thundering Pulse appears to be a powerful S-Tier bow due to the critical damage and massive boost it provides to normal attacks.
But therein lies the rub with the usefulness of this bow. Bow users like Venti and sub-DPS Fischl often rely solely on their abilities rather than engaging in Normal Attacks. There are also characters who focus on Charged Attack DMG, such as Ganyu or Amber. The bow is S-Tier on characters who solely want to use Normal Attacks, but there aren’t that many of them.
B-Tier
You won’t find a better 4* Bow anywhere else.
The Stringless
ATK: 42
Elemental Prowess as a Substat
Passively adds 24/30/36/42/48% to the damage done by Elemental Skill and Elemental Burst.
This bow provides a tremendous direct damage bonus to your Skills and Bursts.
Many support Bow characters just want to swap in, use their abilities, and get out, which reduces the overall impact if your character also likes to do a lot of Normal or Charged Attacks for damage.
The Viridescent Hunt
ATK: 42
CRIT Rate Substatistic
Passive: There is a 50% chance that Normal and Aimed Shot Attacks will create a Cyclone upon hitting an enemy, attracting nearby enemies and dealing 40/50/60/70/80% of ATK as DMG to them every 0.5s for 4s. This effect has a 14/13/12/11/10s cooldown.
The Viridescent Hunt scales poorly in comparison to other weapons in the Battle Pass. However, this does not prevent it from being a top-tier 4* weapon.
What a strong substatistic the CRIT Rate is! The damage done by its passive is adequate, but not great enough to warrant further development. However, the ability to control large groups of enemies at once is useful for setting up devastating Bursts.
Rust
ATK: 42
Target Accuracy Percentage
Increases base damage from normal attacks by 40, 50, 60, 70, or 80% passively, while reducing damage from aimed shots by 8, 9, 10, 11, or 12%
The Stringless are the antithesis of Rust. Your character will be less interested in this the more they rely on their Skill and Burst.
However, Normal Attack specialists like Childe can benefit from Rust’s 5* DMG.
Alley Hunter
ATK: 44
Substatistic: Accuracy of Total Kill
This weapon has a passive effect that raises the character’s DPS by 2% every second up to a maximum of 20% while they are in the party but off the field. The aforementioned DMG buff decays at a rate of 4/5/6/7/8% per second for the first four seconds the character is on the field, down to 0% after eight seconds.
If you need a temporary replacement for a bow character, Alley Hunter is always a good choice.
The damage buff is harder to keep up than something like the Stringless passive, which is always on and provides a boost to attack power, but this one increases damage across the board. It’s even better if your character has passive abilities that allow them to deal damage at all times.
C-Tier
Xem thêm : Marvel Strike Force Tier List Update 07/2026
These Bows have the potential to be amazing, but only for certain types of people.
Windblume Ode
ATK: 42
Mastery of the Elements – Substat
Passive: After using an Elemental Skill, gain a boost to ATK of 16/20/24/28/32% for 6s from the Windblume’s ancient wish.
Windblume Ode, a weapon available only through this event, is a great choice if you’re planning on taking advantage of the opportunity to level it up to r5.
The focus on Elemental Masteries makes it useful for both support and damage dealing characters.
Hamayumi
ATK: 41
Type of Data: ATK Percent
Damage from Normal Attacks is increased by 16/20/24/28/32% and from Charged Attacks by 12/15/18/21/24% thanks to this passive ability. This effect is amplified by 100% when the Energy of the equipping character reaches 100%.
Hamayumi seems like a weapon just waiting to be abused by the right character, but there isn’t a suitable one in the game at the moment. Most bow users choose to specialize in either Normal Attacks or Charged Attacks, making a jack-of-all-trades strategy like Rust less effective. However, Hamayumi can be crafted, making it a viable alternative if you lack the aforementioned specialized options.
Sacrificial Bow
ATK: 44
Recharging of Energy Systems
Passive: Your Elemental Skill has a 40/50/60/70/80% chance to end its own CD after dealing damage to an opponent. Exactly once every 30s, 26s, 22s, 18s, or 14s.
In theory, this is the perfect weapon for any Bow user looking to maximize their Skill use and reduce the time it takes to use their Bursts.
But there’s just so many fantastic 4* Bows to choose from, and every Bow user has their own favorite.
Mitternachts Waltz
ATK: 42
DMG, Phys., Substat
Increases the damage done by your normal attacks passively Increases damage done by an elemental skill by 20/25/30/35/40% for 5 seconds. Attacks against opponents using Elemental Skills improve Enhances the damage of a standard attack by 20%, 25%, 30%, 35%, or 40% for 5 seconds.
Is your character’s primary means of dealing damage the Physical DMG Normal Attacks, or the Elemental Skill (but not the Elemental Burst)?
If this is the case, the Mitternachts Waltz is unmatched by any other 4* bow. However, it must be placed in C-Tier because of the limited scope of its requirements.
Favonius Warbow
ATK: 41
Energy Recharge Substatistic
There is a 60% 70% 80% 90% 100% chance that a CRIT hit will create an Elemental Orb, restoring 6 Energy to the character. Only once every 12s, 10.5s, 9s, 7.5s, or 6s.
Favonius weapons are typically classified as B-Tier. What can we say, though? The battle for the title of “Best 4* Bow” is fierce.
This bow is fine for any support character, but there are better choices.
Compound Bow
ATK: 41
DMG, Phys., Substat
For 6 seconds after a successful Normal Attack or Aimed Shot, your Attack will increase by 4/5/6/7/8% and your Normal Attack Speed will increase by 1.2/1.5/1.8/2.1/2.4%. There is a limit of four stacks. Limit of once every 0.3 seconds.
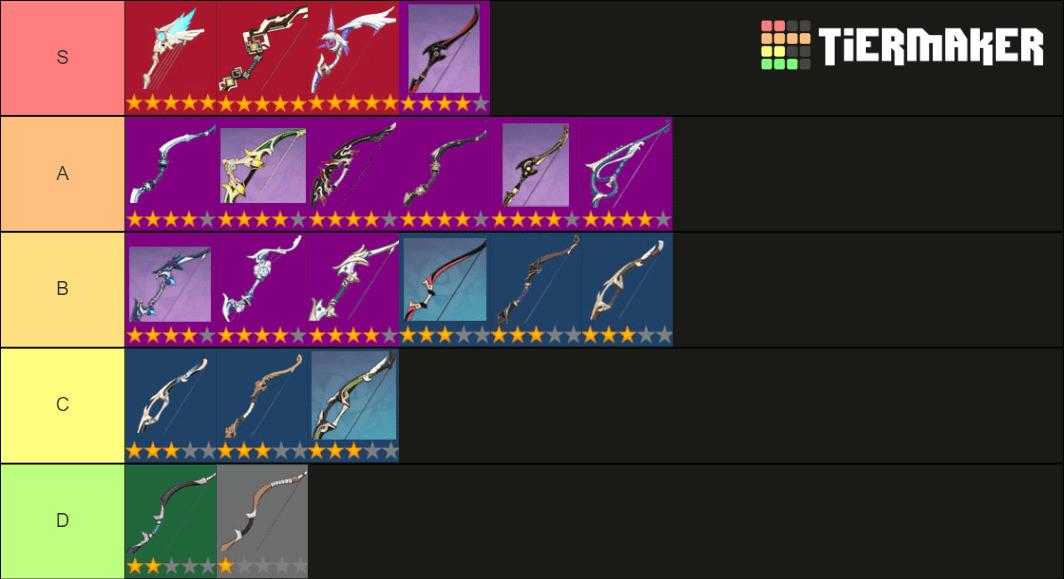
Any Direct Damage Dealing (DDD) character who favors Normal Attacks (and in this case Aimed Shots) would do well to consider the Compound Bow as a cheaper alternative to Rust.
Blackcliff Warbow
ATK: 44
CRIT DMG Substat
ATK is passively increased by 12/15/18/21/24% after a successful kill for 30 seconds. Each stack of this effect can last for up to three times as long as the previous stack.
It’s not a waste of Starglitter to buy a Blackcliff Warbow. Blackcliff weapons are generally considered to be of the B-Tier quality in other types of weaponry.
There’s nothing quite like CRIT DMG on a stick, and if you can max out the passive’s stacks, you’ll be dealing damage equivalent to a 5* item. There are many fantastic Bows out there, but you should save your Starglitter for your characters rather than buying new Bows.
Mouun’s Moon
ATK: 44
Substatistic: Accuracy of Total Kill
The character wielding this weapon gains 0.12/0.15/0.18/0.21/0.24% more Elemental Burst DMG for every point of the party’s combined maximum Energy capacity. This method can boost Elemental Burst DMG by 40, 50, 60, 70, or 80%.
The Bow in this series is inferior to the Claymore and the Spear because no bow user is as concerned with their burst as the other two types of weapons in this set.
D-Tier
For new F2P players who don’t yet have any of the aforementioned weapons, these Bows are a great alternative.
Slingshot
ATK: 38
CRIT Rate Substatistic
Damage done by Normal Attacks and Aimed Shots is increased by 36/42/48/54/60% and decreased by 10% if they miss their target by more than 0.3 seconds.
When it comes to 3* bows, Slingshot is your best option. The impact of CRIT Rate should never be understated. In addition, you receive a massive increase in DMG if you close in on your foes.
Sharpshooter’s Oath
ATK: 39
CRIT DMG Substat
DMG against vulnerable areas is increased passively by 24/30/36/42/48%.
The weapon’s CRIT DMG makes up for its 3* base ATK if you can raise your CRIT Rate high enough.
Its r5 damage is higher than that of the 4* Prototype Crescent bow, which requires extremely rare Billets to craft. If you want to play the minigame of hitting the enemy in the eye, this is the weapon to use.
Prototype Crescent
ATK: 42
At-Kick Percentage (Section)
When an Aimed Shot hits a vulnerable area, it passively boosts your Movement SPD by 10% and your Attack by 36, 45, 54, 63, or 72% for 10 seconds.
Did you know that not every Genshin Impact foe has a single, easily exploitable weakness? This, then, is E-Tier as it pertains to certain foes.
Refinement makes the passive buff worthwhile if you can proc it. Furthermore, most players do not enjoy the slower, less optimized playstyle that is required, especially on Mobile.
E-Tier
This is the ammunition for your larger arsenal.
Royal Bow
ATK: 42
Additional Statistics: ATK Percent
Whenever you deal damage to an opponent, your CRIT Rate passively increases by 8/10/12/14/16%. Limit of five stacks. When you get a CRIT, your stacks vanish.
It’s not worth spending Starglitter on a Royal weapon, least of all the Royal Bow.
It’s not good for E-Tier DMG, but if you’re willing to shell out the Starglitter, the Blackcliff Bow is a much better investment.
Recurve Bow
ATK: 38
Paragraph: Highest Pass Rate
When you defeat an opponent, your health returns by 8/10/12/14/16% passively.
This weapon is terrible in every way…
Raven Bow
ATK: 40
Elemental Prowess as a Substat
DPS against foes hit by Hydro or Pyro is increased by 12/15/18/21/24% passively.
You plan on using Elemental Reactions to ensure that your enemies always suffer from elemental damage. These two concepts do not go together.
Messenger
ATK: 40
CRIT DMG Substat
When an Aimed Shot critically damages an enemy, the attacker takes an additional 100, 125, 150, 175, or 200% of their normal damage. Only once every 10s at most.
In my opinion, this is the most entertaining passive ability in the entire Tier List. It would have been at least C-Tier if not for the extremely long cooldown.
Although it pains us to do so, we must place it in E-Tier. If you want to see some crazy damage numbers on your screen, give it a go, especially with Amber using a Charged Attack on the weak points of Frozen enemies.
Ebony Bow
ATK: 40
Substatistic: Accuracy of Total Kill
Damage done to mechanoid enemies in Ruin is increased passively by 40/50/60/70/80%.
Truth be told, nobody is going to switch to this weapon every time they face the same enemy.
Swords
S-Tier
These would be the best option for your 5* Swords.
Primordial Jade Cutter
ATK: 44
CRIT Rate Substatistic
A passive increase of 20%, 25%, 30%, 35%, or 40% in HP. Provides an attack bonus equal to 1.2/1.5/1.8/2.1/2.4% of the user’s maximum health.
When it comes to 5* Swords, Primordial Jade Cutter is without a doubt the best and most versatile option. At level 90, it provides enough CRIT Rate that you won’t need to prioritize it.
Even though the HP% isn’t ideal on its own, the attack boost based on maximum health makes up for it.
Mistsplitter Reforged
ATK: 48
Code: CRIT DMG
The power of Mistsplitter’s Emblem is bestowed upon you passively, increasing your Elemental Damage Dealt by 12/15/18/21/24% for each individual element. Mistsplitter’s Emblem increases the character’s Elemental Type’s damage done by 8/16/28/56% at stack levels 1/2/3 and by 10/20/35% at levels 12/24/42% and 14/28/49% at levels 16/32/56%. Mistsplitter’s Emblem will be obtained in stacks of 1 in the following situations: Energy is below 100% (stack disappears when Energy is at 100%), and Normal Attack deals Elemental damage (stack lasts 5s) and casts Elemental Burst (stack lasts 10s). The time required to complete each stack is determined separately.
Mistsplitter Reforged is the ultimate S-Tier Sword for DPS sword characters like Ayaka and Keqing who rely on Elemental Infusions. It has a very high base ATK, CRIT DMG as a substat, and can increase Elemental DMG by a total of 2 thanks to its passive ability. The 40% Elemental DMG available at r1 is insane.
This sword’s CRIT DMG substat and its ability to increase the damage of Elemental Skill and Burst, both of which deal Elemental DMG, make it appealing to characters who don’t have any Elemental infusions at all.
Freedom-Sworn
ATK: 46
Mastery of the Elements – Substat
Part of the ‘Millennial Movement’ that drifts where the winds take it. Boosts Damage Taken by 10/12.5/17.5/20%. This weapon grants the wielder a Sigil of Rebellion whenever they cause an Elemental Reaction. Even if the specified character is not currently on the field, this effect can still go off once every 0.5s. You can give “Millennial Movement: Song of Resistance” to everyone in your party for 12 silver when you have two Sigils of Rebellion and use them both at once. DPS for Normal, Charged, and Plunging Attacks is increased by 16/20/24/28/32%, and Attack Strength is increased by 20/25/30/35/40% when “Millennial Movement: Song of Resistance” is equipped. This effect prevents you from gaining Sigils of Rebellion for 20s after it is activated. The “Millennial Movement” has many effects, but buffs of the same type do not stack.
The finest 5* sword available to support characters. Its buff to the entire party is fantastic and easy to activate.
And if you’re feeling particularly cruel, it also lets your supports deal more damage.
A-Tier
If it weren’t for the incredibleness of the Primordial Jade Cutter, any one of these weapons could be S-Tier.
Summit Shaper
ATK: 46
ATK Percentage Breakdown
Passively raises Shield Power by 20%, 25%, 30%, 35%, or 40%. Getting a hit on an opponent will boost your ATK by 4%, 5%, 7%, or 8% for 8s. Limit of five stacks. Only once every 0.3 seconds is allowed. This effect of increasing ATK by 100% while shielded is doubled.
Zero of the Sword characters have any special abilities related to creating a shield.
You could have another character act as a shield, but then you wouldn’t be able to use that weapon to strengthen any team, but rather would be building your team around that weapon. However, the rewards for making this kind of an effort are substantial.
Aquila Favonia
ATK: 48
Paragraph: Physiological DMG
The 20%, 25%, 30%, 35%, and 40% boost to ATK is passive. When taking damage, the soul of the Falcon of the West arises, raising the banner of the resistance and restoring health equal to 100/115/130/145/160% of attack power while simultaneously inflicting damage equal to 200/230/260/290/320% of attack power on nearby enemies. You can only trigger this effect once every 15 seconds.
Aquila Favonia is superb for Physical DPS characters. With its massive base ATK and additional Physical DMG and ATK%, as well as its passive proc that heals you and deals area-of-effect damage to enemies when you’re taking damage, this item can help you get out of sticky situations.
Characters like Keqing and Ayaka, who are among the best Sword DPS in the game, prefer to deal Elemental DMG rather than Physical DMG.
Skyward Blade
ATK: 46
Recharging of Energy Systems
Inactive: CRIT Rate jumped 4%, 5%, 7%, or 8%. Elemental Burst grants Sky-Shattering Power:
For 12 seconds, your Movement Speed and Attack Speed will both be increased by 10%, and the damage of your Normal and Charged Attacks will be increased by 20%, 25%, 30%, 35%, or 40%, respectively.
Skyward Blade may look like a support weapon, but in order to benefit from its passive, your character must remain on the field.
While the damage boost from using your Burst and the time saved thanks to Energy Recharge are both welcome, the overall effect is disjointed. Even though it’s still a 5* weapon and thus superior to all 4* swords, we’d rather have any other 5* sword than this one.
B-Tier
These blades are superior to even the best 4* Swords.
The Black Sword
ATK: 42
CRIT Rate Substatistic
Increases Normal and Charged Attack Damage by 20/25/30/35/40% passively.
Critical hits from Normal and Charged Attacks also restore 60/70/80/90/100% of HP. Every 5s, this effect can happen once.
The Black Sword is widely regarded as a revered 5* weapon. The incredible CRIT Rate also provides a significant boost to both Normal and Charged Attacks.
It’s icing on the cake that it heals you every five seconds.
Festering Desire
ATK: 42
Substat: Recharging the Battery
Elemental Skill Critical Damage and Critical Strike Rate are passively increased by 16/20/24/28/32% and 6/7.5/9/10.5/12%, respectively.
If you’re a swordsman, Festering Desire is like having an extra string on your bow. This weapon is essential for characters like Geo Traveler, whose Elemental Skill is their primary means of dealing damage.
Or, you can give it to anyone who could use some help. We really hope that even if some players missed the event where this weapon was given out as a reward in patch 1.2, they will still be able to get their hands on it in some other way.
Blackcliff Longsword
ATK: 44
Keywords: CRIT DMG
Passive: Upon killing an enemy, your Attack Power will increase by 12/15/18/21/24% for 30 seconds. There can be a maximum of three stacks of this effect, and each stack lasts for a different amount of time.
Blackcliff Longsword’s massive base ATK and loads of CRIT DMG are more than enough to earn it a spot in the B-Tier.
Maximum stacks of the passive ability increase damage beyond that of any other 4* sword. You can’t use the passive against single foes, unfortunately.
Amenoma Kageuchi
ATK: 41
Breakdown: Average Team Kill Percentage
Anti-Tank Range (ATK) at Rest: 42
ATK Percentage Breakdown
Gain 1 Succession Seed automatically after using an Elemental Skill. Once every 5 seconds, you can activate this effect. Succession Seeds are 30 seconds long. There can be up to three Succession Seeds in the world at once. All Succession Seeds are used up when an Elemental Burst is used, but after 2 seconds, the character’s Energy returns at a rate of 6/7.5/9/10.5/12 for each Succession Seed used.
If your DPS character needs to speed up their Energy gain without sacrificing any of your artifact’s main stat or weapon’s substat to do so, then you should consider the 4* Amenoma Kageuchi. Only characters like Xingqiu and Qiqi who have extremely long cooldowns on their Elemental Skill would be opposed to this. It may have a low base ATK, but its ATK% scaling is S-Tier.
Despite its lackluster r1 stats, the Amenoma is a good investment for new players looking to craft a weapon that can be used by a wide variety of characters and improved with relative ease.
C-Tier
In skilled hands, these firearms can perform at a B-Level.
The Flute
ATK: 42
ATK Percentage Breakdown
Harmonic can be passively applied to normal or charged attacks. The power of music is unleashed upon acquiring all five Harmonics, dealing 100/125/150/175/200% ATK DMG to nearby enemies. The maximum duration of a harmonic is 30 seconds, and you can gain one every half a second.
It’s a lot of fun to wield the Flute as a Sword. As long as you keep attacking your enemies, the passive’s AoE damage will continue to proc. It’s a fantastic weapon in most regards, but it can’t compete with the best of the B-Tier choices.
The Alley Flash
ATK: 45
Mastery of the Elements – Substat
Damage done by a character wielding this weapon is passively increased by 12/15/18/21/24%. Taking damage temporarily negates this effect for 5s.
The Alley Flash’s base attack power is second highest to the Aquila Favonia’s. Yes, its base attack power is higher than that of any other 5* weapon. All damage done by a character wielding this weapon is increased passively as well.
If you take damage, the passive will disappear. It’s a high-risk, potentially high-reward weapon that, if used correctly, can deal A-Tier damage.
Favonius Sword
ATK: 41
Recharging of Energy Systems
An additional 6 Energy will be restored to the character passively after every CRIT hit (60/70/80/90/100% chance). Exactly once every 12s, 10.5s, 9s, 7.5s, or 6s.
The Favonius Sword is an invaluable tool for any character working toward their Elemental Burst. It was demoted to the lowest tier because it couldn’t compete with the Festering Desire. This is a backup plan if you don’t have access to Festering Desire.
Sacrificial Sword
ATK: 41
Recharging of Energy Systems
Passive: Your Elemental Skill has a 40/50/60/70/80% chance to end its own CD after dealing damage to an opponent. Once every 30s, 26s, 22s, 18s, or 14s, respectively.
For supports who care a lot about their Elemental Skill’s cooldown being reset (like Qiqi or maybe Xinqiu), this is a fantastic weapon, but most Sword supports would rather have the Favonius Sword.
Prototype Rancour
ATK: 44
Paragraph: Physiological DMG
Passive: Normal and Charged Attacks increase Base ATK and DEF by 4/4.5/5/5.5/6% on hit, and this effect lasts for 6 seconds. There is a limit of four stacks. Limit of once every 0.3 seconds.
The passive ability of this weapon further boosts its already absurdly high base ATK (and DEF) as you begin to whaling on your foes.
This weapon is easily B-Tier if your DPS deals Physical DMG.
Iron Sting
ATK: 42
Mastery of the Elements – Substat
For 6s, all damage is increased by 6/7.5/9/10.5/12% when you deal Elemental Damage. There is a limit of two stacks. Only once every 1s is allowed.
This weapon is excellent if you need the substat Elemental Mastery.
If Elemental Mastery is used as a substat, the damage reduction granted by the passive is less than the damage reduction lost.
Harbinger of Dawn
ATK: 39
Code: CRIT DMG
When your health is above 90%, your CRIT rate will increase passively by 14/18/22/24/28%.
A weapon that increases Critical Hit Damage or Critical Hit Rate is hard to top. Dual-purpose weapon! This sword may do more damage than many 4* weapons despite only being rated as a 3.
The rewards are worth the effort put into maintaining a health bar above 90%, though. Having an r5 Harbinger of Dawn is preferable to having an r1 5* weapon on Albedo, and we don’t say that lightly.
D-Tier
This is a slight improvement over doing nothing.
Sword of Descension
ATK: 39
Note: ATK
When using Normal or Charged Attacks, you have a 50% chance to deal 200% ATK in damage to a small area of effect. Only once every 10s is this effect allowed to take place. The Sword of Descension provides an additional 66 to the Traveler’s attack power if it is equipped.
This blade can only be found in PlayStation games. It has a rather weak base ATK on all characters except the Traveler. It’s not terrible when the Traveler uses the passive voice. However, the passive ability can only be used on a PlayStation.
This weapon cannot be obtained on a PS4 or PS5 and then transferred to a PC or mobile device via cross-save. Only in the hands of a PlayStation player who uses the Traveler as a direct damage specialist on their team can this weapon be considered even B-Tier.
Lion’s Roar
ATK: 42
ATK Percentage Breakdown
Damage dealt to enemies hit by Pyro or Electro is increased by 20/24/28/32/36% passively.
This weapon has enormous potential for damage, but it would be extremely difficult to unleash all of that potential.
Royal Longsword
ATK: 42
Substatistic: Accuracy of Total Kill
Inflicting damage on an opponent passively raises your CRIT Rate by 8%, 10%, 14%, or 16%. Maximum of five stacks. When you get a CRIT, your stacks vanish.
If the Royal Longsword didn’t require so much of the rare substance Starglitter, it would be in the C-Tier.
Skyrider Sword
ATK: 38
Substat: Recharging the Battery
For 12 seconds after using an Elemental Burst, your Attack Power and Movement Speed will be permanently increased by 12/15/18/21/24%.
If you’re just starting out in F2P and you don’t yet have any 4* swords, this is the best way to get the help you need.
Fillet Blade
ATK: 39
Breakdown: Average Team Kill Percentage
Passive: Attacks have a 50% chance to inflict 240, 280, 320, 360, or 400% Attack Power damage on a single foe. Limited to once every 15/14/13/12/11s.
This time it’s a solid 3* option for damage dealers. If you’re having trouble keeping your HP up, this is the better option than Harbinger of Dawn, which has a much higher ceiling.
E-Tier
Newcomers to F2P games now have superior options.
Traveler’s Handy Sword
ATK: 40
Statistics: DEL
Collecting Elemental Orbs and Particles has a passive effect of restoring 1/1.25/1.5/1.75/2% HP per item.
This is terrible… unacceptable, utterly terrible…
Cool Steel
ATK: 39
ATK Percentage Breakdown
Passive: Deal an additional 12/15/18/21/24% damage to foes that are affected by Hydro or Cryo.
The idea, while appealing, is not practical.
Dark Iron Sword
ATK: 39
Mastery of the Elements – Substat
Passive: Increases ATK by 20/25/30/35/40% for 12s after activating the Overloaded, Superconduct, Electro-Charged, or Electro-infused Swirl reaction.
This weapon shows potential, but it falls short of meeting the requirements for D-Tier.
Catalysts
S-Tier
The weapons are highly sought after by all Catalyst users.
Lost Prayer to the Sacred Winds
ATK: 44
CRIT Rate, a Breakdown
Activation-free 10% increase in Movement SPD. Gain an additional 6/8/10/12/14% Elemental DMG every 4 seconds during combat. Don’t exceed a maximum of four stacks. Lasts as long as the character is alive or until they are defeated.
For damage dealers, there is no better catalyst.
Increased Movement Speed will make it easier to stay alive without resorting to switching characters while the passive bonus to Elemental DMG takes time to build up and only works while your character is active. The CRIT rate remains the most important metric.
A-Tier
If you didn’t get any good luck at the weapon banner, these will do.
Memory of Dust
ATK: 46
ATK Percentage Breakdown
Increase Shield Strength by 20%, 25%, 30%, 35%, or 40% passively. Gain 4/5/6/7/8% additional ATK against level 8s when you score a hit on them. Five stacks is the maximum allowed. Limit of once every 0.3 seconds. This effect of increasing ATK while shielded is amplified by a factor of 1.
Xem thêm : Crossing Void Tier List Update 07/2026
We can’t fathom why the people at miHoYo to the point where they felt compelled to rush the release of nearly all of the weapons in this set.
Eventually, I’m sure we’ll see characters wielding every imaginable kind of shield. Building your team around this weapon can net you a huge increase in DMG, but it falls short of being S-Tier due to the fact that you’ll have to do so for your entire party.
Skyward Atlas
ATK: 48
Target Accuracy Percentage
Passively grants a 12/15/18/21/24% Elemental DMG Bonus. There’s a chance in the clouds that a hit from a Normal Attack will succeed 50% of the time. which seek out and attack nearby enemies for 15 seconds, dealing 160/200/240/280/320% ATK DMG (based on level) to them. Limitation of once every 30 years.
If you’re looking for a 5* support catalyst, Skyward Atlas is your best bet, but even then, you’ll have to settle for something less than ideal. The Elemental DPS it provides is lower than the Lost Prayer’s, but the buff lasts permanently.
As with Fischl’s Oz, this passive’s proc remains on the field and deals damage even if you switch characters. The thing will even stick close to you.
B-Tier
Nobody who uses Catalyst wouldn’t benefit from having one of these weapons.
The Widsith
ATK: 42
Keywords: CRIT DMG
A character’s random theme song will play in the background for ten seconds whenever they enter battle. This only happens once every 30 years at most.
Increases Base ATK by 60%/75%/90%/105/120% (Reiterative)
Aria: 48/60/72/84/96% Elemental Damage.
During the Interlude, you gain 240/300/360/420/480 Elemental Mastery.
One of the best passives in the game can be found on the Widsith. It’s true that you can’t predict which of the three buffs you’ll receive, but that hardly matters because they’re all fantastic.
The CRIT DMG substat also exists. To maximize the DMG this weapon can deal, the user must be able to recognize which song was triggered and adapt their attacks accordingly. However, regardless of which buff you have, the DMG floor is extremely high, so you can continue doing the same thing and getting excellent results.
Solar Pearl
ATK: 42
Rate of Criterion-Referenced Interval Testing
For 6 seconds after a normal attack hit, the damage done by Elemental Skills and Elemental Bursts is increased by 20/25/30/35/40% passively. The damage dealt by normal attacks is increased by 20/25/30/35/40% for 6 seconds after being hit by an Elemental Skill or an Elemental Burst.
It’s a pity the passive doesn’t also increase the power of Charged Attacks. Cayalysts like Ningguang and Yanfei, who excel as damage dealers, often revolve around the use of Charged Attacks. Nonetheless, the enhancements it does demonstrate are fantastic, especially the CRIT Rate secondary stat.
Mappa Mare
ATK: 42
Elemental Prowess as a Substat
Mastery of the Elements (Passive) When an Elemental Reaction is triggered, a 10% Elemental DPS Bonus is added for 10 seconds. Limited to a maximum of two stacks.
What really sells us on this weapon is the passive, which triggers Elemental Reactions to increase your Elemental DMG.
Increases to Elemental Damage Dealt to Catalyst users are always a good idea. And the Elemental Mastery substat is also excellent, as everyone but Ningguang is capable of concocting powerful Elemental Reactions.
Wine and Song
ATK: 42
Recharging of Energy Systems
To passively reduce the Stamina cost of using Sprint or Alternate Sprint by 14%, 16%, 18%, 20%, or 22% for 5 seconds after hitting an opponent with a Normal Attack. Using either the Sprint or Alternate Sprint ability also grants a 20%-25%-30%-35%-40% ATK buff for 5 seconds.
Wine and song can be used as a tool in many situations. Support characters are partial to Energy Recharge weapons because, unlike the Favonius Codex or the Sacrificial Fragment, they can easily raise their attack power with Wind and Song.
C-Tier
In the right hands, these Catalysts can work wonders.
Everlasting Moonglow
ATK: 46
HP Percentage Breakdown
Active: Normal Attack Damage is increased by 1%, 1.25%, 1.75 %, or 2% of the Max HP of the character wielding this weapon. Passive: Healing Bonus is increased by 10%, 12.5%, 17.5%, or 20%. After using an Elemental Burst, your Normal Attacks will restore 0.6 Energy for the next 12 seconds if they land a hit. Once every 0.1s, power can be replenished in this manner.
We have never demoted a 5* weapon before, but Everlasting Moonglow is so terrible that we had to do it.
The weapon is designed for Kokomi and has HP scaling and a higher Healing Bonus than Prototype Amber, but it still isn’t all that effective on her.
Although its high base ATK remains, it can’t save a limited 5* catalyst that almost no one who uses catalysts actually wants to use.
Will it perform better than some B-Rank weapons? Absolutely!
Our definition of the C-Tier for catalysts is that they can be amazing when the conditions are just right.
Dodoco Tales
ATK: 41
Type of Data: ATK Percent
Active: Getting hit with your normal attack increases your charged attack damage by 16/20/24/28/32% for 6 seconds. Hits from a Charged Attack increase attack power by 8/10/12/14/16% for 6 seconds.
This weapon is superior to the Solar Pearl on characters whose Normal and Charged Attacks deal more damage than their Skill and Burst.
However, there aren’t many fictional people who are an exact match.
Thrilling Tales of the Dragon Slayers
ATK: 39
HP Percentage Breakdown
Passive: Whenever a character is switched into play, their Attack (ATK) for the next 10 seconds is increased by 24/30/36/48%. Only once every 20s is this effect allowed to take place.
This is the best weapon for Barbara, as her healing increases proportionally to her HP.
The HP% substat won’t be nearly as useful for your other support characters when your main DPS is walking around with a sweet 48% ATK buff, but you won’t mind that in the least.
Favonius Codex
ATK: 42
Recharging of Energy Systems
There is a 60% 70% 80% 90% 100% chance that a CRIT hit will create an Elemental Orb, restoring 6 Energy to the character. Only once every 12s, 10.5s, 9s, 7.5s, or 6s.
The Codex, like all Favonius weapons, is excellent for reinforcements who could benefit from an additional Energy Recharge.
Sacrificial Fragment
ATK: 41
Mastery of the Elements – Substat
Passive: Your Elemental Skill has a 40/50/60/70/80% chance to reset its cooldown after dealing damage to an opponent. Exactly once every 30s, 26s, 22s, 18s, or 14s.
Sacrificial Fragment grants Elemental Mastery in contrast to the usual Sacrificial weapon perk of Energy Recharge.
This makes it better suited for DPS characters looking to reactivate their Elemental Skills after a cooldown. So far, Sucrose is the only known Catalyst user who values this effect; however, this could change in the future.
Eye of Perception
ATK: 41
At-Kick Percentage (Section)
There is a 50% chance that your Normal or Charged Attack will launch a Bolt of Perception, dealing 240/270/300/330/360% ATK as damage. This bolt can ricochet off of foes up to four times. Once every 12s, 11s, 10s, 9s, or 8s, this effect can take place.
DPS classes can benefit greatly from equipping Eye of Perception. There is no problem with that at all.
When engaging multiple foes, the proc’s increased ATK percentage and damage will prove invaluable. But really, you could not pick a better scenario.
Blackcliff Amulet
ATK: 42
Keywords: CRIT DMG
ATK is passively increased by 12/15/18/21/24% after a successful kill for 30 seconds. There can be a maximum of three stacks of this effect, and each stack lasts for a different amount of time.
Blackcliff weapons are typically classified as B-Tier. However, the Widsith already exists, and it is a Catalyst that grants CRIT DMG.
Unlike the Blackcliff Amulet, its passive is useful whether you’re facing off against a single Boss or an entire army of lowly hilichurls.
D-Tier
You should know that your D-Tier options for Catalysts are even worse than they would be for any other type of weapon.
Royal Grimoire
ATK: 44
ATK Percentage Breakdown
Passive: Dealing damage to an opponent raises your Critical Strike Chance by 8%, 10%, 14%, or 16%. Your stack size cannot exceed five. All stacks are destroyed on a CRIT hit.
Catalyst users have access to a wider variety of high-quality, 4* DPS weapons than their counterparts.
If you don’t already have a Blackcliff Amulet, you should buy one instead of this weapon with the Starglitter you’d use to buy it.
Hakushin Ring
ATK: 44
Recharging of Energy Systems
After an Electro elemental reaction is triggered by the character wielding this weapon, nearby party members of an Elemental Type involved in the reaction gain a 10%, 12.5%, 17%, or 20% Elemental DMG Bonus for their element for 6 seconds. There is no way to combine the elemental bonuses gained in this manner.
If its passive wasn’t restricted to Electro Reactions, Hakushin Ring might be the best 4* Energy Recharge catalyst for support characters. You will be handsomely rewarded if you are able to fulfill its requirements. The catalyst user will not only be able to cast Burst more quickly, but they will also gain a buff to their Elemental DMG, which should help their DPS and yours. However, the item isn’t viable for purchase due to the stringent prerequisites.
Prototype Amber
ATK: 42
Paragraph: Highest Pass Rate
Elemental Burst has a passive regeneration rate of 4/4.5/5/5.5/6 Energy per 2 seconds for 6 seconds. In addition, during this time, every member of the party will recover 4/4.5/5/5.5/6% of their health every 2 seconds.
On paper, this appears to be a formidable impetus for any backing. The only catch is that ideal support substats would be Energy Recharge or Elemental Mastery.
Among the Thrilling Tales of the Dragonslayer cast, only Barbara improves with higher HP. It’s not worth spending precious billets on crafting Prototype Ambers when a 3* weapon is more valuable than these craftable 4* catalysts.
Frostbearer
ATK: 42
Target Accuracy Percentage
The passive effect of hitting an opponent with a Normal or Charged Attack causes an Everfrost Icicle to form and fall from the sky above them, dealing 80, 95, 110, 125, or 140% Area-of-Effect Attack Damage.
Cryo causes 200/240/280/320/360% Attack Damage to foes. Limit of once every 10 seconds.
On a Cryo Catalyst DPS, this item would be fantastic.
The only catch is that not a single player, damage dealer or otherwise, is using Cryo Catalyst.
Twin Nephrite
ATK: 40
CRIT Rate Substatistic
Defeating an opponent passively boosts your mobility. Reduced 12/14/16/18/20% SPD and ATK for 15s.
Twin Nephrite is a reliable option for a 3* Catalyst for your main damage dealer.
The CRIT Rate substat is strong and the passive voice works fine here.
Amber Catalyst
ATK: 40
Mastery of the Elements – Substat
For 6 seconds after a Normal Attack hit, all Elemental damage is increased by 6/7.5/9/10.5/12%. Limited to a maximum of two stacks.
Since all Catalyst users rely on Elemental DMG, this item provides a significant boost to their damage output.
Ningguang wouldn’t benefit from having Elemental Mastery, so please don’t give it to her.
E-Tier
Wasteful relics.
Emerald Orb
ATK: 40
Mastery of the Elements – Substat
Passive: Increases ATK by 20/25/30/35/40% for 12s after initiating a Vaporize, Electro-Charged, Frozen, or Hydro-infused Swirl reaction.
The point is to hand this to someone using a Hydro Catalyst so they can gain strength through Elemental Reactions.
It’s still not worth it, even if you play Mona as a damage dealer.
Magic Guide
ATK: 38
Mastery of the Elements – Substat
Damage dealt to enemies by Hydro or Electro is increased passively by 12/15/18/21/24%.
This passive is just as bad as every other passive of its type.
Polearms
S-Tier
The content of these Polearms will be diluted.
Staff of Homa
ATK: 46
CRIT DMG Substat
A passive increase of 20%, 25%, 30%, 35%, or 40% in HP. Provides an attack bonus equal to 0.8/1.2/1.4/1.6% of the user’s maximum health. This ATK bonus increases by 1/1.2/1.4/1.6/1.8% of Max HP when the wielder’s HP is below 50%.
If not the best 5* weapon overall, the Staff of Homa is certainly the best Polearm.
As long as your character’s health is below 50%, the damage it deals is insane. Additionally, CRIT DMG is included.
Primordial Jade Winged-Spear
ATK: 48
CRIT Rate, a Breakdown
Passive: Increases Attack Speed by 3.2/3.9/4.6/5.3/6% for 6 seconds when hit. Limit of seven stacks. Every 0.3s, at most, this effect can happen once. When you have all five available stacks, your damage done is increased by 12/15/18/21/24%.
The Primordial Jade Winged-Spear is a fantastic weapon that, while not as broken as the Staff of Homa, still has a lot going for it thanks to its CRIT Rate substat and massive passive damage bonus.
Faster than a speeding bullet, polearm users can easily hit their foes seven times in a row for maximum stacks.
A-Tier
Winners and losers can be found among 5* Polearms.
Vortex Vanquisher
ATK: 46
ATK Percentage Breakdown
Passive: Increases Shield Strength by 20/25/30/35/40%, and increases Attack Power by 4/5/6/7/8% for 8s whenever you deal damage to an opponent. There is a limit of five stacks. Limit of once every 0.3 seconds. This effect on attack power while shielded is amplified by a factor of 1.
The Vortex Vanquisher was designed specifically for Zhongli, but even he finds more use in the Staff of Home.
Never underestimate the massive damage boost at max stacks while wearing a shield, or the power of a 5* weapon. It would be fun to have this weapon, but we wouldn’t go out of our way to seek it out.
Engulfing Lightning
ATK: 46
Recharge of Energy Sources
With a passive Energy Recharge, your attack power will increase by 28/35/42/49/56%. The most Attack Bonus you can get is 80/90/100/110/120%. After using an Elemental Burst, you will receive a 30%/35%/40%/45%/50% Energy Recharge for 12 seconds.
Rarely does a 5* weapon work so well for one character while being so mediocre for the rest, but that’s exactly what happens with Engulfing Lightning. This is the ultimate 5* weapon on Raiden Shogun.
Most Polearm users would rather equip another 5* if given the choice, but other characters, like Xiangling, can use the Emblem of Severed Fate set bonus as well.
Skyward Spine
ATK: 48
Recovery of Energy
Passive: Boosts Normal ATK SPD by 12% and CRIT Rate by 8%/10%/12%/16%. Furthermore, there is a 50% chance that Normal Attacks and Charged Attacks will unleash a vacuum blade that deals 40/55/70/85/100% of ATK as DMG in a small area of effect. Once every two seconds is the maximum frequency of this effect.
The initial attack power and passive are both excellent. Even the AoE DMG has a high chance to trigger frequently. The best Polearm for a DPS character, however, is any other Polearm.
And it’s not like the people who back the idea get some crazy benefit from it. When it comes to emotional impact, this 5* weapon ranks near the top.
B-Tier
All of these top-tier 4* Polearms are easily accessible to F2P players.
Crescent Pike
ATK: 44
Physical DMG Substat
Passive: Using Normal or Charged Attacks after picking up an Elemental Orb/Particle increases damage by 20/25/30/35/40% ATK for 5 seconds.
The Crescent Pike is undoubtedly the best weapon that can be crafted and one of the best 4* weapons available. Most Polearm DPS characters rely on Physical DMG, despite the fact that it sounds like it could be a problem substat in some cases.
The passive is easy to trigger, and once you do, you’ll be able to smash like a truck. This is a reliable 5* DMG weapon, unlike the Blackcliff weapons, whose passive cannot be relied upon under any circumstances.
Wavebreaker’s Fin
ATK: 45
Additional Statistics: ATK Percent
The character wielding this weapon gains 0.12/0.15/0.18/0.21/0.24% additional Elemental Burst DMG for every point of the party’s combined maximum Energy capacity. This method can boost Elemental Burst DMG by up to 40/50/60/70/80%.
Wavebreaker’s Fin is the latest in a line of 4* Polearm options that can hold their own against 5* weapons. Compared to Engulfing Lightning, the Vortex Vanquisher, and the Staff of Homa, its base attack power is significantly higher. You’ve got a top-tier 4* option thanks to this, and it comes with a passive so powerful that several Polearm characters would kill for it. This can deal 5* amounts of damage to the right characters, especially at higher refinement levels.
The Catch
ATK: 42
Recovery of Energy
Increases Elemental Burst CRIT Rate by 6%, 7.5%, 9%, and 12% passively and raises Elemental Burst DMG by 16/20/24/28/32% passively.
If you’re willing to put in the time and effort, this free 4* weapon can be obtained through fishing, and it’s well worth it. For Polearm characters like Xiangling and Baal, whose primary source of damage is their Elemental Burst, this is effectively a 5*. However, the Catch will be greatly appreciated by any support or Sub-DPS that requires an Energy Recharge.
Blackcliff Pole
ATK: 42
Code: CRIT DMG
ATK is passively increased by 12/15/18/21/24% after a successful kill for 30 seconds. Each stack of this effect can last for up to three times as long as the previous stack.
When compared to the Crescent Pike, it’s hard to get excited about this weapon. However, it does have its own set of advantages. One positive aspect is that it boosts damage from all sources, not just Normal and Charged Attacks.
On the other hand, when engaging a lone Boss, the buff is largely irrelevant. If you keep your stacks high enough, it can deal damage on par with 5* weapons, just like the Crescent Pike.
Deathmatch
ATK: 41
CRIT Rate Substatistic
ATK and DEF are both increased by 16/20/24/28/32% passively whenever there are at least two enemies within range. ATK is increased by 24/30/36/42/48% when there are fewer than 2 foes in close proximity.
While Deathmatch’s base ATK is on the low side, its high CRIT Rate more than makes up for it. The passive’s increase to ATK percentage also aids in making up for the character’s lackluster ATK.
And if you’re up against a single Boss, your attack bonus is doubled. Give it a shot, okay? We all have a natural aversion to lower ATK weapons, but Deathmatch is still capable of B-Tier DMG despite this. The fact that two other 4* Polearms can almost do 5* DMG isn’t its fault.
C-Tier
You could find much worse, but you could also find much better… for no cost at all!
Prototype Starglitter
ATK: 42
Recovery of Energy
After using an Elemental Skill, your Normal and Charged Attack DPS will be increased by 8/10/12/14/16% for 12 seconds. You can only have two stacks at a time.
Supports typically use Favonius weapons for Energy Recharge, but Polearm users have access to the Prototype Starglitter.
Because it can be made by anyone, it has wide applicability. Even if you’re right that the passive is better suited to DPS characters, not having the Favonius passive isn’t going to hurt you too much.
Kitain Cross Spear
ATK: 44
Mastery of the Elements – Substat
Passive: Deals 6/7.5/9/10.5/12% more damage with Elemental Skills. Character loses 3 Energy after using Elemental Skill on an opponent, but recovers 3/3.5/4/4.5/5 Energy every 2s for the next 6s. Once every 10s, this effect can take place. Can occur even if the character isn’t physically present.
Due to the limiting nature of the first Elemental Mastery Polearm, Dragon’s Bane, the addition of Kitain Cross Spear is a welcome change. Even without its rather useful passive, this would have made it the best choice for Polearm users seeking Elemental Mastery. While it’s true that not many players currently using Polearms care about Elemental Mastery, new characters are always being added, and some of them are bound to want EM.
Favonius Lance
ATK: 44
Energy Recharge Substatistic
An additional 6 Energy will be restored to the character passively after every CRIT hit (60/70/80/90/100% chance). This only happens once every 12/12,5/9/7.5/6s.
Favonius Lance is indispensable if restoring your Energy from zero to full is your only concern.
However, you still need to throw a few Normal Attacks in order for the passive to activate unless you’re critting with a Skill or Burst. As a result, the free Prototype Starglitter is the better option for most people.
Lithic Spear
ATK: 44
Target Accuracy Percentage
The user of this weapon receives a passive 7/8/9/10/11% ATK buff and a 3/4/5/6/7% CRIT Rate buff for every character in the game that was born in Liyue. The multiplicity of this effect is up to 4.
It seems pointless to build a team around this weapon when there are so many fantastic 4* options for DPS characters.
There is good damage to be had, but the Crescent Pike and Blackcliff Pole are both more accessible and deal more damage per hit. And if you’re looking for CRIT Rate, Deathmatch will grant you more than an all-Liyue r5 Lithic Spear.
Dragon’s Bane
ATK: 41
Elemental Prowess is a Substat
DPS against foes hit by Hydro or Pyro is increased by 20/24/28/32/36% passively.
The after-effects of a bane are terrible. However, only two Polearms, including Dragon’s Bane, grant Elemental Mastery. Furthermore, both of its supported components are relevant to Vaporize. That’s why you won’t find it in the D-Tier.
This is a serviceable substitute for the Kitain Cross Spear if Elemental Mastery is required.
D-Tier
Yet another collection of low-powered F2P weapons.
Dragonspine Spear
ATK: 41
Physical DMG Substat
Passive: When using Normal or Charged Attacks, there is a 60/70/80/90/100% chance that an Everfrost Icicle will form and fall on top of the target, dealing 80/95/110/125/140% Area of Effect Attack Damage.
Cryo inflicts damage equal to 200/240/280/320/360% of the target’s attack strength on enemies. Limit of once every 10 seconds.
The similarities between this weapon and the Crescent Pike are striking. Both of these Polearms are able to be crafted and provide bonuses to Physical DMG.
The passive in Crescent Pike is simply unrivaled. It’s the Crescent Pike that even Rosaria, who uses the Cryo Physical DMG Polearm, prefers. There is no point in putting in the effort to write this.
Royal Spear
ATK: 44
Breakdown: Average Team Kill Percentage
Increases your Critical Strike Chance by 8%, 10%, 14%, or 16% when you deal damage to an opponent. Limit of five stacks. All stacks are destroyed on a CRIT hit.
If Dragonspine Spear is bad because it’s just as difficult to get a Crescent Pike as a Royal Spear, then Blackcliff Pole is just as difficult to get a hold of as a Royal Spear.
There isn’t much of a comparison between the Blackcliff Pole and this weapon in terms of design.
White Tassel
ATK: 39
CRIT Rate Sub-Statistic
Passively, your Normal Attack damage will increase by 24/30/36/42/48%.
We appreciate White Tassel’s straightforward nature. No, it won’t scale very well because it’s only a 3* weapon. If you’re content to primarily use Normal Attack, however, this weapon is quite versatile.
Furthermore, while seeking out better weapons, you will easily get it to r5. Also, we forgot to talk about the CRIT Rate.
Halberd
ATK: 40
ATK Percentage Breakdown
Passive: Basic Attacks deal an extra 160%, 240%, 280%, or 320% damage. Limit of once every 10 seconds.
The halberd is a typical reliable 3* weapon. It’s adequate as a primary damage dealer.
You won’t mind giving it to supports if it means keeping them on the field for the short amount of time necessary to trigger the passive.
E-Tier
And the Genshin Impact Polearm of the Year goes to…
Black Tassel
ATK: 38
Paragraph: Highest Pass Rate
Passive: increases DMG by 40/50/60/70/80% when fighting slimes.
The fact that there is only a single E-Tier Polearm in the game is indicative of how powerful these weapons actually are.
Black Tassel, with its terrible substat and Bane passive that makes most other Bane passives look good, is a clear example of a weapon type’s rejects.
Where Is F-Tier?
To emphasize that we think every character in this game has the potential to be good (if not great) with the right itemization, playstyle, and team composition, we left off an F-Tier category from our character Tier List. Characters like Amber and Xinyan are often relegated to the F-Tier and treated like yesterday’s garbage, but those who take the time and effort to upgrade them can achieve incredible results.
So, in our opinion, Genshin Impact does not feature any F-Tier characters.
However, you can rest assured that there are weapons of the F-Tier variety included. All weapons rated 1* and 2* are included in this.
Weapons rated 1* or 2* have horrible ATK, but no other substats or passives. A 3* weapon is vastly superior to any 1* or 2* weapon, despite the fact that there are some truly awful weapons out there. But since they don’t have any passives or substats, we’d have to repeat this speech ten times before we ran out of things to say. For this reason, we put it all aside.
Conclusion
This list will help you prioritize which weapons to upgrade because there simply aren’t enough of them in Genshin Impact for you to do so.
But don’t forget that there’s more to character optimization than just weapons. In this case, artifacts are more important than usual. If you’re looking to level up your Genshin Impact game, then you need to read our guide on the best artifacts for each character.
It’s helpful to know which weapons and artifacts work best with which characters, but you still have to get the characters in the first place. If you want to find out more about how to get specific characters, you can do so by clicking here.
Regardless, we believe our guides can help you have a better gaming experience. We’ll meet again when you’ve upgraded your arsenal. Have a good time until then!
Nguồn: https://gemaga.com
Danh mục: List