Correctly erasing an SSD is essential, whether you’re preparing it for resale or just clearing out old data to make room for a new user.
- Upcoming Steam Sale Dates. What You Need To Know? Update 07/2026
- Ninja Fortnite Settings And Gear Update 07/2026
- Animal Crossing: New Horizons Guide – How To Buy And Sell Turnips? Update 07/2026
- What Is PS5 3D Audio? How can I get PS5 3D Audio? Update 07/2026
- What Build Is Best For Yoimiya? The best Yoimiya weapon, Artifacts, and more Update 07/2026
Because of the unique way that data is stored on NAND flash memory found in SSDs, the standard drive wiping methods used for HDDs are ineffective.
Bạn đang xem: How To Securely Erase An Ssd Drive On Windows 10 Update 07/2026
To put it simply, formatting an SSD with Windows’s Disk Management utility will leave data traces that can be recovered and used for malicious purposes. And so, the question arises: how does one safely wipe and sanitize an SSD in Windows 10?
Before doing any work on a hard drive, it is imperative that you make a copy of any data you will need. If you delete something using one of these methods, it’s gone forever.
What do solid-state drives do?
Data on an SSD is permanently stored on an integrated circuit, which is a group of electronic circuits embedded within a silicon semiconductor cell. SSDs are also known as semiconductor storage devices; however, they are more commonly referred to as solid-state drives (SSDs) due to the lack of mechanical parts that characterizes HDDs.
![How To Securely Erase An SSD Drive On Windows 10 [Simple]](https://gemaga.com/wp-content/uploads/2023/02/how-to-securely-erase-an-ssd-drive-on-windows-10-img_63e4a1d597c71.jpg)
SSDs are much quicker and quieter than HDDs, thanks to the fact that flash memory can be electronically written to, transferred to, and erased from. However, they cost more and have less space than HDDs. SSDs are common in high-end machines and as auxiliary storage in regular computers.
What are solid-state drives used for?
The extremely fast throughput and low access times of solid-state drives initially led to their widespread use only in high-performance technological domains and among enthusiasts’ personal computers. However, they are now commonly included, if not the standard feature, on budget laptops and desktop computers.
Specifically, SSDs excel in the following scenarios:
- In the business world, SSDs are commonly used because of the importance of quick access times and file-transfer speeds when dealing with massive amounts of data (such as in programming environments or data analysis).
- In order to achieve optimal performance in computer-based games, gamers have historically had to spend a considerable sum on high-end gaming PCs. This is especially true in terms of storage space, as even the smallest of files (textures, maps, levels, characters) are constantly being read and written by today’s blockbuster games.
- SSDs are portable because they help laptops and tablets get further on a single charge. Additionally, the shock resistance of SSDs makes it less likely that data will be lost if a mobile device is dropped.
- In order to provide adequate service to client PCs, enterprise servers require SSDs with fast reads and writes.
What are the different types of SSDs
There are a lot of acronyms and abbreviations to learn when looking for a solid-state drive. Therefore, what does this mean? Here’s a quick primer to get you up to speed.
There is a required interface for connecting an SSD to your computer. Typical connections include:
- SSDs that use PCIe or NVMe: Typically, PCI Express (PCIe) is used to link high-performance peripherals like video cards, network interface controllers, and so on. When you need lightning-fast data transfer between your SSD and your CPU/RAM, this interface is your best bet due to its high bandwidth and low latency. This interface is used by solid-state drives (SSDs) that adhere to the Nonvolatile Memory Express (NVMe) standard, which provides greater IOPS and even lower latency than SATA (which we’ll get to in a moment). With multiple parallel channels, NVMe can reach speeds of up to 4,000 MB/s while offering a raw throughput of up to 16 GBits/s.
- traditional SSDs, SATA III, and mSATA III An older interface built for storage, Serial Advanced Technology Attachment (SATA) can reach speeds of up to 6 GBit/s, or about 600 MB per second. NVME, which is much quicker, is gradually replacing SATA. However, upgrading to a SATA-based SSD is still recommended for older PCs or laptops with a hard disk drive.
SSDs come in a wide variety of capacities, from about 32 GB all the way up to 5 TB in the consumer market. (Of course, enterprise grade storage has a much larger capacity and costs more.)
During the brief time that netbooks were popular (hey, do you remember those? The famous Asus Eee PC series used 1 to 4 GB of solid-state drives (SSDs) as storage, from which parts of the operating system were run for faster access. It was at this point that SSDs entered the mainstream. As time went on, solid-state drives (SSDs) became standard in ultrabooks and then desktop computers. Modern hard drives typically range in size from 250 GB to 500 GB, which is more than enough space to install Windows and run the majority of today’s popular software in addition to storing a large number of your own files.
History of solid-state drives (SSDs)
Mechanical hard drives were the primary method of data storage for many years. The read/write head of a conventional HDD travels back and forth to gather data, among other moving parts. As a result, hard disk drives (HDDs) are the most prone to malfunction in a computer.
The modern solid-state drives function in an entirely new way. NAND flash memory is a simple memory chip used because of its lack of moving parts and fast access times.
It wasn’t until the 1970s and 1980s that SSDs were commonly used in high-end supercomputers, but early experiments with the technology began in the 1950s. Yet, despite the high 5-digit costs, the technology’s storage capacity was only 2MB-20MB. Military and aerospace applications of SSD technology were sporadic prior to their widespread adoption in consumer electronics in the 1990s.
SSD costs decreased in the early 1990s as a result of technological advancements. Size and longevity were still problems, however; solid-state drives (SSDs) lasted for about a decade. However, it wasn’t until the late aughts that SSDs became consistently reliable enough to be used for decades at acceptable access speeds.
Xem thêm : How To Use A Ps4 Controller On Pc Mac Update 07/2026
Similar to random-access memory (RAM), solid-state drive memory chips are used by SSDs. Information is stored on a matrix of NAND flash cells rather than a magnetic platter. Each block, or grid, has a storage capacity of 256 KB to 4 MB. A solid-state drive’s controller knows where each block is located, making it possible for data to be (almost) instantly delivered in response to a request from your computer. A read/write brain doesn’t need any time to look up information. As a result, SSDs have access times in the nanosecond range.
Be aware that the era of conventional hard disk drives has not yet come to an end. It was not until recently that SSD shipments began to exceed HDD shipments. Many of the people who use Avast are still using antiquated mechanical hard drives.
What Is Secure Erase
Using a predetermined set of commands, data on a hard drive can be erased permanently using a process called Secure Erase. To permanently delete all data from a hard drive, use the Secure Erase command, which overwrites each sector with a binary one or zero. This is why there is no way to restore the information that was deleted using the Secure Erase commands.
Still, even though they are directives. Given that Secure Erase commands are accessible from the hard drive’s firmware, you cannot run them in Command Prompt like you would in Windows 11/10. You will need third-party software, such as EaseUS disk wipe software, to securely erase your SSD in Windows 11/10.
When Do You Need to Wipe an SSD
When should you use a secure erase on a solid-state drive? There are situations in which you must completely format an SSD:
- You can then resell the SSD with the knowledge that no one else will be able to access the files stored on it because they have been deleted.
- In order to get the SSD ready for a new user, you must: If you want to ensure the safety of your data, erasing the files on the storage device could be a good idea.
- Prepare the solid-state drive for alternative purposes, such as installing an operating system, playing games, or as an additional data storage device.
- Do a secure erase on your SSD if you suspect it may be infected with malware or a virus.
SSD Manufacturer Secure Erase Utility
As part of their product, the vast majority of SSDs come with a utility that includes a set of features unique to SSDs, such as a Secure Erase option. Most experts agree that Secure Erase is the best method for completely wiping out data from an SSD.
By restoring an SSD to its original settings, or “factory settings,” Secure Erase completely deletes all data on the device. After that point, data recovery software will no longer be able to salvage any of your lost files.
We advise looking up not only the utility but also instructions for completing an erase on the website of your hard drive manufacturer, as each toolkit operates differently. The SSD may already have a toolkit installed on it.
Samsung Magician, Intel Solid State Drive Toolbox, and Kingston SSD Toolbox are all good examples of secure erase utilities.
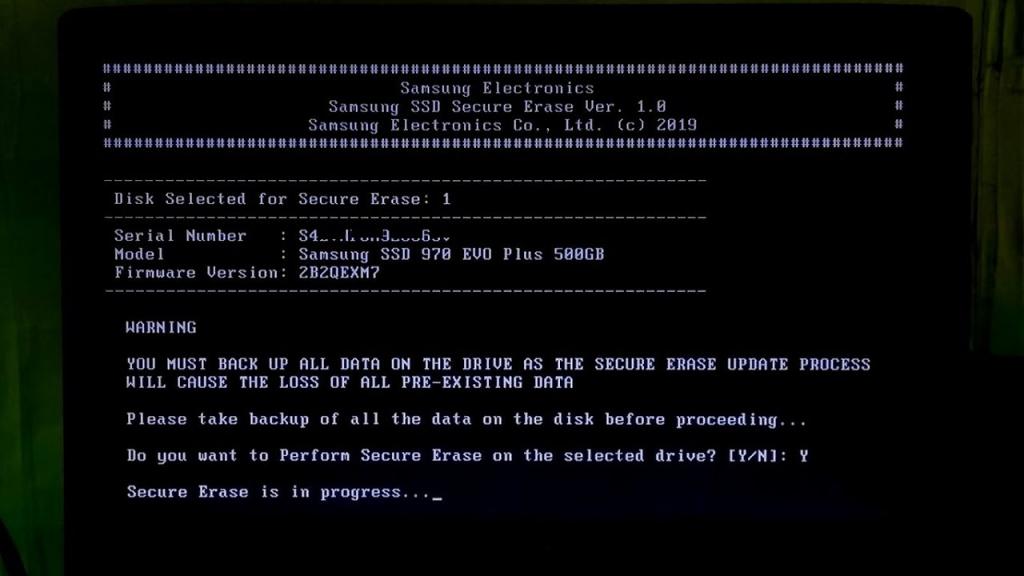
Let’s use Samsung’s Magician as an example:
- In order to access the tool, click here to download it from Samsung’s website.
- Just double-click the executable and the wizard will take you through the rest of the setup.
- Launch Samsung Magician and select “Secure Erase” from the drop-down menu at the program’s bottom.
- Just do as directed to activate the Secure Erase function. Most utilities require a bootable USB drive to function. Always keep in mind that this will erase everything on the drive, including Windows 10.
HDD Erase
The NSA once endorsed a simple program called HDD Erase as the best method for permanently wiping drives, and it is now the second most popular method.
HDD Erase’s main benefits are that it is free to use and compatible with SSD hard drives from any manufacturer. HDD Erase, on the other hand, can only be used in DOS and isn’t as intuitive as the other options we cover.
- Get HDD Erase by clicking here.
- Use a program like Rufus to make a USB DOS bootable drive.
- The HDD Erase program should be copied to the USB drive.
- To boot from the USB drive, restart the computer and change the boot order in the BIOS.
- On the DOS prompt, enter “hdderase” and hit enter to permanently erase the hard drive.
- Press Y and enter to continue when prompted.
- To proceed, press any key. To continue after the disclaimer, press the “Y” button.
- If prompted again to use an electrical outlet rather than a battery to run the computer, select “Y.”
- Then, among the list of drives, locate the one you wish to delete and make a note of the letter and numerical values to its left (for instance, “PO”). Please double-check that you have selected the right drive.
- Enter the combined alphabetic and numeric code and click “Enter.”
- To access the menu of customization options, press Y and enter.
- To activate Secure Erase, enter the number “1” and press Enter.
- To begin the secure deletion process, press “Y” and enter once more.
- Once done (this could take a few minutes or several hours, depending on the size of the SSD), return to the main menu, type “N,” and press enter to exit.
User-Friendly Third-Party Utilities
The third option is to employ a tool other than HDD Erase itself. In an effort to make their software more user-friendly, many of these apps create environments that look and feel like Windows 10. Parted Magic and Blancco Drive Eraser are two well-known examples.
These tools are similar to a manufacturer’s toolkit in their functionality, but they typically come with a hefty price tag. Still, they simplify matters significantly for the inexperienced user.
FAQS
With EaseUS BitWiper, you can securely and thoroughly erase everything on your SSD in Windows 11/10, whether it be sensitive information, malware, or viruses. Check out the FAQs and answers down below if you still have concerns about secure erase SSD.
1. Does Secure Erase damage SSD?
Secure Erase, as described on this page, is a method for permanently erasing data from a disk by writing sectors of binary one or zero.
The combination of writing the 0 and 1 will render the SSD’s data permanently unrecoverable and may cause some disk damage in the process. Use a disk wiping tool, such as EaseUS BitWiper, to keep unauthorized users off your SSD.
2. How do I avoid data loss due to securely wipe an SSD?
We advise backing up all critical data to another device in advance to reduce the risk of losing information while wiping an SSD. To make a copy of your SSD’s data, you can use EaseUS Todo Backup; just follow these instructions.
Xem thêm : Are Sound Cards Worth It? Comprehensive Guide Update 07/2026
1. Select the data you want to back up by clicking the “Select backup contents” button.
Second, select File from the four backup types (File, Disk, OS, and Mail).
Third, click “Open” to see your computer’s and the network’s files laid out side by side. In order to customize which files you wish to archive, you can expand the directory.
Step 4: Follow the on-screen prompts to decide where you’d like to save the backup.
To add a password to the backup in “Backup Options”, select “Options”; to set a backup schedule and select an event to trigger a backup, select “Backup Scheme”. Additional settings for the backup procedure are also flexible.
Step 5: Save the backup to a local disk, EaseUS’ cloud storage, or a network attached storage device.
In Step 6, customers can choose between backing up to EaseUS’s cloud storage and another cloud storage service.
Select Local Drive, then add Cloud Device, enter your account information, and log in to begin backing up to a cloud service other than your own. The EaseUS cloud storage service can also be used to store backups. After selecting EaseUS Cloud, sign up for an account and then sign in.
Step 7: Select “Backup Now” to initiate the backup process. When the backup is complete, a notification card will appear on the left side of the panel. Right-click on a backup job to access additional management options.
A professional disk wiping tool is necessary for safely clearing data from an SSD. This page suggests using EaseUS BitWiper to assist you, which is a good choice.
3. How do I secure erase Samsung SSD?
You can use the above instructions as a guide for wiping out your Samsung SSD. Alternately, this handy checklist will help you get things done:
The most important thing to do with your valuable Samsung SSD data is to make a backup.
To properly format a Samsung SSD, you should download a trusted wipe tool.
EaseUS BitWiper, the Samsung Magician SSD Tool, the SanDisk SSD Dashboard, and similar programs can all be used for this purpose.
Remove all data from the Samsung SSD using the eraser of your choice.
A Final Artisanal Method
The only way for SSD to permanently delete information is to overwrite it. Knowing this, you can safely delete sensitive data from a hard drive by filling it with media files like movies and music in Windows Explorer, and then erasing everything on the drive.
Once the storage capacity is reached, any previously stored information will be permanently deleted. If you delete the media files now, your SSD will be clean. In this case, the SSD will be completely empty, with only some of the media files stored on it being retrievable.
This will only be successful on SSDs that have never been formatted with Windows 10.
Nguồn: https://gemaga.com
Danh mục: Guide