1. Optimize Windows 10 With Gaming Mode
On the lookout for a better way to optimize Windows 10 for gaming?
Windows’ Game Mode is a crucial configuration for play. To learn more:
Bạn đang xem: How To Speed Up Windows 10 For Gaming Update 07/2026
- Input: Windows key I
- select a game mode
- Choose your gaming options by selecting Game Mode or activating it.
- Game Mode can be accessed from the Gaming menu.
- Flip the switch to activate Game Mode.
If your computer has this feature, Game Mode will automatically adjust settings to give you the smoothest gameplay possible. Microsoft also plans to halt Windows Update for the time being.
Although this is a good start, there are still some issues with gaming on Windows 10 when using Game Mode. For additional Windows 10 gaming adjustments, please continue reading.
2. Improve Online Game Performance: Disable Nagle’s Algorithm
Essentially, Nagle’s algorithm bundles data packets at the expense of a more consistent internet connection. Although it serves a purpose, enabling Nagle’s algorithm on your computer may cause lag when participating in online games.
Disabling this feature and thereby enhancing Windows 10 gaming performance requires first verifying the IP address used.
- Simply press the Windows key plus the letter X.
- Achieve this by picking Windows PowerShell.
- Type ipconfig into the box and hit Enter.
- In order to find out what kind of IP address your computer has, type in “IPv4 address” and see what comes up.
Once you have the IP address, you can use it to make the following changes to the Windows Registry:
- A new window will open.
- Simply open a new registry editor by pressing
- Click Yes
- To edit the Windows registry, open Registry Editor with caution.
Type or paste the following path into the address bar:
HKEY_LOCAL_MACHINE\SYSTEM\CurrentControlSet\Services\Tcpip\Parameters\Interfaces
The left pane contains various folders and files identified by alphabetic and numeric identifiers. If you can’t get to the right file, check the DhcpIPAddress column in one of the directories.
Once you locate the corresponding file folder:
- Just right-click the file folder.
- For a DWORD (32-bit) Value, click the New button.
- TcpAckFrequency – Please Identify
- Click OK
- Choose New > DWORD (32-bit) Value once more.
- Let’s call it TCPNoDelay.
- Simply double-click on each, and then change all of the settings to 1.
Nagle’s Algorithm is turned off when this is done. Turning the parameter values back to 0 disables them in case of problems.
3. Optimize Windows 10 Online Gaming With Faster DNS
In Windows 10, network congestion can be a problem for online multiplayer games and those that rely on a remote server.
While a faster internet connection would be helpful, it would be much easier and less expensive to simply adjust the network settings.
- To access the System Preferences menu, press the Windows key I.
- Navigate to Preferences > Network & Internet > Adapter Settings
- The right-click menu of your wireless network
- Choose Preferences
- Emphasize IPv4 (Internet Protocol)
- Remember to write down the two DNS entries.
- Substitute 1.1.1.1 and 1.0.0.1 for them.
- Achieve this by selecting OK and then Closing
- Open a new tab in your default browser.
The improved connection speed should be welcome news for those of you who enjoy playing games online.
4. Disable Automatic Updates for the Best Gaming PC Settings
When you upgrade to Windows 10, the operating system will update itself and restart without your knowledge or consent. Although this function doesn’t trigger frequently, you should never let your guard down lest you lose your progress.
Automatic updates not only have the potential to unexpectedly restart Windows, but also have the adverse effect of reducing network throughput while downloading.
Although you can’t stop the system from restarting on its own, you can put it off for a while. In order to play your games uninterrupted by Windows Update downloads:
- Simply press the Windows key plus the letter I to access the Control Panel.
- Navigate to Windows Update by selecting Update & Security > Windows Update.
- Explore the options under “Advanced,” then “Update Options.”
- Disable If an update requires a restart, please do so as soon as possible.
- Enable Disclose a warning (Windows will give you plenty of notice before it reboots after an update)
- You can put off updating for up to a week by using the Pause updates feature.
You can avoid having Windows Updates download and install during peak usage times simply by telling Windows 10 when you plan to use it.
5. Disable Notifications in Windows 10
In Windows 10, the Focus Assist function allows you to control when and how you get alerts.
Notifications often include pop-ups and chimes, which can be annoying and even ruin a game. With the help of Focus Assist, you can control how much of your attention you give to a given task.
- Simply press the Windows key I to access the Control Panel.
- Access Focus Assist via the System menu.
- Simply uncheck the boxes next to any other alerts and you’ll be left with only alarms.
- Make sure the toggle for “When I’m playing a game” is turned on
- Get out of the Settings menu
6. Prevent Steam Auto-Updating Games
To buy and install games, most Windows gamers use Steam.
Steam’s update system is a major source of frustration for users. You can’t disable the system-wide update process for your games while this is happening. Updates for games you never play could eat up storage space, and automatic downloads could slow down your connection.
If you want to stop Steam from quietly updating your games:
- Start the Steam program.
- In Steam, go to “Settings” then “Downloads.”
- Deactivate the option to download while playing.
In addition, you can stop Steam from updating infrequently played games:
- Launch Steam’s Media Library.
- Simply right-clicking an unused but installed game
- Use the Property menu to get to Updates.
- The Automatic Updates setting can be modified Keep this game updated at all times or only when I tell you to.
- Check the box labeled Background Downloads and click the button labeled “Pause downloads while I play.”
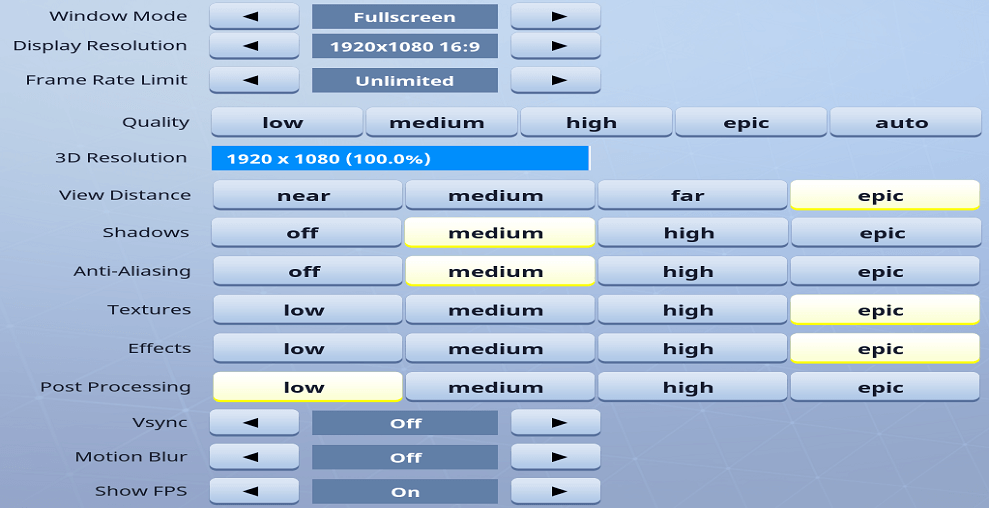
7. Tweak Windows 10 Visual Effects for Game Improvements
The GUI, or graphical user interface, of your computer may slow it down. The default Windows 10 theme is designed to make a good impression.
It’s possible for games in the foreground to interfere with a flashy UI in the background. Make Windows 10 run better for video games by modifying these settings.
- To access the Windows Settings, press the Windows key plus the letter I.
- Expression of Type
- To modify how Windows looks and runs, click the Settings cog.
- Select Optimize for peak performance in the settings menu.
- To apply, please click the button.
- Simply select the “Advanced” menu option.
- Be sure that Programs is selected in Adjust the best performance of.
- Reapply, and then click OK to verify
8. Tweak Your Mouse Settings for Windows 10 Gaming
Does your mouse slow down your Windows 10 gaming experience? If you want to know, tweaking your mouse’s settings is a good place to start. The performance of your mouse in games can be affected by a setting called pointer precision (also known as mouse acceleration). Turning it off can improve Windows 10’s gaming performance.
- Free Configuration
- A mouse can be set up in the Devices menu.
- Go to the Pointer menu and pick an option.
- Select the box labeled Improve pointing accuracy.
- When you’re ready, select the applicable option and click Apply
- If you’re ready to leave, click OK; you can also tweak the pointer speed to your liking.
If you’ve noticed an improvement in gameplay, it’s likely because your mouse was holding you back.
9. Max Power Plan to Improve Windows 10 Gaming Performance
Because of their assumed insignificance, power options are frequently disregarded. While some gamers report improved performance after adjusting their PC’s power settings, others see no noticeable change.
You need to try it out on your computer to find out for sure. In order to modify your energy consumption habits:
- Configuration Menus That Can Be Opened
- the ability to exert one’s type
- The additional power options can be accessed by selecting Power & Sleep > Advanced Power Options.
- If you want the best performance, go with the advanced choice.
- Use if nothing else is available. A new, personalized power configuration can be created by creating a power plan.
Your computer will be able to perform better with this setting, but it will require more power and run hotter as a result. This Windows 10 optimization is best utilized on desktop PCs as opposed to portable devices.
10. Keep Your Windows 10 Drivers Updated for Improved Gaming Performance
The Graphics Processing Unit (GPU) is the brains of your computer’s gaming system. Unfortunately, the GPU’s continued fast and efficient operation relies on using the most recent Windows driver.
Driver updates are beneficial for all graphics cards, new and old.
To inspect the brand and model of your GPU:
- Option-click the Desktop
- Choose Display Settings > Advanced Display Settings.
- Look for the Display adapter settings at the bottom.
In this window, go to Properties > Driver > Update Driver to access the latest driver updates. If that doesn’t work, you can always check the manufacturer’s website to see if there’s a newer version of the driver available.
Xem thêm : Pokemon Sword And Shield Guide: How To Raise Friendship? Update 07/2026
In many cases, you can get automatic driver updates and free gaming software from the manufacturer. Installation of the chipset and LAN drivers for your motherboard is also highly recommended for optimum performance. This makes sense given how important they are to having a good gaming experience overall.
Opening Windows PowerShell (right-click Start to find it) and entering: is the quickest way to verify chipset drivers.
The wmic baseboard query for product, manufacturer, version, and serialnumber
In the DOS prompt, your motherboard’s brand and model will be displayed.
Include the name of your device’s manufacturer and model in the search box below to locate the drivers you need. You can usually get the required software from the manufacturer’s website, under the “Support” tab.
Find your on-board LAN drivers here as well as your chipset drivers for a speedy and reliable internet connection.
11. Install DirectX 12 to Optimize Windows 10 for Gaming
Windows 10 relies heavily on DirectX 12, the most recent version of Microsoft’s popular gaming API.
It provides improved frame rates, decreased power consumption, and enhanced visual effects in addition to support for multiple GPU and CPU cores.
To see if your copy of DirectX is up-to-date:
- To launch Windows PowerShell, click here.
- For a diagnosis, enter dxdiag.
- Tap Enter
A few seconds later, the DirectX Diagnostic Tool will load.
Are you missing DirectX 12 and unable to play this game? If you upgraded from Windows 8, there is a slim possibility that this will occur. 1. Improve the situation by:
- You can access the Windows operating system’s configuration menu by pressing the Windows key plus the letter I
- Simply go to Settings and click on Security and Updates.
- Navigate to Windows Update > Verify for Updates.
- Please be patient as the updates load.
10 Reasons for PC Lagging and How to Fix Stop Lag Windows 10/8/7
Computer lag can have either a hardware or software root cause. Learn the ins and outs of why your PC has suddenly slowed down and what you can do about it right here!
1. CPU with Poor Performance
A computer with lag or lag spikes may have a CPU that is too old, too hot, or not fast enough. Simply put, a higher-performance central processing unit (CPU) means a quicker computer.
To make sure your computer’s processor is operating at peak performance, run a CPU stress test (which is free for Intel processors) and check your AMD processor’s status with the AMD System Monitor. Try to get a new one if the old one isn’t doing the job.
2. Corrupted or Insufficient RAM
RAM corruption or insufficiency can negatively impact system performance, trigger unpredictable restarts, lead to a blue screen, and more. Moreover, if RAM is damaged or corrupted, the system memory will not be able to support the required number of running processes and services. This causes your PC to run slowly.
To eliminate PC lag in Windows 10/8/7, try replacing the corrupted RAM or adding more memory for your computer.
Error message “Your computer is low on memory” in Windows 10/8.1/8/7? You can try these complete fixes to see if they resolve the low memory error.
3. Old Graphics Card
Problems with the graphics card are often at the root of a computer’s inability to run games smoothly. Since it is the graphics card’s job to render 3D graphics and do the calculations for in-game physics, it is the most important component for a good gaming experience.
You can expect significant lag while playing games on a computer with a basic graphics card. Is there a way to eliminate stuttering in Windows 10/8/7 video games? If the current one is outdated, replace it immediately.
4. Windows Is Running on HDD
Loading times are proportional to the speed of your hard drive. When playing games that are fairly demanding on processing speed, computers that still use the old-fashioned mechanical hard disk will lag or even freeze.
Given that Windows is always slower when running on HDD rather than SSD, this is a good argument for making the switch. If you set up your solid-state drive correctly, you’ll notice a significant increase in gaming performance and be able to put an end to the computer’s tendency to lag and freeze up.
Change Operating System Drive from Hard Drive to Solid State Drive without Reinstall
To upgrade, though… how? It may be costly to enlist the aid of technicians. Alternatively, you can use expert hard drive cloning software to upgrade your HDD to an SSD or move Windows 10/8/7 to a new storage medium. The free version of MiniTool Partition Wizard can be used to perform disk upgrades and system migrations with relative ease.
The Migrate Operating System to Hard Disk or Solid State Drive function allows you to copy either just the Operating System or the entire System Disk to a new hard drive or solid state drive. What’s more, the Copy Disk is made to copy an entire disk, whether it’s a data disk or a system disk, onto a different disk.
Either can be used to remedy the sluggishness of Windows 10/8/7 on a computer by upgrading the disk to an SSD. Try MiniTool Partition Wizard now by downloading it for free.
The program Copy Disk serves as an illustration.
MiniTool Partition Wizard’s first step is to be launched to the main interface. Click Copy Disk in the left pane, or choose Copy from the context menu after selecting the system disk.
Second, designate the SSD you have attached to your computer as the location where the data will be written.
To prevent data loss, check that your SSD can accommodate the partitions’ size. To add insult to injury, the cloning procedure involves wiping the target disk clean, so be sure to back up any data you deem essential before beginning.
Step 3: Select a disk cloning copy method and proceed by clicking the Next button.
Suggestion: To maximize the speed of an SSD, select the “Align partitions to 1 MB” option. Since the Free Edition of MiniTool Partition Wizard does not support SSDs larger than 2TB, you will need to upgrade to the paid version to access the option to Use GUID Partition Table for the target disk.
Fourth, figure out how to start Windows from the designated drive.
Five, hit the “Apply” button to save your modifications.
Games installed in the system partition can be moved to the SSD along with Windows using the Migrate OS to HD/SSD Wizard, so you won’t even need to reinstall them to play them on the new storage medium.
The best backup software, MiniTool ShadowMaker, also has a feature called Clone Disk that makes it simple and straightforward to upgrade to an SSD and thus resolve the issue of a sluggish Windows 10 computer.
Find it appealing? You can get its trial version by clicking the link below, and then you can begin the disk cloning process by following the steps outlined in the article “How to Clone a Hard Drive to SSD in Windows 10/8/7.”
Once you have completed the HDD to SSD upgrade, you can swap out the HDD for the SSD and start Windows directly from the SSD. You won’t have to worry about Windows 7, 8, or 10 slowing down your computer again.
5. Hard Drive Is Damaged
If your hard drive (and especially your system disk) is malfunctioning, your computer may run slowly or not at all. In Windows 10, 8, or 7, how do I eliminate lag?
If you suspect that logical or physical damage to your disk is to blame for your computer’s slow performance or frequent freezes, a thorough check can reveal the problem and lead you to a solution, such as fixing the errors or protecting the bad blocks.
Xem thêm : Spiritfarer Guide: How To Upgrade Your Ship? Update 07/2026
To do this, launch the Command Prompt and run chkdsk.exe to look for any logical or physical damage. One by one, enter the following: chkdsk x: /f or chkdsk x: /r (where x is the letter of the drive you want to check).
The MiniTool Partition Wizard, which is a partition manager, can also test the disk for bad sectors and help you check and repair file system errors. Keep in mind that this utility can only detect bad blocks; if it does, you’ll need to use chkdsk /r to protect your data.
6. Operating System Isn’t Maintained or Upgraded
A variety of applications and utilities can accumulate on your system if it is not regularly serviced, tweaked, or updated. This causes your computer to suddenly slow down, even if it’s brand new or high-quality.
How to eliminate PC sluggishness and speed up your Windows 10/8/7 computer. Observe the steps outlined below.
First, delete unused software.
New computers typically come with a plethora of software already installed. The accumulation of these is a natural consequence of the aging of computers. The vast majority of them, however, are never opened, and some may even be operating in the background without your knowledge.
The more programs you have open at once, the slower your computer will run, regardless of how much RAM it has.
This means you’ll have to either close each app by itself or launch Task Manager to view what’s running and kill it there.
Technique 2: Delete Temporary Files
Internet Explorer stores all of your browsing history permanently on your hard drive. It’s normal for Windows to create temporary files whenever you install new software or just use the operating system.
Disk Cleanup allows you to delete these temporary files to free up space on the system, which can eliminate PC lag.
Warning: Microsoft has replaced this app with Storage Sense in Windows 10. If Disk Cleanup isn’t available on your computer, you can delete temporary files using Sense.
Due to Storage Sense’s similar functionality, Microsoft has announced that the Disk Cleanup tool will be removed from Windows 10.
First, open a file manager (such as My Computer or This PC), then locate the C: partition, right-click it, and select Properties.
Second, select the Disk Cleanup option from the General menu.
Third, click Temporary Files at the bottom of the list of files you want to remove.
Fourth, select OK and then the Delete Files button to confirm the removal.
By doing so, you can alleviate the “my computer lags when playing games” problem and free up some disk space.
Third Method: Scheduled Drive Optimization and Defragmentation
In essence, this method enhances the performance of your hard drive. Access the C drive’s settings by opening My Computer or This PC and right-clicking the C drive. Then, select Optimize from the Tools menu to begin enhancing the performance of your hard drive.
Fourthly, make sure your OS is always up-to-date.
A system update for Windows 10/8/7 could be the answer to your computer’s slow performance issues. This means maintaining a regular schedule of OS updates.
It is recommended that a backup of the operating system or disk data be created with MiniTool ShadowMaker before performing the update.
7. Outdated Drivers
Problems with hardware or software can occur on a Windows 10/8/7 computer if the drivers are out of date. The majority of the time, such problems will cause your computer to run slowly. To lessen your computer’s sluggishness, you should usually update the drivers.
8. Internet Connection Issue
The significance of the internet is only expected to grow. However, issues with the signal strength, the reliability of the lines, the gateway, or the lack of connection, as well as the upload and download speeds, are constant and can slow down a computer.
This typically occurs when your operating system is attempting an update or sending data to the data center while concurrently running software is downloading or uploading data.
Here, Windows Performance Monitor can be used to gather data about the computer’s central processing unit, random access memory, and network connection. Simply type “performance monitor” into Windows 10’s Cortana search box and select the resulting option.
9. Your PC Is Infected with Virus
Even if you have an antivirus program installed in Windows 10/8/7, your computer may still be vulnerable to infection. Computer problems, such as slow performance, are increasingly attributable to viruses and other forms of malware.
What can be done to speed up a sluggish PC? Now is the time to launch the antivirus program and perform a full system scan to identify and eliminate any viruses. Next, see if your PC is still slow.
Firewalls that are poorly made or improperly configured can also slow down a computer. If you think a firewall or virus/malware scanner is to blame for your computer’s slow performance, temporarily disabling those programs may help you determine if your suspicions are justified.
Don’t forget to activate your firewall and/or antivirus software after the test is complete.
10. Insufficient or Malfunctioning Power Supply
Your computer may be running slowly because of an insufficient or faulty power supply. Check that the central processing unit and/or graphics processing unit are receiving adequate power. You can get assistance fixing the problem by contacting the manufacturer.
In reality, there are a plethora of other causes of the dreaded “my computer lags when playing games” problem, such as a faulty audio card or other hardware. Try out the suggestions in light of your unique circumstances.
FAQs
How do I optimize my computer for gaming?
- Use Game Mode to get the most out of Windows 10.
- In other words, turn off Nagle’s algorithm.
- Control the peak times.
- Improve your storage with an SSD.
- Adjust the Visual Effects to your liking.
- Game updates on Steam can be disabled.
- Make use of a high-output power strategy.
- It’s time to upgrade your video card drivers.
- Turn off rapid mouse movement.
- Grab DirectX 12 and set it up.
To what do I owe my computer’s sluggish performance?
- HDD is currently hosting Windows 10.
- Memory (RAM) issues.
- The CPU is getting old.
- The hard drive failed.
- Insufficient space on the boot disk.
- Software that uses excessive amounts of memory or system resources.
- Disorganized shards of data on the hard drive.
- Some malicious software or computer virus has infiltrated the system.
- Dishes don’t line up properly
- Microsoft’s Windows operating system has reached the end of its useful life.
Is Windows 10 better gaming?
Compared to earlier Windows versions, Windows 10 provides enhanced gaming performance and an improved gaming experience. Therefore, Windows 10 is a viable option for PC gamers who wish to take advantage of the platform.
In what ways can a computer’s speed be improved?
- Increase your RAM.
- Switch to an SSD.
- Throw away unused software.
- Turn off the auto-start features.
- Removal of unnecessary files from the disk.
- Make Like Glass and Get Opaque With It.
- There are no fancy extras.
- Take care of routine maintenance.
- No tips.
- The power structure must be altered.
Now You Know How to Optimize Your PC for Gaming
The modern gamer will find Windows 10 to be a genuine treat (and now Linux as well, thanks to these technologies and services that have rescued gaming on Linux).
The gaming community has a unique place in the future of Windows 10, as evidenced by the massive game library, Xbox One compatibility, and gaming-centric software. The fact remains, though, that flaws abound in any system. These Windows 10 adjustments will help you get closer to gaming perfection:
- New in Windows 10: Dedicated Gaming OS
- Turn off the Nagle algorithm
- Incorporate quicker Domain Name System servers
- Stop the auto-updates
- Turn Off Windows 10 Alerts
- Steam’s auto-updates should not be enabled
- Improve gameplay by adjusting visual effects.
- Optimize your mouse’s settings for faster frame rates in games.
- Adjust your power settings to their highest possible levels
- Update drivers regularly.
- Please download and install DirectX 12
Nguồn: https://gemaga.com
Danh mục: Guide