Get the most out of Dead by Daylight by employing the most effective killers. This is the most recent and comprehensive Killer Tier List for Dead by Daylight.
While the survival horror genre is typically dominated by single-player games, Dead by Daylight (DBD) adds a multiplayer twist. There are 5 people involved in a DBD game: It’s down to four survivors and one killer.
Bạn đang xem: Dead By Daylight Killers Tier List Update 08/2026
The killer has been given a procedurally generated map on which to track down the remaining players.
We’ve compiled a list of the best ones to use if you enjoy playing the role of the killer. The characters on this list will help you hunt more efficiently and effectively. Okay, let’s get down to business.
Dead By Daylight – A Quick Introduction
Dead by Daylight is one of the most well-known asymmetric survival horror video games currently available. It came out in June of 2016 and has steadily gained followers since then. Behaviour Interactive worked on the game, and Starbreeze Studios was responsible for publishing it.
Dead by Daylight lets you take on the role of a killer or a survivor. The survivors must get away from the killer and to the map’s exit, while those who play the killer role can kill or torture other survivors.
The action is fast-paced and thrilling, and the maps are well-thought out. There is a wide variety of killers to pick from, each with its own set of skills and approach to the game. When there are several potential killers to choose from, making a decision can be challenging.
This is where Dead by Daylight’s killers ranking chart comes in handy. To help you decide who to play in Dead by Daylight, we’ve compiled a tier list of killers based on their relative strengths, weaknesses, and overall fun factor. So, let’s not waste any more time and dive right in!
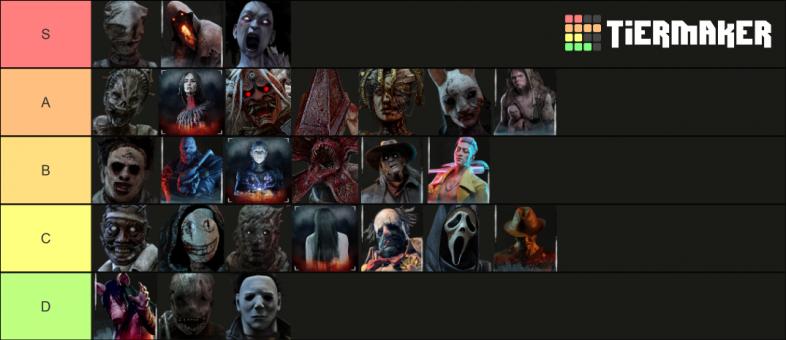
S-Tier
The best killer games are these. They have many helpful items that will give you a significant advantage in your search for survivors.
| Killer | Perks | Power | Description |
|---|---|---|---|
| Named “Oni,” A. Yamaoka, aka Kazan | Zanshin Methods Within a radius of 24 meters, you can see the Auras of all Pallets, Destroyable Walls, and Vaults. Reverberating Blood Nemesis |
The Fury of Yamaoka Blood Orbs dropped by defeated opponents should be ingested. Blood Fury is activated by pressing and holding the Active Ability button when your Power meter is at its maximum. The Oni becomes extremely dangerous while Blood Fury is active and gains access to Demon Dash and Demon Strike. |
The Oni possesses some of the game’s most potent abilities. With it, you can eliminate the opposition in under half a minute.
The Oni’s power tends to multiply rapidly as the game progresses. Finding survivors, running them down, and sucking their blood for extra speed is central to his play style. The Oni’s only drawback is that his power needs to be recharged after each use. When he does, he’ll become an absolutely terrifying threat. |
| An expression of “The Spirit” Yamaoka Rin | Ghostly Rage When you have broken 4/3/2 Pallets, The Entity will instantly break a Pallet the next time it stuns you. Hex: The Spooky Suburbs |
Spirit of Yamaoka Yamaoka’s Haunting can be charged by pressing and holding the Power button. The soul will leave the body, but the Husk will remain in place. |
The Spirit can temporarily disappear without a trace. For example, she can vanish, pick up a speed boost, and then reappear next to a group of survivors who are completely unaware of her presence.
The current killing meta in Dead by Daylight is all about mobility. The Nurse and Spirit do a wonderful job of playing off of this characteristic. The Spirit is so powerful because it strips away data that would otherwise be vital to her opponents’ survival, while keeping all the data that would aid her in her hunt. |
| Also known as “The Hag” Sherwood, Lisa | Three-Seal Hex The Blindness Status Effect is applied to a Survivor when they are hit by a Basic Attack while the Hex Totem is active. Hex: Ruin Destroy All Optimism Spend 2 Tokens to get a 3/4/5% Haste Status Effect that lasts for 10 seconds after hooking a Survivor. |
Catalyst, Blackened To get down on one knee and draw a Phantasm Trap sign, press the Power button. Within 40 meters of a triggered Phantasm Trap, the Hag can teleport there. |
In my experience, the Hag is the most frustrating killer to face off against.
Her traps are designed to coerce and direct the survivors’ actions so that they conform to her plan. Instead of blindly hunting down survivors, a skilled hag player will use her traps to take control of the entire arena. |
| It’s the Nurse! A. Smithson, Sally | Stridor In comparison to regular breathing, the survivors’ grunts of pain are increased in volume by a factor of 0–25%. Thanatophobia The Calling of a Nurse |
Spencer Takes His Last Gasp When activated, they blink for up to twenty meters. |
The killer who can reach the highest possible level of proficiency is also the best in the game.
The Nurse’s ability to blink makes it easier to chase down survivors because it effectively renders solid objects invisible. At first, you may find that the survivors do nothing but run in circles with you. You will begin to see a string of victories once you master blinking and blink chaining. |
| Freddy Krueger, from “The Nightmare,” | Fire Up For the remainder of the Trial, your Picking up, Dropping, Pallet breaking, Breakable-wall breaking, Generator damaging, and Vaulting speeds will be increased by 3, 3.5, or 4% for every Generator you destroy. Keep Me in Mind The Blood Guard |
Nightmare Devil After being put to sleep by the Nightmare for more than 60 seconds, Survivors enter the Dream World passively. |
Since his release, Freddy has been a reliable choice for teams. Teleporting to unfinished power generators is a breeze thanks to his superior mobility.
His ability to lay down Dream Snares makes him an excellent survivor hunter. Everything here is applicable to a typical situation when fighting Freddy. His already challenging nature exponentially increases the moment you enter the Dream World (which is every minute, by the way). |
| “The Pest” T. R. Grimes, Jr. | Grab of the Dragon The first survivor to interact with a Generator after it has been kicked for 30 seconds will scream, giving away their location for 4 seconds and subjecting themselves to the Exposed Status Effect for 60 seconds. There is a 120/100/80-second cooldown on using Dragon’s Grip. Spell: Blood Favor A hex that pleases The Entity when blood is shed. Hex: Blood Favour causes The Entity to prevent any Pallet within 24/28/32 meters of the injured Survivor from being pulled down for 15 seconds whenever that Survivor enters the Injured State. | Malignant Bribery The Blight has five tokens to begin the Trial with. Rush, Unique Capability Once Blighted Corruption is fully charged, pressing the Power button will launch The Blight into a high-velocity rush at the cost of 1 Token. The Blight is unable to launch an Attack during the Rush phase. Lethal Rush is a specialized attack. You can use 1 Token to initiate a Lethal Rush by pressing the Power button again during the Chain Rush Window. The Blight can launch an attack during a Lethal Rush by pressing the Attack button. When attacking, charging into breakable walls or pallets will cause them to be destroyed. |
Playing Blight now makes you nearly impossible to beat thanks to a significant power increase. You’ll benefit greatly from learning this killer because he has the highest possible skill ceiling. If you can master when and how to use his abilities, you will likely become unbeatable in the metagame as it stands right now. |
A-Tier
These killers are top-notch and usually have everything they need to win. Despite being inferior to S-tiers in terms of attributes (especially mobility), they can still be extremely useful.
| Killer | Perks | Power | Description |
|---|---|---|---|
| Known as “The Huntress,” Anna | Predatory Animal Once Bloodlust Tier I is achieved, the Undetectable Status Effect is granted. Hunter-related actions now award 30/40/50% more Bloodpoints. The Urgency of Being Local Hunteress’s Lullaby: A Curse |
Hatchets for Hunting To wind up a Hunting Hatchet, press and hold the Power button for a few seconds. To perform a Hatchet Throw, simply let go of the Power button. |
The Huntress is one of a kind because of her lethal accuracy at range. Her entire toolkit is based on and optimized by this one skill.
The end result is a killer who, in the hands of a skilled player, can get off to a fast start and keep on performing well thanks to her perks as the game progresses. Maps strewn with obstacles, like trees, present a challenge for any Huntress player. Her lethality comes from afar sniping at survivors. This difficulty increases dramatically in the face of these challenges. |
| “The Cleric of Death” “Pyramid Head” | Punishment by Force The Broken Status Effect lasts for 60/70/80 seconds and is applied to survivors who take a Protection Hit. Torture Path Deathbound |
Judgment Ceremonies To activate, press and hold the Power button, and then proceed forward to etch a path into the soil. Any movement on the trail will activate Killer Instinct, bringing Torment upon the survivor. Those in the Dying State who have been afflicted by Torment may be confined to a Cage of Atonement. |
Unlike the other killers on this list, Pyramid Head has a unique method of map control.
He can’t get around very easily, but his tracking and trapping abilities are invaluable. He makes up for his slow speed with a powerful long-range ability. When taking on the role of Pyramid Head, the player is usually afforded a high level of situational awareness. Because of his skills, he can easily track down any remaining survivors and deal with them as necessary. |
| The Ghost, or “The Wraith” Dr. Philip Ojomo | Predator You can pinpoint the disturbances left behind by fleeing Survivors thanks to your keen tracking ability. Survivors’ Scratches tend to appear somewhat/moderately/substantially closer together. Bloodhound Shadowborn |
Alarm Chime Cloak by pressing and holding the Power button. When you press and hold it again to uncloak, you’ll be able to take a 1-second Lunge forward. Up to 24 meters away, you can hear the Wailing Bell, and up to 40 meters away, you can hear the *Wooosh* noise that accompanies it.
Cloak |
Because of his nerf, Wraith dropped a tier. When the Wraith uncloaked and revealed his Aura, he slowed down slightly. For a considerable amount of time, both these abilities and Wraith were too strong. If you get along well with him, you won’t even notice a difference in his condition. He’s still very useful as a killer and gets the job done, albeit not as well as he once did. |
| Max Thompson Jr., aka “The Hillbilly,” | Enduring Pallet’s stuns last 40/45/50% less time. Lightborn Tinkerer |
Saw Chains To immediately launch into a Chainsaw Sprint, press and hold the Power button. Those who are hit by the Chainsaw during the Sprint will enter the Dying State. |
The Hillbilly’s success depends entirely on the player’s skill with the chainsaw.
Due to its excessive strength, the overheat mechanic has been used in previous patches to significantly weaken it. Despite this, the Hillbilly has great potential for a chase, good map control, and moderate snowballing late in the game. |
B-Tier
These killers are excellent overall, but they have some weaknesses that the best players can exploit.
| Killer | Perks | Power | Description |
|---|---|---|---|
| The Form” Mr. Myers, Michael | Do not save the best for last. Gain a Token for every Basic Attack that hits but does not damage the Obsession. Tokens can be stacked to reduce the cooldown of successful attacks by an additional 5%. Have Fun with Your Dinner Waning Candle |
Internal Enemy The Shape can gain more evil power by stalking his prey after activating Evil Within, which also improves his vision of his prey. | As the game goes on, Myers improves. If you can get past his shaky start, this is good news. Although he is a lot of fun to control, that isn’t enough to put him in the top tiers. |
| The Nemesis. The T-Type Nemesis | Punitive Killer You were built to hunt down and kill enemies. For the first seven, eight, or nine seconds of the Trial, everyone’s Aura will be visible. Hysteria Eruption |
T-Virus As your Mutation Rate increases, so does your Power. Zombies T-Virus creates two undead adversaries free to roam the Trial Grounds. |
Nemesis has had problems due to the fact that Zombies are essentially useless. Some shifts have occurred because of recent improvements to them (Zombie movement speed increase). Nemesis is currently not one of the best killers, but if he receives some buffs, he could become one. |
| The Onry by Sadako Yamamura | Disaster Trap: Raging Waters Through this psychic link, you are able to change the parameters of the Trial. Four Hooks are transformed into Scourge Hooks at trial’s outset. You can see the white Auras of Scourge Hooks. The following occur whenever a Survivor is freed from a Scourge Hook: For 5/6/7 seconds, everyone else’s Auras will be visible. The Brine’s Call Horrendous Storm |
Panicked Deluge The Onry gains the Undetectable Status Effect prior to Manifestation, making it invisible to Survivors; however, it occasionally becomes visible when within 32 meters of Survivors. |
This threat from “The Ring” series should not be ranked just yet. She’s very agile and noticeable on the map, but she lacks personality at times. Sadako will remain in the B tier until her playstyle becomes more apparent. |
| “The Face of Death” It’s Danny Johnson. | Put me in the Listening Position For 6 seconds, you can see the survivor’s Aura whenever they take an immediate action within 48 meters of you. Exciting Earthquakes Subtle Pursuit |
A Veil of Night When the Power meter is at its maximum, you can use Night Shroud by pressing the Power button. Night Shroud bestows the Undetectable Status Effect on the Ghost Face. |
The current meta does not reward players like Ghostface, who specialize in stealthy killing. In terms of silent assassination, he is unparalleled. With only a B-tier toolkit at his disposal, his status is not much better.
He has a high ceiling of skill and is rewarded for it with a powerful snowball effect in the late game. As soon as you eliminate a few survivors, the tide will turn in your favor. You’ll need to catch some enemies first, though, and Ghostface’s map control makes that difficult. |
| “The Jokester” | Bamboozle Your Vaulting Speed Increases by 5%, 10%, or 15%. When you use the Vault, The Entity will seal off that area for 8/12/16 seconds. Coulrophobia The Weasel Blows Its Top |
The Restorative Drink To release a Bottle of The Afterpiece Tonic, press or tap the Power button. The impact will shatter the bottle, releasing a cloud of toxic gas that will poison any survivors caught in its path. |
The Clown’s gas projectiles are his greatest strength. The accuracy of the player with them is central to his entire play style.
This is insufficient to make this killer any more effective. His threat level would increase if he could move faster. |
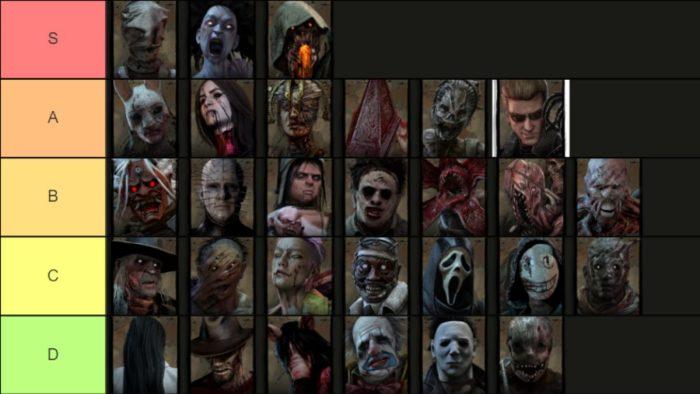
C-Tier
These are merely adequate killers, which necessitate the use of a competent player to prove their worth.
| Killer | Perks | Power | Description |
|---|---|---|---|
| The Demogorgon. Demogorgon | Surge Any Generators within a 32-meter radius of a Survivor who has been put into the Dying State by a Basic Attack will immediately explode and begin regressing. Mindbreaker Restriction That Is Almost Cruel |
To the Depths To fully charge and activate Of the Abyss, press and hold the Power button. Killer Instinct will highlight all nearby survivors whenever a Portal is activated (yellow aura). |
The Demogorgon has sophisticated navigation and pursuit equipment at its disposal.
It can either shred the survivors’ defenses to pieces or use its portals to counter the survivors’ loops strategically. The Demogorgon is a reliable killer, but it has trouble keeping up with a well-organized group. If it does not get off to a good start, its abilities do not tend to snowball. |
| The Cannibal” Mr. Bubba Sawyer | Knock Out Survivors within 32/24/16 meters of you won’t see anyone you put into the Dying State with your Basic Attack. The dying Survivor will crawl 50% more slowly for the next 15 seconds due to the Blindness Status Effect. Chili and smoked meats The Death of Franklin |
Bubba’s Sawmill To use one Charge for a two-second Chainsaw Dash that can hit multiple targets, press and hold the Power button. Those who survive a Chainsaw Dash but get hit will enter the Dying State. |
Having to avoid the Cannibal’s chainsaw is a nightmare. It has a cooldown of three uses, but each use grants the killer increased movement speed.
However, mastering the Cannibal requires a steady hand. He must be careful not to run into anything while operating the chainsaw. If he doesn’t, he’ll animate something that wastes the killer’s time—time that could be spent tracking down the survivors. |
| “The Cenobites” Spencer, Elliot | Deadlock You cause emotional anguish by removing all avenues of possible relief. The Entity obstructs the most advanced Generator for 20/25/30 seconds whenever a Generator is finished. During this time, the blocked Generator’s Aura will appear in white. Spell: Toy Evil Reel: A Sorrowful Present Four Hooks are transformed into Scourge Hooks at trial’s outset. You can see the white Auras of Scourge Hooks. The following occur whenever a Survivor is freed from a Scourge Hook: The Survivor is hemorrhaging and has the Mangled Status Effects until they are healed. Until the Survivor is injured again, their Action Speed is reduced by 7/8/9% whenever they use Healing or Repairing. |
Calls to Suffering Create a portal by pressing and holding the Power button, and then releasing it to enter it. Once the door has been opened, you can call forth a possessed Chain by tapping the Ability button. Confiscated Link in the Chain A Survivor who is the target of a Possessed Chain will be bound by an unbreakable Chain that cannot be stopped. |
If your enemies don’t have good lines of communication, this is probably the best assassin to use. Only now can you be a real threat to other players all over the map by picking him. Cenobite’s weakness is that he feels very underpowered when used by experienced players. |
| “The Physician” Carter, Herman | Force That Cannot Be Ignored The item consumption rates of affected survivors are boosted by 80%, 90%, or 100%. Keep an Eye on, Abuse Overcharge |
Spark of Carter When The Doctor uses his Shock Therapy or Static Blast on a survivor and succeeds, the survivor’s level of madness rises, and they begin to experience the effects of the Madness Status. |
Fewer than a handful of players routinely consult The Doctor. However, that shouldn’t be taken as evidence of how well he performs in games.
He’s not as efficient as the other killers at tracking down their prey, but he more than makes up for it by being a major nuisance to the survivors. His area-of-effect (AoE) ability can be used to isolate a power plant. He can use his decent speed to sneak up on retreating foes. |
| “The Pestilence” Adiris | Intervention in Corruption At the beginning of the Trial, The Entity will shut down the three farthest Generators for 80/100/120 seconds. Panic that Spreads Black Faith |
Abhorrent culling Vile Purge can be used to infect both props and survivors, starting a vicious cycle of illness. |
The survivors must adapt their strategy to the Plague’s cadence. In order to combat her, the opposing team must divide and conquer or risk being infected themselves.
Like The Huntress’s hatchets, The Plague’s infectious projectiles hit their targets dead on. This killer’s lack of escape strategies is a significant hole in her arsenal. A skilled player can easily outrun her, despite her usefulness in controlling the map and confusing survivors. |
| “The Gunslinger of Death” Mr. Caleb Quinn, | Gearhead Gearhead activates for 20/25/30 seconds after a Survivor is hit twice with a Basic Attack. For as long as the Generator is being repaired, a bright yellow aura will emanate from it whenever a Survivor makes a successful Skill Check. Toggle Switch of Death Hex: vengeance |
One Who Saves To focus your sights, simply press and hold the power button. Forcibly drag an unwilling Survivor toward The Deathslinger by pressing the Attack button and firing a spear that can become lodged in their flesh. |
The Deathslinger’s Redeemer Spear makes him particularly effective in one-on-one encounters. Because his Terror notification sound is personalized, it often fools his opponents into thinking he has launched a surprise attack.
This murderer’s lackluster map control can be attributed, in part, to his painfully slow movement speed across large areas. His spear isn’t very effective at long range. |
D-Tier
These murderers are so obsolete that they’ve almost been forgotten. Since they don’t provide a satisfying experience, you can count on there being a small number of users.
| Killer | Perks | Power | Description |
|---|---|---|---|
| The Two of Us” Deshayes, Victor and Charlotte. | Hoarder If a Survivor is within 32/48/64 meters of your location, doing any of the following will cause Hoarder to issue a Loud Noise Notification for 4 seconds: Pulls a key that opens a safe. takes any Item, even Rare ones, off the shelf. In the Trial, Hoarder causes two more chests to appear. Oppression The Kill Shot |
Ties That Bind To free Victor, Charlotte must first press and hold the Power button. By pressing the Abilities button, you can switch between controlling Charlotte and Victor. | It’s entertaining to play against twins because you can take advantage of some of their abilities to annoy them. While inexperienced players may have trouble keeping up with this killer, seasoned pros will find it difficult to beat. |
| The Trickster. Hak Ji-Woon | Starstruck Those who manage to escape your Terror Radius will experience the Status Effect. The duration of the Status Effect is increased by 2/4% for every second beyond your Terror Radius. Starstruck turns off after hooking or releasing the carried Survivor. Any Survivor currently within your Terror Radius will be affected by the Status Effect for 26/28/30 seconds. Cult Dispersal If survivors try to vault through a Window too quickly, The Entity will seal it shut for 14/17/20 seconds. No Escape |
Start the Trial with 44 Blades and a Bang! | When the enemy blunders and takes 10 knives to the back, the Trickster benefits in his own way. The problem is that it lacks flair; throwing a pair of knives at an opponent may make you feel like you wasted your time when a regular attack would have done more damage. If you’re not well-versed in combat, you can counter him by playing around the walls, preventing him from doing much damage. |
| The Hog. A. Young, Amanda | The Hangman’s Game Find out immediately when a Survivor starts trying to destroy one of your Hooks. See the Aura of any other Survivor within 2/4/6 meters of any Hook while toting them around. Surveillance Do One of Two Things |
Baptism of Jigsaw Put in four Bear Traps in reverse to begin the trial. |
The Pig ranks lower than other killers due to her “jack-of-all-trades, master-of-none” approach.
She has a terrible chase mechanic and her bear traps are all over the place. Even so, The Pig is not completely hopeless. If used by a competent player, her equipment is adequate. |
F-Tier
The game’s worst murderer.
| Killer | Perks | Power | Description |
|---|---|---|---|
| The Trapper by Evan MacMillan | Intriguing Appearance Whenever a survivor within your Terror Radius tries to repair, heal, or sabotage something, there is a 10% greater chance that they will fail the check. Force of Nature Agitation |
Bear Trap Those unfortunate enough to fall prey to a Bear Trap will suffer Injuries and be rendered temporarily immobile. |
The Trapper is a frustrating game because so much preparation is required before any progress can be made.
The competence of the survivors is also crucial to the outcome. The Trapper’s antics are easy to sabotage and circumvent, rendering his efforts futile. |
| “The Army” Joey, Frank, Julie, and Susie | Discordance A yellow Aura indicates a working Generator within 64/96/128 meters that is being worked on by 2 or more survivors. Mad Grit A.I.R. Maiden |
Wild rage While Feral Frenzy is in effect, the Legion’s Movement speed is increased. The Legion can jump over Pallets without damaging them. The Blood Pools and Scratches of the Survivors are out of the Legion’s sight. |
This killer was once an S-tier option before receiving significant nerfs. The killer’s mobility is severely limited because of this. The Legion will soon advance in the tier list as a result of an upcoming rework. |
10 Best Killers In Dead By Daylight
The Nurse
After her husband died, the Nurse, whose real name was Sally Smithson, did what she could to support herself and her daughter. The horrors she saw at Crotus Prenn Asylum drove her to kill more than fifty patients and four employees in an effort to end the epidemic. And now she actively seeks out other players to recruit.
The Nurse is a popular character to play because of her useful abilities, such as the Thanatophobia perk, which causes all injured survivors to take damage whenever they repair, cleanse, or slow down. She is more challenging to work with for new members of the team. However, mastering her takes time and practice, and the rewards are worth it, as she is a potent killer and among the best in the game.
The Spirit
If you prefer a more malicious style of play, Rin Yamaoka, better known as The Spirit, an extraordinarily vengeful and powerful killer, is the perfect choice for you. After Rin discovered that her father had murdered her mother, she vowed to get revenge on him in this or the next life, no matter how many people managed to escape his brutality.
Many players enjoy playing as The Spirit because of how she can surprise survivors with her traversal power. She can use her teleportation ability to sneak away without anyone noticing. Hex: Haunted Ground is a useful ability for this character to have. One of the best advantages against survivors is that after the player using her has cleansed or blessed the two spawned Hex totems, the survivors will be exposed for a long period of time and can be downed with a single hit.
The Nightmare
Fans of the Nightmare on Elm Street franchise will know this character not only as The Nightmare, but also as Freddy Krueger, The Springwood Slasher. As a playable character, he is a powerful, humorous, and entertaining monstrosity. He is included in downloadable content.
Eventually, the survivors will be dragged into the Dream World, where the Nightmare can use Dream Snares to slow them down and fake Dream Pallets to trick them. If the Blood Warden perk is also used, escaping becomes extremely difficult for the survivors. Any horror fan will tell you that Freddy is the master of turning your worst dreams into something truly terrifying.
The Hag
The character known as “The Hag,” whose real name is “Lisa Sherwood,” has one of the game’s more disturbing histories. Lisa was kidnapped and tortured before finally breaking free and drawing a symbol from her grandmother’s secret book. She settled on retribution, leaving the survivors as mere bystanders.
If you take on the role of The Hag, you’ll be able to set up elaborate Phantasm Traps for the unsuspecting survivors to stumble into. Once activated, she is taken there immediately. Her Third Seal is a powerful ability that can blind the remaining survivors. It is not recommended that new players start with her because of the learning curve involved in using her effectively, but she is one of the best killers in the game for torturing survivors once the player has mastered her abilities.
The Oni
Some of the people mentioned above didn’t always plan on doing wrong. Some people, however, seem to have gotten a head start in life by torturing others. This describes Kazan Yamaoka, better known by his moniker The Oni. This character and his eventual form are inspired by Japanese folklore, and while he may not be the game’s primary focus, he is still a potent option among the many available.
Xem thêm : Exos Heroes Tier List Update 08/2026
Kazan Yamaoka wanted to restore the samurai’s honor. His mission resulted in the deaths of many innocent people and the torturing of many more before he was finally killed. This ominous figure possesses potent skills and advantages, such as the Blood Echo. For a reasonable amount of time after a survivor is hooked up to this perk, all wounded survivors will become hemorrhaged and exhausted.
The Cannibal
The Cannibal, a fan favorite from the cult classics, is also known to audiences as Leatherface. If the idea of giving someone the runaround with a chainsaw sounds exciting, then you’ll love The Cannibal.
Even without his advantages, the Cannibal is a formidable foe simply because of his presence. Bubba’s Chainsaw is a fantastic perk that you can use. With this perk, players can do what Leatherface does best: unleash a devastating sweep attack with his trusty chainsaw, instantly killing any survivors in their path.
The Wraith
If you find the idea of being a stealthy hitman appealing, then you should consider hiring The Wraith, formerly known as Philip Ojomo. Because of his Wailing Bell, he can also hide in plain sight, making him an even better candidate.
He was always unable to avoid danger and now hunts down and kills the few people who managed to escape the carnage. His predatory skills and sudden attacks keep survivors on their toes, especially when combined with certain advantages. Any pool of blood left by injured survivors shines bright, making them easier to track down, thanks to the useful Bloodhound perk.
The Nemesis
The success of a bundle hinges on the quality of the DLC connecting two excellent horror games. It was a win-win for everyone when the most terrifying monster from Resident Evil, Nemesis, was combined with Dead by Daylight’s villain-focused gameplay.
In Dead By Daylight, this monstrosity is called “The Nemesis,” and it has the ability to infect survivors with its T-Virus perk by touching them with its tentacle. When a healthy survivor is hurt while using the Hysteria perk, all other hurt survivors are unable to hear the Terror Radius for up to 30 seconds.
The Twins
The Twins, aka Charlotte and Victor Deshayes, are perfect for any role that calls for an extreme murderer with an extra dose of creepiness. In addition to their unbreakable bond, these conjoined twins excel in a few other areas as well.
Theirs is a tragic backstory. They were born during the Salem Witch Trials, were labeled demons, and witnessed their mother being burned at the stake. Victor’s fast movement and pounce attack on frightened survivors are terrifying regardless of the backstory. The perk Blood Bond is perfect for this purpose because it severely damages survivors and is nearly impossible to avoid.
The Executioner
Once again, a downloadable content pack for Dead by Daylight paired the game brilliantly with Silent Hill. Because of this, Dead by Daylight added Pyramid Head, also known as The Executioner.
It should come as no surprise that Dead by Daylight maintains Pyramid Head’s reputation as a terrifying, ruthless, and dangerous evil force. With the help of the Rites of Judgement perk, the player can really put the hurt on survivors. With this ability, Pyramid Head can etch a path in the ground that causes Torment to any survivors who cross its path. As a corollary, this makes his ranged attack Rites of Judgement: Punishment of the Damned possible.
Frequently Asked Questions
1. What is the Dead by Daylight killers tier list, and why is it important?
The killers in Dead by Daylight are ranked on a “tier list,” or strength and performance scale. The higher up a killer is, the more effective they are. Player understanding of who to play as and who to avoid is greatly aided by tier lists.
2. Who is the best killer in DBD and why?
The S-tier assassins are the top players in the game. These murderers are experts at tracking down survivors thanks to a combination of skills and traits that play to their respective strengths.
3. Do all the killers have any weaknesses?
All of Dead by Daylight’s killers have their strengths and weaknesses. By understanding their capabilities and weaknesses, survivors will be better prepared to face them.
4. Which killer should I avoid playing as?
Avoid taking on the role of the D-tier killers at all costs. While they might have some useful skills, they are too weak and specialized to be effective against survivors.
5. How often do the rankings change?
Performace in-game directly affects a killer’s placement on the Dead by Daylight tier list. If a killer is particularly effective, they could be promoted to a higher tier. If they are having trouble, however, they may be demoted. The rankings are dynamic and adapt to the changing nature of the game.
Final Words
People are big fans of ranking video games in tier lists. They help players save time and energy by pointing them in the direction of the best character. To help you decide who to play as in Dead by Daylight, we’ve compiled a list of the best killers in the game and ranked them from best to worst.
Keep in mind that using each and every assassin in the game as practice will help you the most. You should give each one a shot and see which one works best for you.
Thanks for checking out our ranking of DBD killers. Please share your thoughts and questions with us in the space provided below.
Nguồn: https://gemaga.com
Danh mục: List