In Risk of Rain 2, the player’s primary focus has always been on surviving.
If you’re a beginner player, you might be daunted by the sheer amount of material the game offers. It’s not enough to worry about hordes of adversaries and chaotic conflicts; you also have to deal with an abundance of items.
Bạn đang xem: Risk of Rain 2 Tier List. The Gaming Guide Update 07/2026
First, you must decide which survivor you will utilize. Learning the mechanics of a game might be easier with the correct character, so mastering one early on is beneficial.
As a result, we’ve compiled a list of the greatest and worst Risk of Rain 2 survivors. As a result, you’ll be one step closer to defeating the game’s many challenges.
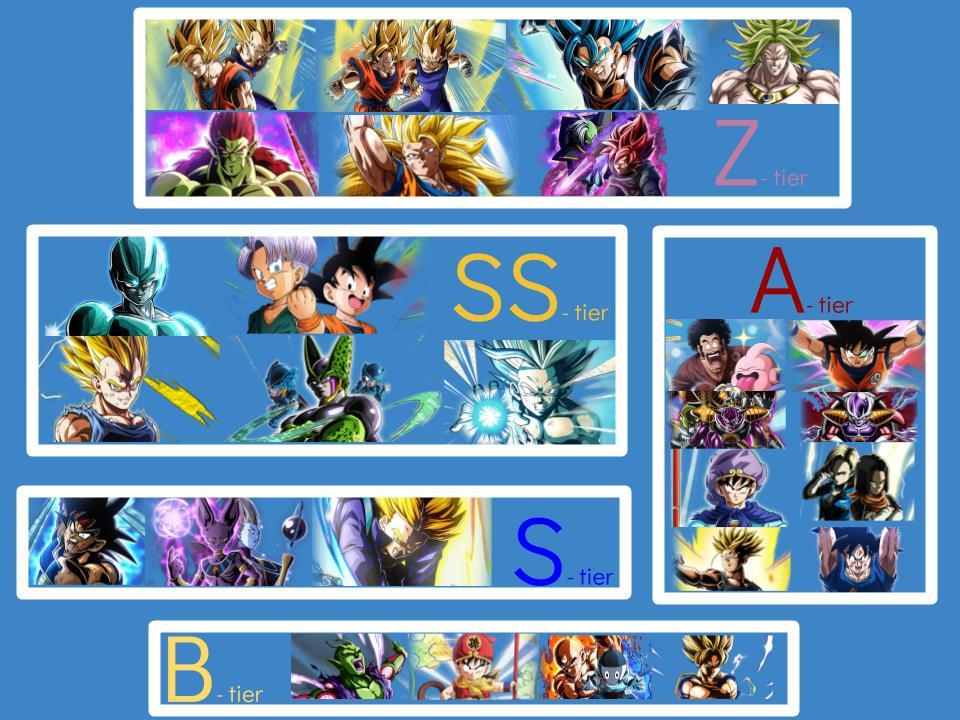
S-Tier
The game’s best survivors. Most scenarios can be handled with ease using their equipment. Making the effort now will pay off in the long run.
Shotguns are the Captain’s primary means of self-defense. Even while it may appear to be geared at close-range players, this is actually quite adaptable. This device may be charged up to drastically lessen the spread of the shots. With this system, you can deal substantial damage to opponents even when attacking from a distance.
A taser that can keep opponents in place and an orbital shot that causes heavy damage as well as stuns adversaries on a large area complete this survivor’s varied arsenal. When the time comes, the Captain will be able to use these instruments to clear a path away from danger.
She prefers to use her fists when fighting. For a brief period of time, a scrap barrier protects her from enemy strikes when a basic attack is connected to it. As a result, she is able to close in on her foes with minimal risk.
The Loader’s grappling fists set her apart from the competition. By launching her knuckles, she can grab a hold of something and draw it toward her (or you to them for heavier enemies). Stun foes with a grappling version. In addition to slingshotting the Loader across long distances or gaining height, these can also be used for other purposes.
Although the Captain is more consistent, the Loader is not. The Loader, on the other hand, will breeze through the entire run once she has access to the appropriate things.
Loader
As long as there were no updates, Loader was always robust. Many gamers consider her to be the best melee character in the entire game. Second only to MUL-T, she has the second-highest hp in the game.
This character’s mobility is above average, but her swinging mechanic is tough to master, making her unsuitable for novices. You will need to be patient if you don’t want to use this mechanic. She’s incredibly deadly, but only if you’re willing to put in the time to understand the basics.
Pros
- Incredibly adaptable.
- The game’s second-highest HP.
- The best armed combatant
Cons
- Complicated to utilize
- However, these other qualities necessitate persistence.
Captain
The Captain is a tough unlock, but once you do, you’ll have the game’s best character at your disposal. He is an asset in every situation due to his ability to both attack and defend well. It’s possible to kill anything with the Captain after a bit of practice.
Unfortunately, his skills are sluggish, and mastery requires a lot of effort. While he may not be for everyone, he is often regarded as the best in his field.
Pros
- Invaluable in every situation
- Damage output is high.
- When used correctly, he can be very effective.
Cons
- The skill may require some practice.
- Mobility is reduced
- Everyone’s cup of tea
A-Tier
Specialized duties and additional utility make these survivors extremely valuable in a variety of situations. If you’re lucky enough to obtain the necessary goods during the course of a run, they’re not as powerful as S-tiers.
Her glaives are her most effective weapon for dealing damage and keeping the throng in check. They deliver more damage each bounce as they bounce around a group of opponents. Arrow rain, an AoE power that slows and damages opponents, is another one of her abilities.
However, there is considerable room for the player’s skill to decide how a run proceeds when playing The Huntress. Beginners may have a difficult time adapting to this survivor because she places so much emphasis on ducking and hitting your bullets.
A double-jump passive is only one of the several abilities he has access to right away. This enhances his mobility and is far superior to the hover provided by the Artificer.
To make up for his reliance on melee weapons, he possesses a high rate of health regeneration. If you know what you’re doing, you’ll have less of a chance of getting struck when he goes close to an enemy.
The Mercenary’s offensive abilities are strong, with high damage and good utility. This survivor is always worth a try.
He has a respectable offensive output thanks to the nail gun and rebar he uses. Using the double rebar technique can further increase his damage potential, but this is likely to be patched out in the near term.
Xem thêm : Dragonball Z Dokkan Battle Tier List Update 07/2026
When in transport mode, MUL-T gains an additional level of speed and protection. Use this when you need to readjust and regroup in an emergency. The MUL-T may also fire several blast canisters from a retreating posture in order to harm and cripple enemy waves.
Because of its size, MUL-T is a secure bet for first-time players. As a result, you can concentrate on attacking instead of worrying about lesser adversaries striking you. As far as survival and convenience of use are concerned, the MUL-T is your best chance.
Bandit
Many gamers are attracted to Bandit because of his unique ability to scale damage forever. The character’s excellent mobility and Lights Out ability, which allows him to reset ability cooldowns, are also popular among players.
Although his secondary isn’t particularly strong, Bandit is vulnerable if you don’t know how to properly utilize him. Bandit’s unique playing style should be understood before attempting to take on the role of this character.
Pros
- Damage can be indefinitely scaled.
- Lights Out can be used to reset cooldowns.
- A lot of mobility
Cons
- a weaker first-team
- To be successful, it is necessary to practice and gain information.
- When utilized incorrectly, some goods are ineffective.
MUL-T
MUL-T has been upgraded to A-Tier status after a few much-needed tweaks. He can now do even more damage as a tank thanks to the new enhancements. Because he has the highest health and is the only one with armor, he commands this position.
MUL-T isn’t the fastest character in the series, but he isn’t the slowest. In order to inflict the most damage, he need a large number of AOE equipment. Despite the fact that he can shoot at foes and bosses swiftly, he must be within a reasonable distance to do so.
MUL-T has the best attack rate in the game despite being a tank character, which isn’t a surprise. A few damage items will allow him to wipe out any enemy on the battlefield.
Pros
- Has the best physical and mental well-being.
- Some protection is provided by the use of armor.
- Fastest possible rate of attack
Cons
- Rather sluggish
- The attack’s range is somewhat limited.
- A lot of AOE items are required.
Huntress
The Huntress is a low-HP, high-DPS glass cannon. Single-target damage is her specialty, but she’s also incredibly mobile, allowing her to run and shoot. Anyone who enjoys playing characters with a high level of aggression and uncertainty will relish the opportunity to do so with her.
The Huntress has the lowest HP of any character in the game, and she has a hard time dealing with groups. For her main, you also need to be within striking distance. In spite of this, any competent Huntress player will make an effort to compensate for this shortcoming by good mobility.
S-tier would have been appropriate for the Huntress if she had higher HP. However, this would result in an overpowered and unbalanced character. Having a powerful character with a flaw that can be exploited is a reasonable compromise.
Pros
- high DPS per target
- A lot of mobility
- Shoots while sprinting
Cons
- The game’s lowest HP.
- Sometimes you’ll have to get a little closer.
- It’s bad in the area of Operations Research.
B-Tier
However, a few minor defects must be rectified if these survivors are to remain functional.
Rex is dangerous since he deals huge damage by depleting his own HP. When employing this survivor, it’s critical to strike a balance between offense and survival.
Fortunately, Rex has his tools with him. With his basic inject attack, he can restore health equivalent to some of the damage he has dealt. His offensive arsenal would be incomplete without Seed Mortar, which deals massive damage. Using Tangling Growth will drain Rex’s HP, but it will likely make up for it because it heals Rex for every target it hits.
Rex is best suited to those that have a good handle on the game’s mechanics. He can be tricky to deal with at the beginning of a run, but as you collect more items, he transforms into a destructive machine.
Acrid may look like a melee character, but it’s actually best used as a poke survivor. Poison your attackers, then switch to a new monster to finish off the remaining adversaries. Continue in this manner for a while. Because the Acrid lacks the appropriate defensive equipment to deal with waves of enemies head-on, this style of play is essential.
However, it’s still a fairly simple survivor that can be relied upon in the event of a run.
The Engineer’s Bubble Shield, which shields everything inside from projectiles, is his finest defensive tool.
The tactic of hunkering down inside the bubble and taking out attackers one by one has worked for you in the past. It is preferable to leave your turrets in the bubble while roaming outside and picking foes from there on higher levels of difficulty. To prevent an early finish to your run, tougher enemies will have no issue rushing you inside the bubble.
The Engineer character is a lot of fun to play with. It’s best to use him just once you’ve gotten a good feel for the game’s difficulties before moving on to other survivors.
Rex
Rex is a character who plays a little differently from the others. If you don’t count item use, his damage per second (DPS) is the highest in the game. With Bramble Volley and Tangling Growth, he can also regulate his HP.
The more Rex uses his skills, the more vulnerable he becomes to fatal strikes. Despite the fact that they typically don’t kill him, it can be a disadvantage in the most heated of confrontations. His range of motion is also less than ideal. Despite his advantages, he’s also uninteresting to certain gamers.
Furthermore, Rex hasn’t been updated in a while. Even if he’s not for everyone, he nonetheless has a following of ardent admirers.
Pros
- Even without the aid of any equipment, it is still a formidable force.
- Effective versus bosses
- Well-balanced set
Cons
- Mobility is reduced
- At first, it was difficult to grasp.
- Many of his powers drain his health.
Engineer
Because of his battle style, the Engineer is sometimes regarded as the greatest character in Risk of Rain 2. Because of his turrets, he’s a ranged combatant who can keep out of harm’s path. Additionally, his Bubble Shield shields him from projectiles.
Engineers can avoid being struck in battle by setting up turrets and then fleeing. It’s important to keep moving since even the strongest foes might injure him if they rush in.
The Engineer has a hard time getting around, even with all of his survival skills. Without a weapon, he’ll be unable to flee danger. If you’re playing with others, it may also be difficult for you to blend into the group.
Pros
- Despite fleeing, can still inflict damage.
- All projectiles are protected by his Bubble Shield.
- Self-healing
Cons
- Mobility that is below average
- Group runs aren’t recommended.
- Playing style that is repetitive
C-Tier
These aren’t awful survivors, just your run-of-the-mill types. Sadly, their best qualities aren’t as impressive as those in the higher ranks.
Even though the Artificer is a safe survivor, she isn’t quite constant in her runs. If you don’t have the correct goods, her offense isn’t overwhelming. No wonder she’s a little sluggish! It is true that she can float in the air to lessen fall damage, but in most cases, this actually works against you.
Mercenary
An advanced katana and a distinctive style of play make up the Mercenary’s arsenal. He’s a blast to play because of his unique powers, and he does a lot of damage. To get the most out of him, you’ll need to be an above-average player of the game.
Because of this, the Mercenary can be easily killed if you don’t plan beforehand. For novices, it’s best to avoid him because he requires a lot of practice to master.
Pros
- Playing style
- Damage output is high.
- Movement in a hurry
Cons
- Initially difficult to learn
- Only a few lines of defense are available.
- Few long-ranged attacks
Acrid
Acrid’s percentage-based poison powers allow him to perform best when battling bosses. An enemy’s strength is proportional to the damage he can cause. He’s also a formidable tank, able to take a lot of damage and keep on keeping on.
His poison, on the other hand, is ineffective against weaker foes. His mobility is also below par when compared to other melee heroes. It doesn’t matter how enjoyable it is to use him; he’s too specialized for the majority of enemies.
Pros
- Damage output is high.
- Quickly dispatches bosses
- Excellent for dealing large amounts of damage in a single burst
Cons
- Mobility issues
- Relatively poor in dealing with more common and weaker foes.
- Even if he does a lot of damage, he’s not very good at deathblows.
Artificer
The Artificer has been given a boost by the creators, and now she’s even better. Her talents allow her to do a lot of damage. As a result of her play style, she is an ideal character for beginners to acquire and utilize early in the game.
You may come to discover that there are many better possibilities as you grow, however. Aside from delivering damage, the Artificer does little else. In other cases, she is also hampered by her sluggishness.
Pros
- Inflicts massive amounts of damage per second.
- Beginner-friendly
- Buffed out recently
Cons
- Mobility is reduced
- Too narrow a focus
- Because to the excessively long cooldown for Primary,
D-Tier
The game’s worst survivor. While he is still capable, he is no match for any other character.
It is the Commando’s primary approach to shoot and move. Weapons of his caliber were effective at long range. To get away from his enemies, he uses his movement to shift his position. He has a few useful skills that help him deal damage and weaken enemies, but none of them stand out.
Commando
In terms of gameplay, the Commando is a one-man army. You can use his special talents as well as your gun to take down adversaries. This character’s powers are too mediocre, and he’s outclassed by everyone else.
When it comes to area-of-effect attacks, the Commando falls far short of its potential. Even worse, his utilitarian skills are among the poorest.

You can use him to learn the game, so he’s not completely pointless. You won’t need him after you’ve unlocked the other characters.
Pros
- He’s yours by default.
- It’s easy to use.
- The majority of the time, his abilities are adequate.
Cons
- Everyone else is superior to you.
- The gameplay is drab.
- Specialization is lacking.
FAQS:
Who Is the Best Character in Risk of Rain 2?
Risk of Rain 2’s Captain is often regarded as the best character. There are few instances in which he can’t handle himself. His playing style, on the other hand, may not be to everyone’s taste.
What is the best class in Risk of Rain 2?
This individual is an engineer.
The Engineer was perhaps Risk of Rain 2’s finest class prior to the fixes. High damage and durability, the potential to melt monsters, and great sustain if equipped with some Bustling Fungus are just some of the advantages of this weapon
What is the goal in Risk of Rain 2?
When a player activates a random-located, randomly-placed teleporter, aliens, including bosses, are unleashed, and the player must protect themselves until the teleporter is fully operational.
Conclusion:
Every character in Risk of Rain 2 has their own distinct set of skills and playstyles. Tier lists might help you narrow down your options, but in the end, the final decision is yours. While it’s understandable to want to wait for the right character, doing so may limit your experience of the game. Focus on having fun rather than acquiring the most strong characters.
Nguồn: https://gemaga.com
Danh mục: List